by Joche Ojeda | Jan 9, 2025 | dotnet
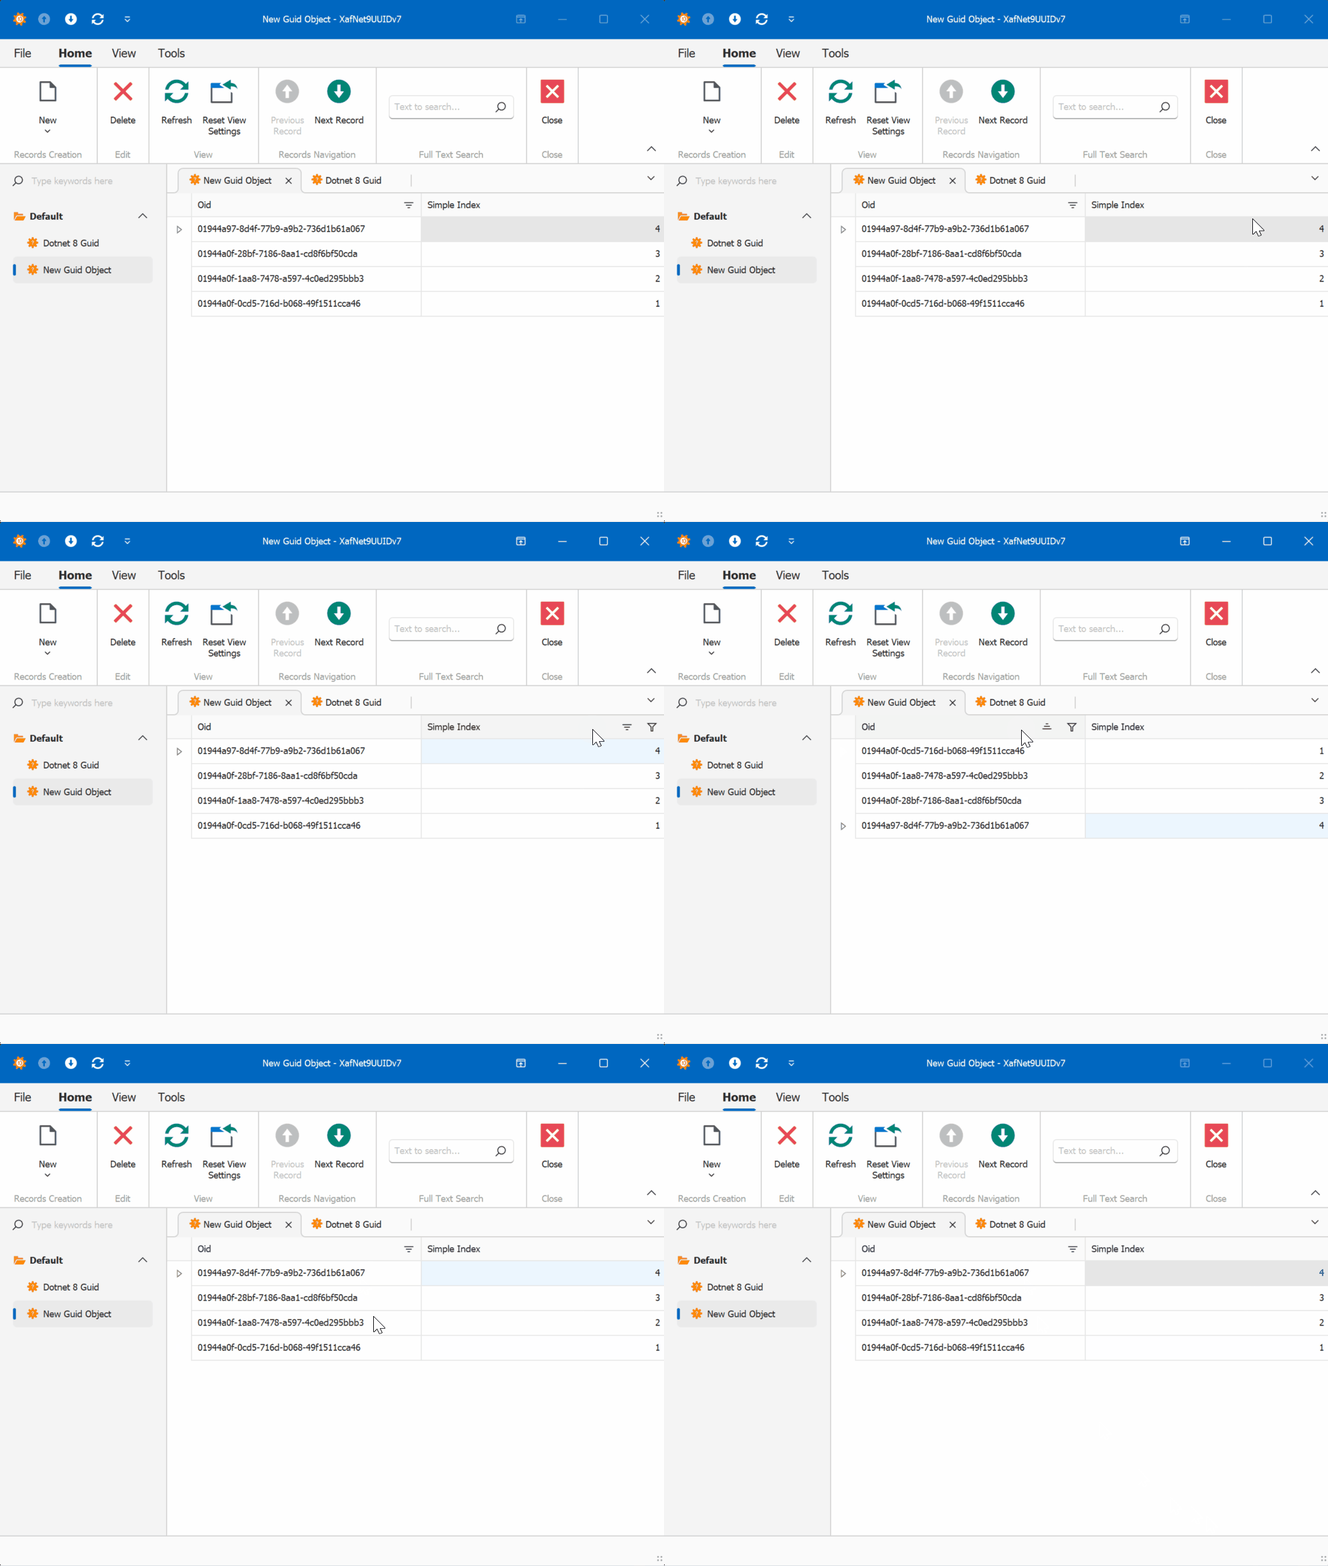
While researching useful features in .NET 9 that could benefit XAF/XPO developers, I discovered something particularly interesting: Version 7 GUIDs (RFC 9562 specification). These new GUIDs offer a crucial feature – they’re sortable.
This discovery brought me back to an issue I encountered two years ago while working on the SyncFramework. We faced a peculiar problem where Deltas were correctly generated but processed in the wrong order in production environments. The occurrences seemed random, and no clear pattern emerged. Initially, I thought using Delta primary keys (GUIDs) to sort the Deltas would ensure they were processed in their generation order. However, this assumption proved incorrect. Through testing, I discovered that GUID generation couldn’t be trusted to be sequential. This issue affected multiple components of the SyncFramework. Whether generating GUIDs in C# or at the database level, there was no guarantee of sequential ordering. Different database engines could sort GUIDs differently. To address this, I implemented a sequence service as a solution.Enter .NET 9 with its Version 7 GUIDs (conforming to RFC 9562 specification). These new GUIDs are genuinely sequential, making them reliable for sorting operations.
To demonstrate this improvement, I created a test solution for XAF with a custom base object. The key implementation occurs in the OnSaving method:
protected override void OnSaving()
{
    base.OnSaving();
    if (!(Session is NestedUnitOfWork) && Session.IsNewObject(this) && oid.Equals(Guid.Empty))
    {
        oid = Guid.CreateVersion7();
    }
}
Notice the use of CreateVersion7() instead of the traditional NewGuid(). For comparison, I also created another domain object using the traditional GUID generation:
protected override void OnSaving()
{
    base.OnSaving();
    if (!(Session is NestedUnitOfWork) && Session.IsNewObject(this) && oid.Equals(Guid.Empty))
    {
        oid = Guid.NewGuid();
    }
}
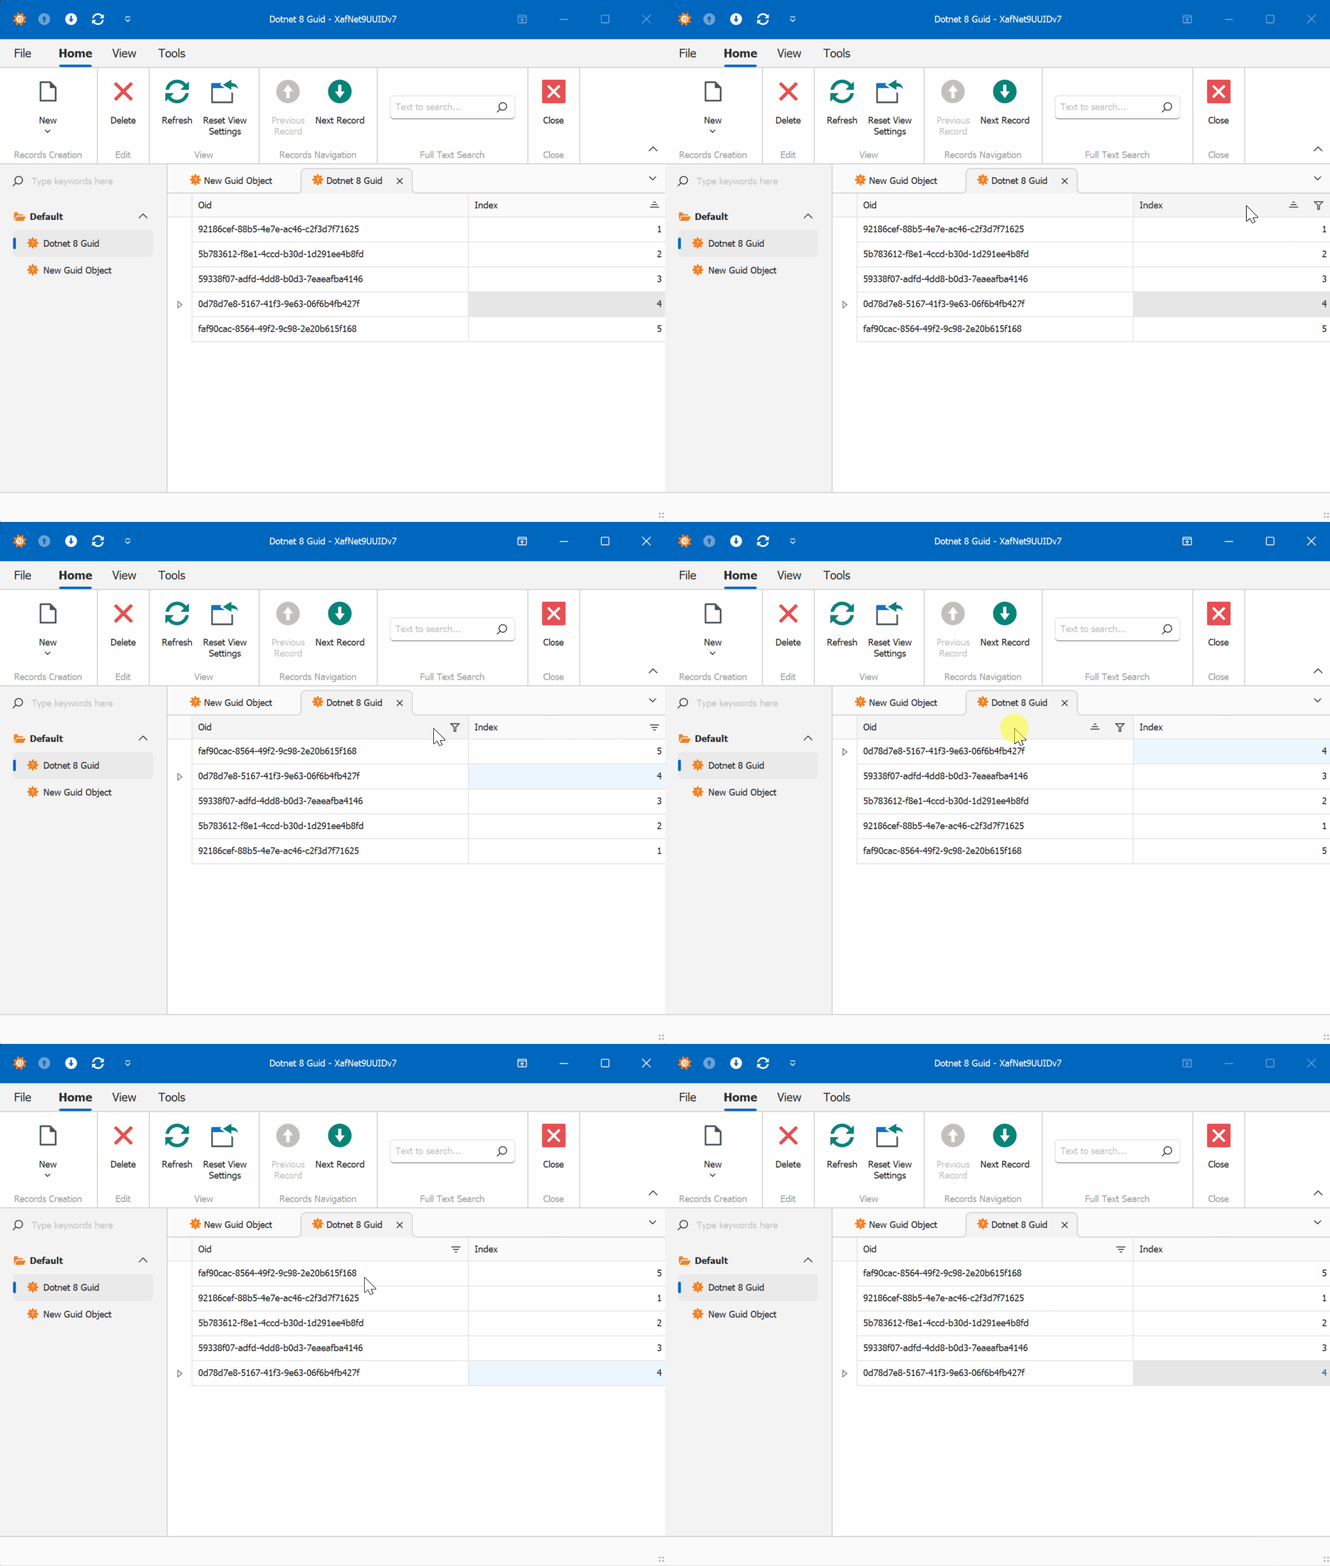
When creating multiple instances of the traditional GUID domain object, you’ll notice that the greater the time interval between instance creation, the less likely the GUIDs will maintain sequential ordering.
GUID Version 7

GUID Old Version

This new feature in .NET 9 could significantly simplify scenarios where sequential ordering is crucial, eliminating the need for additional sequence services in many cases. Here is the repo on GitHubHappy coding until next time!
Related article
On my GUID, common problems using GUID identifiers | Joche Ojeda

by Joche Ojeda | Jan 2, 2025 | XtraReports
Introduction ?
If you’re familiar with Windows Forms development, transitioning to XtraReports will feel remarkably natural. This guide explores how XtraReports leverages familiar Windows Forms concepts while extending them for robust reporting capabilities.
? Quick Tip: Think of XtraReports as Windows Forms optimized for paper output instead of screen output!
A Personal Journey ✨
Microsoft released .NET Framework in late 2002. At the time, I was a VB6 developer, relying on Crystal Reports 7 for reporting. By 2003, my team was debating whether to transition to this new thing called .NET. We were concerned about VB6’s longevity—thinking it had just a couple more years left. How wrong we were! Even today, VB6 applications are still running in some places (it’s January 2, 2025, as I write this).
Back in the VB6 era, we used the Crystal Reports COM object to integrate reports. When we finally moved to .NET Framework, we performed some “black magic” to continue using our existing 700 reports across nine countries. The decision to fully embrace .NET was repeatedly delayed due to the sheer volume of reports we had to manage. Our ultimate goal was to unify our reporting and parameter forms within a single development environment.
This led us to explore other technologies. While considering Delphi, we discovered DevExpress. My boss procured our first DevExpress .NET license for Windows Forms, marking the start of my adventure with DevExpress and XtraReports. Initially, transitioning from the standalone Crystal Report Designer to the IDE-based XtraReports Designer was challenging. To better understand how XtraReports worked, I decided to write reports programmatically instead of using the visual designer.
Architectural Similarities ?️
XtraReports mirrors many fundamental Windows Forms concepts:
| Source |
Destination |
| XtraReport Class |
Report Designer Surface |
| XtraReport Class |
Control Container |
| XtraReport Class |
Event System |
| XtraReport Class |
Properties Window |
| Control Container |
Labels & Text |
| Control Container |
Tables & Grids |
| Control Container |
Images & Charts |
| Report Designer Surface |
Control Toolbox |
| Report Designer Surface |
Design Surface |
| Report Designer Surface |
Preview Window |
Like how Windows Forms applications start with a Form class, XtraReports begin with an XtraReport base class. Both serve as containers that can:
- Host other controls
- Manage layout
- Handle events
- Support data binding
Visual Designer Experience ?
The design experience remains consistent with Windows Forms:
| Windows Forms |
XtraReports |
| Form Designer |
Report Designer |
| Toolbox |
Report Controls |
| Properties Window |
Properties Grid |
| Component Tray |
Component Tool |
Control Ecosystem ?
XtraReports provides analogous controls to Windows Forms:
// Windows Forms
public partial class CustomerForm : Form
{
    private Label customerNameLabel;
    private DataGridView orderDetailsGrid;
}

// XtraReports
public partial class CustomerReport : XtraReport
{
    private XRLabel customerNameLabel;
    private XRTable orderDetailsTable;
}
Common control mappings:
- Label ➡️ XRLabel
- Panel ➡️ XRPanel
- PictureBox ➡️ XRPictureBox
- DataGridView ➡️ XRTable
- GroupBox ➡️ Band
- UserControl ➡️ Subreport
Data Binding Patterns ?
The data binding syntax maintains familiarity:
// Windows Forms data binding
customerNameLabel.DataBindings.Add("Text", customerDataSet, "Customers.Name");

// XtraReports data binding
customerNameLabel.ExpressionBindings.Add(
    new ExpressionBinding("Text", "[Name]"));
Code Architecture ?️
The code-behind model remains consistent:
public partial class CustomerReport : DevExpress.XtraReports.UI.XtraReport
{
    public CustomerReport()
    {
        InitializeComponent(); // Familiar Windows Forms pattern
    }

    private void CustomerReport_BeforePrint(object sender, PrintEventArgs e)
    {
        // Event handling similar to Windows Forms
        // Instead of Form_Load, we have Report_BeforePrint
    }
}
Key Differences ⚡
While similarities abound, important differences exist:
- Output Focus ?️
- Windows Forms: Screen-based interaction
- XtraReports: Print/export optimization
- Layout Model ?
- Windows Forms: Flexible screen layouts
- XtraReports: Page-based layouts with bands
- Control Behavior ?
- Windows Forms: Interactive controls
- XtraReports: Display-oriented controls
- Data Processing ?️
- Windows Forms: Real-time data interaction
- XtraReports: Batch data processing
Some Advices ?
- Design Philosophy
// Think in terms of paper output
public class InvoiceReport : XtraReport
{
    protected override void OnBeforePrint(PrintEventArgs e)
    {
        // Calculate page breaks
        // Optimize for printing
    }
}
- Layout Strategy
- Use bands for logical grouping
- Consider paper size constraints
- Plan for different export formats
- Data Handling
- Pre-process data when possible
- Use calculated fields for complex logic
- Consider subreports for complex layouts

by Joche Ojeda | Oct 15, 2024 | A.I, Semantic Kernel, XAF, XPO
A few weeks ago, I forked the Semantic Kernel repository to experiment with it. One of my first experiments was to create a memory provider for XPO. The task was not too difficult; basically, I needed to implement the IMemoryStore interface, add some XPO boilerplate code, and just like that, we extended the Semantic Kernel memory store to support 10+ databases. You can check out the code for the XpoMemoryStore here.
My initial goal in creating the XpoMemoryStore was simply to see if XPO would be a good fit for handling embeddings. Spoiler alert: it was! To understand the basic functionality of the plugin, you can take a look at the integration test here.
As you can see, usage is straightforward. You start by connecting to the database that handles embedding collections, and all you need is a valid XPO connection string:
using XpoMemoryStore db = await XpoMemoryStore.ConnectAsync("XPO connection string");
In my original design, everything worked fine, but I faced some challenges when trying to use my new XpoMemoryStore in XAF. Here’s what I encountered:
- The implementation of XpoMemoryStore uses its own data layer, which can lead to issues. This needs to be rewritten to use the same data layer as XAF.
- The XpoEntry implementation cannot be extended. In some use cases, you might want to use a different object to store the embeddings, perhaps one that has an association with another object.
To address these problems, I introduced the IXpoEntryManager interface. The goal of this interface is to handle object creation and queries.
public interface IXpoEntryManager
{
    T CreateObject();
    public event EventHandler ObjectCreatedEvent;
    void Commit();
    IQueryable GetQuery(bool inTransaction = true);
    void Delete(object instance);
    void Dispose();
}
Now, object creation is handled through the CreateObject<T> method, allowing the underlying implementation to be changed to use a UnitOfWork or ObjectSpace. There’s also the ObjectCreatedEvent event, which lets you access the newly created object in case you need to associate it with another object. Lastly, the GetQuery<T> method enables redirecting the search for records to a different type.
I’ll keep updating the code as needed. If you’d like to discuss AI, XAF, or .NET, feel free to schedule a meeting: Schedule a Meeting with us.
Until next time, XAF out!
Related Article
https://www.jocheojeda.com/2024/09/04/using-the-imemorystore-interface-and-devexpress-xpo-orm-to-implement-a-custom-memory-store-for-semantic-kernel/

by Joche Ojeda | Jul 3, 2024 | Uncategorized
Hey there, fellow developers! Today, let’s talk about a practice that can revolutionize the way we create, test, and perfect our software: dogfooding. If you’re wondering what dogfooding means, don’t worry, it’s not about what you feed your pets. In the tech world, “eating your own dog food” means using the software you develop in your day-to-day operations. Let’s dive into how this can be a game-changer for us.
Why Should We Dogfood?
- Catch Bugs Early: By using our own software, we become our first line of defense against bugs and glitches. Real-world usage uncovers issues that might slip through traditional testing. We get to identify and fix these problems before they ever reach our users.
- Enhance Quality Assurance: There’s no better way to ensure our software meets high standards than by relying on it ourselves. When our own work depends on our product, we naturally aim for higher quality and reliability.
- Improve User Experience: When we step into the shoes of our users, we experience firsthand what works well and what doesn’t. This unique perspective allows us to design more intuitive and user-friendly software.
- Create a Rapid Feedback Loop: Using our software internally means continuous and immediate feedback. This quick loop helps us iterate faster, refining features and squashing bugs swiftly.
- Build Credibility and Trust: When we show confidence in our software by using it ourselves, it sends a strong message to our users. It demonstrates that we believe in what we’ve created, enhancing our credibility and trustworthiness.
Real-World Examples
- Microsoft: They’re known for using early versions of Windows and Office within their own teams. This practice helps them catch issues early and improve their products before public release.
- Google: Googlers use beta versions of products like Gmail and Chrome. This internal testing helps them refine their offerings based on real-world use.
- Slack: Slack’s team relies on Slack for communication, constantly testing and improving the platform from the inside.
How to Start Dogfooding
- Integrate it Into Daily Work: Start by using your software for internal tasks. Whether it’s a project management tool, a communication app, or a new feature, make it part of your team’s daily routine.
- Encourage Team Participation: Get everyone on board. The more diverse the users, the more varied the feedback. Encourage your team to report bugs, suggest improvements, and share their experiences.
- Set Up Feedback Channels: Create dedicated channels for feedback. This could be as simple as a Slack channel or a more structured feedback form. Ensure that the feedback loop is easy and accessible.
- Iterate Quickly: Use the feedback to make quick improvements. Prioritize issues that affect usability and functionality. Show your team that their feedback is valued and acted upon.
Overcoming Challenges
- Avoid Bias: While familiarity is great, it can also lead to bias. Pair internal testing with external beta testers to get a well-rounded perspective.
- Manage Resources: Smaller teams might find it challenging to allocate resources for internal use. Start small and gradually integrate more aspects of your software into daily use.
- Consider Diverse Use Cases: Remember, your internal environment might not replicate all the conditions your users face. Keep an eye on diverse scenarios and edge cases.
Conclusion
Dogfooding is more than just a quirky industry term. It’s a powerful practice that can elevate the quality of our software, speed up our development cycles, and build stronger trust with our users. By using our software as our customers do, we gain invaluable insights that can lead to better, more reliable products. So, let’s embrace the dogfood, turn our critical eye inward, and create software that we’re not just proud of but genuinely rely on. Happy coding, and happy dogfooding! ??
Feel free to share your dogfooding experiences in the comments below. Let’s learn from each other and continue to improve our craft together!

by Joche Ojeda | Jun 25, 2024 | Object-Oriented Programming
Aristotle and the “Organon”: Foundations of Logical Thought
Aristotle, one of the greatest philosophers of ancient Greece, made substantial contributions to a wide range of fields, including logic, metaphysics, ethics, politics, and natural sciences. Born in 384 BC, Aristotle was a student of Plato and later became the tutor of Alexander the Great. His works have profoundly influenced Western thought for centuries.
One of Aristotle’s most significant contributions is his collection of works on logic known as the “Organon.” This term, which means “instrument” or “tool” in Greek, reflects Aristotle’s view that logic is the tool necessary for scientific and philosophical inquiry. The “Organon” comprises six texts:
- Categories: Classification of terms and predicates.
- On Interpretation: Relationship between language and logic.
- Prior Analytics: Theory of syllogism and deductive reasoning.
- Posterior Analytics: Nature of scientific knowledge.
- Topics: Methods for constructing and deconstructing arguments.
- On Sophistical Refutations: Identification of logical fallacies.
Together, these works lay the groundwork for formal logic, providing a systematic approach to reasoning that is still relevant today.
Object-Oriented Programming (OOP): Building Modern Software
Now, let’s fast-forward to the modern world of software development. Object-Oriented Programming (OOP) is a programming paradigm that has revolutionized the way we write and organize code. At its core, OOP is about creating “objects” that combine data and behavior. Here’s a quick rundown of its fundamental concepts:
- Classes and Objects: A class is a blueprint for creating objects. An object is an instance of a class, containing data (attributes) and methods (functions that operate on the data).
- Inheritance: This allows a class to inherit properties and methods from another class, promoting code reuse.
- Encapsulation: This principle hides the internal state of objects and only exposes a controlled interface, ensuring modularity and reducing complexity.
- Polymorphism: This allows objects to be treated as instances of their parent class rather than their actual class, enabling flexible and dynamic behavior.
- Abstraction: This simplifies complex systems by modeling classes appropriate to the problem.
Bridging Ancient Logic with Modern Programming
You might be wondering, how do Aristotle’s ancient logical works relate to Object-Oriented Programming? Surprisingly, they share some fundamental principles!
- Categorization and Classes:
- Aristotle: Categorized different types of predicates and subjects to understand their nature.
- OOP: Classes categorize data and behavior, helping organize and structure code.
- Propositions and Methods:
- Aristotle: Propositions form the basis of logical arguments.
- OOP: Methods define the behaviors and actions of objects, forming the basis of interactions in software.
- Systematic Organization:
- Aristotle: His systematic approach to logic ensures consistency and coherence.
- OOP: Organizes code in a modular and systematic way, promoting maintainability and scalability.
- Error Handling:
- Aristotle: Identified and corrected logical fallacies to ensure sound reasoning.
- OOP: Debugging involves identifying and fixing errors in code, ensuring reliability.
- Modularity and Encapsulation:
- Aristotle: His logical categories and propositions encapsulate different aspects of knowledge, ensuring clarity.
- OOP: Encapsulation hides internal states and exposes a controlled interface, managing complexity.
Conclusion: Timeless Principles
Both Aristotle’s “Organon” and Object-Oriented Programming aim to create structured, logical, and efficient systems. While Aristotle’s work laid the foundation for logical reasoning, OOP has revolutionized software development with its systematic approach to code organization. By understanding the parallels between these two, we can appreciate the timeless nature of logical and structured thinking, whether applied to ancient philosophy or modern technology.
In a world where technology constantly evolves, grounding ourselves in the timeless principles of logical organization can help us navigate and create with clarity and precision. Whether you’re structuring an argument or designing a software system, these principles are your trusty tools for success.


