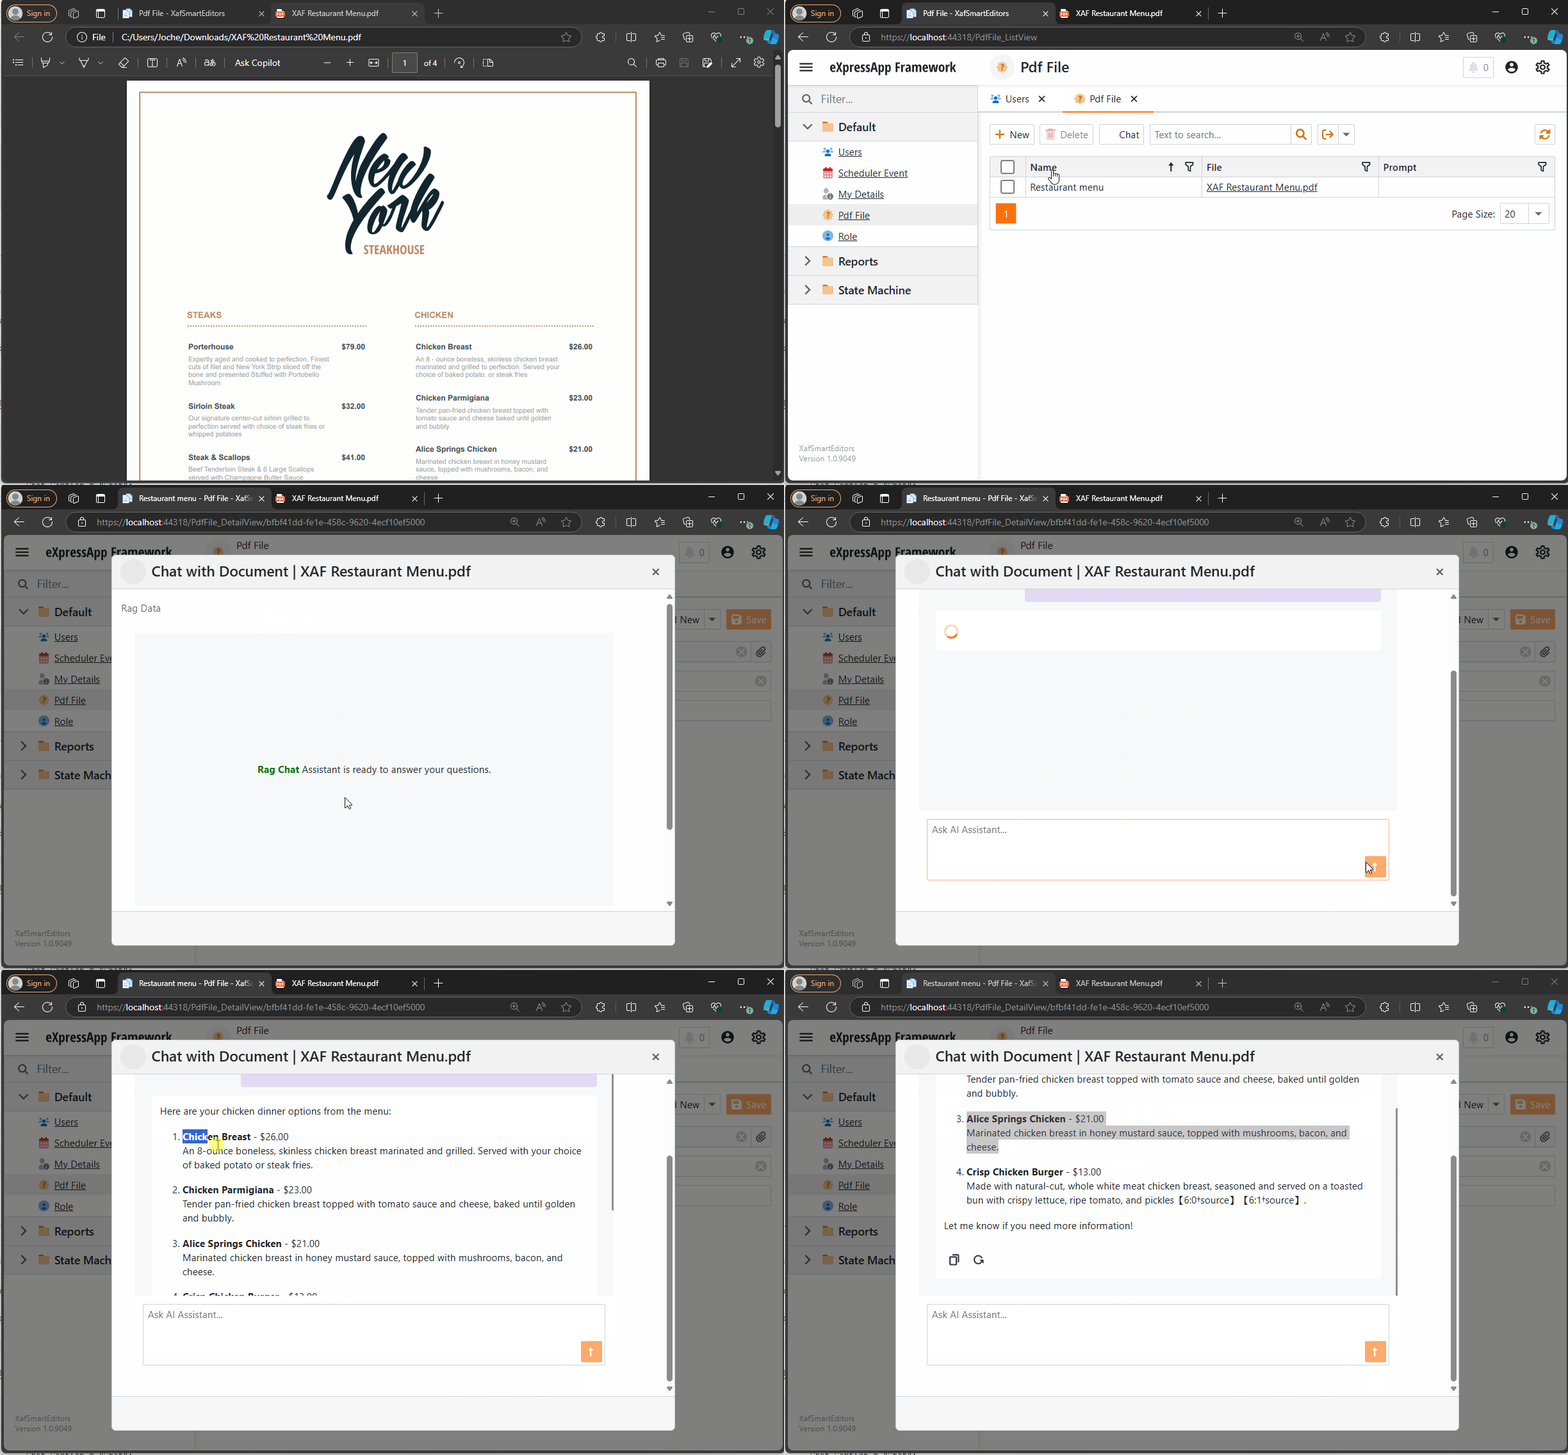
The New Era of Smart Editors: Creating a RAG system using XAF and the new Blazor chat component

The New Era of Smart Editors: Creating a RAG system using XAF and the new Blazor chat component

The New Era of Smart Editors: Developer Express and AI Integration

The new era of smart editors is already here. Developer Express has introduced AI functionality in many of their controls for .NET (Windows Forms, Blazor, WPF, MAUI).

This advancement will eventually come to XAF, but in the meantime, here at XARI, we are experimenting with XAF integrations to add value to our customers.

In this article, we are going to integrate the new chat component into an XAF application, and our first use case will be RAG (Retrieval-Augmented Generation). RAG is a system that combines external data sources with AI-generated responses, improving accuracy and relevance in answers by retrieving information from a document set or knowledge base and using it in conjunction with AI predictions.

To achieve this integration, we will follow the steps outlined in this tutorial:

Implement a Property Editor Based on Custom Components (Blazor)

Implementing the Property Editor

When I implement my own property editor, I usually avoid doing so for primitive types because, in most cases, my property editor will need more information than a simple primitive value. For this implementation, I want to handle a custom value in my property editor. I typically create an interface to represent the type, ensuring compatibility with both XPO and EF Core.

namespace XafSmartEditors.Razor.RagChat
{
    public interface IRagData
    {
        Stream FileContent { get; set; }
        string Prompt { get; set; }
        string FileName { get; set; }
    }
}

Non-Persistent Implementation

After defining the type for my editor, I need to create a non-persistent implementation:

namespace XafSmartEditors.Razor.RagChat
{
    [DomainComponent]
    public class IRagDataImp : IRagData, IXafEntityObject, INotifyPropertyChanged
    {
        private void OnPropertyChanged([CallerMemberName] string propertyName = null)
        {
            PropertyChanged?.Invoke(this, new PropertyChangedEventArgs(propertyName));
        }

        public IRagDataImp()
        {
            Oid = Guid.NewGuid();
        }

        [DevExpress.ExpressApp.Data.Key]
        [Browsable(false)]  
        public Guid Oid { get; set; }

        private string prompt;
        private string fileName;
        private Stream fileContent;

        public Stream FileContent
        {
            get => fileContent;
            set
            {
                if (fileContent == value) return;
                fileContent = value;
                OnPropertyChanged();
            }
        }

        public string FileName
        {
            get => fileName;
            set
            {
                if (fileName == value) return;
                fileName = value;
                OnPropertyChanged();
            }
        }
        
        public string Prompt
        {
            get => prompt;
            set
            {
                if (prompt == value) return;
                prompt = value;
                OnPropertyChanged();
            }
        }

        // IXafEntityObject members
        void IXafEntityObject.OnCreated() { }
        void IXafEntityObject.OnLoaded() { }
        void IXafEntityObject.OnSaving() { }

        public event PropertyChangedEventHandler PropertyChanged;
    }
}

Creating the Blazor Chat Component

Now, it’s time to create our Blazor component and add the new DevExpress chat component for Blazor:

<DxAIChat CssClass="my-chat" Initialized="Initialized" 
          RenderMode="AnswerRenderMode.Markdown" 
          UseStreaming="true"
          SizeMode="SizeMode.Medium">
    <EmptyMessageAreaTemplate>
        <div class="my-chat-ui-description">
            <span style="font-weight: bold; color: #008000;">Rag Chat</span> Assistant is ready to answer your questions.
        </div>
    </EmptyMessageAreaTemplate>
    <MessageContentTemplate>
        <div class="my-chat-content">
            @ToHtml(context.Content)
        </div>
    </MessageContentTemplate>
</DxAIChat>

@code {
    IRagData _value;
    [Parameter]
    public IRagData Value
    {
        get => _value;
        set => _value = value;
    }
    
    async Task Initialized(IAIChat chat)
    {
        await chat.UseAssistantAsync(new OpenAIAssistantOptions(
            this.Value.FileName,
            this.Value.FileContent,
            this.Value.Prompt
        ));
    }

    MarkupString ToHtml(string text)
    {
        return (MarkupString)Markdown.ToHtml(text);
    }
}

The main takeaway from this component is that it receives a parameter named Value of type IRagData, and we use this value to initialize the IAIChat service in the Initialized method.

Creating the Component Model

With the interface and domain component in place, we can now create the component model to communicate the value of our domain object with the Blazor component:

namespace XafSmartEditors.Razor.RagChat
{
    public class RagDataComponentModel : ComponentModelBase
    {
        public IRagData Value
        {
            get => GetPropertyValue<IRagData>();
            set => SetPropertyValue(value);
        }

        public EventCallback<IRagData> ValueChanged
        {
            get => GetPropertyValue<EventCallback<IRagData>>();
            set => SetPropertyValue(value);
        }

        public override Type ComponentType => typeof(RagChat);
    }
}

Creating the Property Editor

Finally, let’s create the property editor class that serves as a bridge between XAF and the new component:

namespace XafSmartEditors.Blazor.Server.Editors
{
    [PropertyEditor(typeof(IRagData), true)]
    public class IRagDataPropertyEditor : BlazorPropertyEditorBase, IComplexViewItem
    {
        private IObjectSpace _objectSpace;
        private XafApplication _application;

        public IRagDataPropertyEditor(Type objectType, IModelMemberViewItem model) : base(objectType, model) { }

        public void Setup(IObjectSpace objectSpace, XafApplication application)
        {
            _objectSpace = objectSpace;
            _application = application;
        }

        public override RagDataComponentModel ComponentModel => (RagDataComponentModel)base.ComponentModel;

        protected override IComponentModel CreateComponentModel()
        {
            var model = new RagDataComponentModel();

            model.ValueChanged = EventCallback.Factory.Create<IRagData>(this, value =>
            {
                model.Value = value;
                OnControlValueChanged();
                WriteValue();
            });

            return model;
        }

        protected override void ReadValueCore()
        {
            base.ReadValueCore();
            ComponentModel.Value = (IRagData)PropertyValue;
        }

        protected override object GetControlValueCore() => ComponentModel.Value;

        protected override void ApplyReadOnly()
        {
            base.ApplyReadOnly();
            ComponentModel?.SetAttribute("readonly", !AllowEdit);
        }
    }
}

Bringing It All Together

Now, let’s create a domain object that can feed the content of a file to our chat component:

namespace XafSmartEditors.Module.BusinessObjects
{
    [DefaultClassOptions]
    public class PdfFile : BaseObject
    {
        public PdfFile(Session session) : base(session) { }

        string prompt;
        string name;
        FileData file;

        public FileData File
        {
            get => file;
            set => SetPropertyValue(nameof(File), ref file, value);
        }

        public string Name
        {
            get => name;
            set => SetPropertyValue(nameof(Name), ref name, value);
        }

        public string Prompt
        {
            get => prompt;
            set => SetPropertyValue(nameof(Prompt), ref prompt, value);
        }
    }
}

Creating the Controller

We are almost done! Now, we need to create a controller with a popup action:

namespace XafSmartEditors.Module.Controllers
{
    public class OpenChatController : ViewController
    {
        Popup

WindowShowAction Chat;

        public OpenChatController()
        {
            this.TargetObjectType = typeof(PdfFile);
            Chat = new PopupWindowShowAction(this, "ChatAction", "View");
            Chat.Caption = "Chat";
            Chat.ImageName = "artificial_intelligence";
            Chat.Execute += Chat_Execute;
            Chat.CustomizePopupWindowParams += Chat_CustomizePopupWindowParams;
        }

        private void Chat_Execute(object sender, PopupWindowShowActionExecuteEventArgs e) { }

        private void Chat_CustomizePopupWindowParams(object sender, CustomizePopupWindowParamsEventArgs e)
        {
            PdfFile pdfFile = this.View.CurrentObject as PdfFile;
            var os = this.Application.CreateObjectSpace(typeof(ChatView));
            var chatView = os.CreateObject<ChatView>();

            MemoryStream memoryStream = new MemoryStream();
            pdfFile.File.SaveToStream(memoryStream);
            memoryStream.Seek(0, SeekOrigin.Begin);

            chatView.RagData = os.CreateObject<IRagDataImp>();
            chatView.RagData.FileName = pdfFile.File.FileName;
            chatView.RagData.Prompt = !string.IsNullOrEmpty(pdfFile.Prompt) ? pdfFile.Prompt : DefaultPrompt;
            chatView.RagData.FileContent = memoryStream;

            DetailView detailView = this.Application.CreateDetailView(os, chatView);
            detailView.Caption = $"Chat with Document | {pdfFile.File.FileName.Trim()}";

            e.View = detailView;
        }
    }
}

Conclusion

That’s everything we need to create a RAG system using XAF and the new DevExpress Chat component. You can find the complete source code here: GitHub Repository.

If you want to meet and discuss AI, XAF, and .NET, feel free to schedule a meeting: Schedule a Meeting.

Until next time, XAF out!

Test Driving DevExpress Chat Component

Test Driving DevExpress Chat Component

If you’re a Blazor developer looking to integrate AI-powered chat functionality into your applications, the new DevExpress DxAIChat component offers a turnkey solution. It’s designed to make building chat interfaces as easy as possible, with out-of-the-box support for simple chats, virtual assistants, and even Retrieval-Augmented Generation (RAG) scenarios.

The best part? You don’t have to start from scratch—DevExpress provides a range of pre-built examples, making it easy to get started and customize to your needs. Whether you’re aiming for a basic chatbot or a more complex AI assistant, this component has you covered.

To use the examples you can use any open A.I compatible service like Ollama, Open A.I and Azure OpenAI, in current devexpress example they use Azure like this

using DevExpress.AIIntegration;
...
string azureOpenAIEndpoint = Environment.GetEnvironmentVariable("AZURE_OPENAI_ENDPOINT");
string azureOpenAIKey = Environment.GetEnvironmentVariable("AZURE_OPENAI_API_KEY");
string deploymentName = "YourModelDeploymentName"
...
builder.Services.AddDevExpressBlazor();
builder.Services.AddDevExpressAI((config) => {
    config.RegisterChatClientOpenAIService
        new AzureOpenAIClient(
            new Uri(azureOpenAIEndpoint),
            new AzureKeyCredential(azureOpenAIKey)
        ), deploymentName);
    //or call the following method to use self-hosted Ollama models
    //config.RegisterChatClientOllamaAIService("http://localhost:11434/api/chat", "llama3.1");
});

I tested with OpenA.I  API instead of azure, so my code looks like this

string azureOpenAIEndpoint = Environment.GetEnvironmentVariable("AZURE_OPENAI_ENDPOINT");
string azureOpenAIKey = Environment.GetEnvironmentVariable("AZURE_OPENAI_API_KEY");

string OpenAiKey= Environment.GetEnvironmentVariable("OpenAiTestKey");

builder.Services.AddDevExpressBlazor();
builder.Services.AddDevExpressAI((config) => {
    //var client = new AzureOpenAIClient(
    //    new Uri(azureOpenAIEndpoint),
    //    new AzureKeyCredential(azureOpenAIKey));
    //Open Ai models ID are a bit different than azure, Azure=gtp4o OpenAI=gpt-4o
    var client = new OpenAIClient(new System.ClientModel.ApiKeyCredential(OpenAiKey));
    config.RegisterChatClientOpenAIService(client, "gpt-4o");
    config.RegisterOpenAIAssistants(client, "gpt-4o");
});


Notice the IDs of the models in Azure and Open A.I are different

  • Azure=gtp4o
  • OpenAI=gpt-4o

This are the URLs for the different example

  • Chat : https://localhost:53340/
  • Assistant/RAG: https://localhost:53340/assistant
  • Streaming: https://localhost:53340/streaming

I’m super happy that DevExpress components are doing all the heavy lifting and boilerplate code for us, I have developed the same scenarios using semantic kernel even when there is not so much code to write you still have the challenge of develop a responsive U.I

For more information and to see the examples in action, check out the full article.

Understanding LLM Limitations and the Advantages of RAG

Understanding LLM Limitations and the Advantages of RAG

Navigating the Limitations of Large Language Models: Understanding Outdated Information, Lack of Data Sources, and the Comparative Advantages of Retrieval-Augmented Generation (RAG)

Introduction

In the rapidly evolving field of artificial intelligence, Large Language Models (LLMs) like OpenAI’s GPT series have become central to various applications. However, despite their impressive capabilities, these models exhibit certain undesirable behaviors that can impact their effectiveness. This article delves into two significant limitations of LLMs – outdated information and the absence of data sources – and compares their functionality with Retrieval-Augmented Generation (RAG), highlighting the advantages of RAG over traditional fine-tuning approaches in LLMs.

1. Outdated Information in Large Language Models

A prominent issue with LLMs is their reliance on pre-existing datasets that may not include the most current information. Since these models are trained on data available up to a certain point in time, any developments post-training are not captured in the model’s responses. This limitation is particularly noticeable in fields with rapid advancements like technology, medicine, and current affairs.

2. Lack of Data Source Attribution

LLMs generate responses based on patterns learned from their training data, but they do not provide references or sources for the information they present. This lack of transparency can be problematic in academic, professional, and research settings where source verification is crucial. Users may find it challenging to distinguish between factual information, well-informed guesses, and outright fabrications.

Comparing LLMs with Retrieval-Augmented Generation (RAG)

Retrieval-Augmented Generation (RAG) presents a solution to some of the limitations faced by LLMs. RAG combines the generative capabilities of LLMs with the information retrieval aspect, pulling in data from external sources in real-time. This approach allows RAG to access and integrate the most recent information, overcoming the outdated information issue inherent in LLMs.

Why RAG Excels Over Fine-Tuning in LLMs

Fine-tuning involves additional training of a pre-trained model on a specific dataset to tailor it to particular needs or improve its performance in certain areas. While effective, fine-tuning does not address the core issues of outdated information and source attribution.

  • Dynamic Information Update: Unlike fine-tuned LLMs, RAG can access the latest information, ensuring responses are more current and relevant.
  • Source Attribution: RAG provides the ability to trace back the information to its source, enhancing credibility and reliability.
  • Customizability and Flexibility: RAG can be customized to pull information from specific databases or sources, catering to niche requirements more effectively than a broadly fine-tuned LLM.

Conclusion

While Large Language Models have transformed the AI landscape, their limitations, particularly regarding outdated information and lack of data source attribution, pose challenges. Retrieval-Augmented Generation offers a promising alternative, addressing these issues by integrating real-time data retrieval with generative capabilities. As AI continues to advance, the synergy between generative models and information retrieval systems like RAG is likely to become increasingly significant, paving the way for more accurate, reliable, and transparent AI-driven solutions.

Enhancing AI Language Models with Retrieval-Augmented Generation

Enhancing AI Language Models with Retrieval-Augmented Generation

Enhancing AI Language Models with Retrieval-Augmented Generation

Introduction

In the world of natural language processing and artificial intelligence, researchers and developers are constantly searching for ways to improve the capabilities of AI language models. One of the latest innovations in this field is Retrieval-Augmented Generation (RAG), a technique that combines the power of language generation with the ability to retrieve relevant information from a knowledge source. In this article, we will explore what RAG is, how it works, and its potential applications in various industries.

What is Retrieval-Augmented Generation?

Retrieval-Augmented Generation is a method that enhances AI language models by allowing them to access external knowledge sources to generate more accurate and contextually relevant responses. Instead of relying solely on the model’s internal knowledge, RAG enables the AI to retrieve relevant information from a database or a knowledge source, such as Wikipedia, and use that information to generate a response.

How does Retrieval-Augmented Generation work?

RAG consists of two main components: a neural retriever and a neural generator. The neural retriever is responsible for finding relevant information from the external knowledge source. It does this by searching for documents that are most similar to the input text or query. Once the relevant documents are retrieved, the neural generator processes the retrieved information and generates a response based on the context provided by the input text and the retrieved documents.

The neural retriever and the neural generator work together to create a more accurate and contextually relevant response. This combination allows the AI to produce higher-quality outputs and reduces the likelihood of generating incorrect or nonsensical information.

Potential Applications of Retrieval-Augmented Generation

Retrieval-Augmented Generation has a wide range of potential applications in various industries. Some of the most promising use cases include:

  • Customer service: RAG can be used to improve the quality of customer service chatbots, allowing them to provide more accurate and relevant information to customers.
  • Education: RAG can be used to create educational tools that provide students with accurate and up-to-date information on a wide range of topics.
  • Healthcare: RAG can be used to develop AI systems that can assist doctors and healthcare professionals by providing accurate and relevant medical information.
  • News and media: RAG can be used to create AI-powered news and media platforms that can provide users with accurate and contextually relevant information on current events and topics.

Conclusion

Retrieval-Augmented Generation is a powerful technique that has the potential to significantly enhance the capabilities of AI language models. By combining the power of language generation with the ability to retrieve relevant information from external sources, RAG can provide more accurate and contextually relevant responses. As the technology continues to develop, we can expect to see a wide range of applications for RAG in various industries.