by Joche Ojeda | Jan 22, 2025 | ADO.NET, C#, Data Synchronization, Database, DevExpress, XPO, XPO Database Replication
SyncFramework for XPO is a specialized implementation of our delta encoding synchronization library, designed specifically for DevExpress XPO users. It enables efficient data synchronization by tracking and transmitting only the changes between data versions, optimizing both bandwidth usage and processing time.
What’s New
- Base target framework updated to .NET 8.0
- Added compatibility with .NET 9.0
- Updated DevExpress XPO dependencies to 24.2.3
- Continued support for delta encoding synchronization
- Various performance improvements and bug fixes
Framework Compatibility
- Primary Target: .NET 8.0
- Additional Support: .NET 9.0
Our XPO implementation continues to serve the DevExpress community.
Key Features
- Seamless integration with DevExpress XPO
- Efficient delta-based synchronization
- Support for multiple database providers
- Cross-platform compatibility
- Easy integration with existing XPO and XAF applications
As always, if you own a license, you can compile the source code yourself from our GitHub repository. The framework maintains its commitment to providing reliable data synchronization for XPO applications.
Happy Delta Encoding! ?

by Joche Ojeda | Jan 21, 2025 | ADO.NET, C#, Data Synchronization, EfCore
SyncFramework Update: Now Supporting .NET 9!
SyncFramework is a C# library that simplifies data synchronization using delta encoding technology. Instead of transferring entire datasets, it efficiently synchronizes by tracking and transmitting only the changes between data versions, significantly reducing bandwidth and processing overhead.
What’s New
- All packages now target .NET 9
- BIT.Data.Sync packages updated to support the latest framework
- Entity Framework Core packages upgraded to EF Core 9
- Various minor fixes and improvements
Available Implementations
- SyncFramework for XPO: For DevExpress XPO users
- SyncFramework for Entity Framework Core: For EF Core users
Package Statistics
Our packages have been serving the community well, with steady adoption:
- BIT.Data.Sync: 2,142 downloads
- BIT.Data.Sync.AspNetCore: 1,064 downloads
- BIT.Data.Sync.AspNetCore.Xpo: 521 downloads
- BIT.Data.Sync.EfCore: 1,691 downloads
- BIT.Data.Sync.EfCore.Npgsql: 1,120 downloads
- BIT.Data.Sync.EfCore.Pomelo.MySql: 1,172 downloads
- BIT.Data.Sync.EfCore.Sqlite: 887 downloads
- BIT.Data.Sync.EfCore.SqlServer: 982 downloads
Resources
NuGet Packages
Source Code
As always, you can compile the source code yourself from our GitHub repository. The framework continues to provide reliable data synchronization across different platforms and databases.
Happy Delta Encoding! ?

by Joche Ojeda | Dec 2, 2024 | Blazor
Over time, I transitioned to using the first versions of my beloved framework, XAF. As you might know, XAF generates a polished and functional UI out of the box. Using XAF made me more of a backend developer since most of the development work wasn’t visual—especially in the early versions, where the model designer was rudimentary (it’s much better now).
Eventually, I moved on to developing .NET libraries and NuGet packages, diving deep into SOLID design principles. Fun fact: I actually learned about SOLID from DevExpress TV. Yes, there was a time before YouTube when DevExpress posted videos on technical tasks!
Nowadays, I feel confident creating and publishing my own libraries as NuGet packages. However, my “old monster” was still lurking in the shadows: UI components. I finally decided it was time to conquer it, but first, I needed to choose a platform. Here were my options:
- Windows Forms: A robust and mature platform but limited to desktop applications.
- WPF: A great option with some excellent UI frameworks that I love, but it still feels a bit “Windows Forms-ish” to me.
- Xamarin/Maui: I’m a big fan of Xamarin Forms and Xamarin/Maui XAML, but they’re primarily focused on device-specific applications.
- Blazor: This was the clear winner because it allows me to create desktop applications using Electron, embed components into Windows Forms, or even integrate with MAUI.
Recently, I’ve been helping my brother with a project in Blazor. (He’s not a programmer, but I am.) This gave me an opportunity to experiment with design patterns to get the most out of my components, which started as plain HTML5 pages.
Without further ado, here are the key insights I’ve gained so far.
Building high-quality Blazor components requires attention to both the C# implementation and Razor markup patterns. This guide combines architectural best practices with practical implementation patterns to create robust, reusable components.
1. Component Architecture and Organization
Parameter Organization
Start by organizing parameters into logical groups for better maintainability:
public class CustomForm : ComponentBase
{
    // Layout Parameters
    [Parameter] public string Width { get; set; }
    [Parameter] public string Margin { get; set; }
    [Parameter] public string Padding { get; set; }

    // Validation Parameters
    [Parameter] public bool EnableValidation { get; set; }
    [Parameter] public string ValidationMessage { get; set; }

    // Event Callbacks
    [Parameter] public EventCallback<bool> OnValidationComplete { get; set; }
    [Parameter] public EventCallback<string> OnSubmit { get; set; }
}
Corresponding Razor Template
<div class="form-container" style="width: @Width; margin: @Margin; padding: @Padding">
    <form @onsubmit="HandleSubmit">
        @if (EnableValidation)
        {
            <div class="validation-message">
                @ValidationMessage
            </div>
        }
        @ChildContent
    </form>
</div>
2. Smart Default Values and Template Composition
Component Implementation
public class DataTable<T> : ComponentBase
{
    [Parameter] public int PageSize { get; set; } = 10;
    [Parameter] public bool ShowPagination { get; set; } = true;
    [Parameter] public string EmptyMessage { get; set; } = "No data available";
    [Parameter] public IEnumerable<T> Items { get; set; } = Array.Empty<T>();
    [Parameter] public RenderFragment HeaderTemplate { get; set; }
    [Parameter] public RenderFragment<T> RowTemplate { get; set; }
    [Parameter] public RenderFragment FooterTemplate { get; set; }
}
Razor Implementation
<div class="table-container">
    @if (HeaderTemplate != null)
    {
        <header class="table-header">
            @HeaderTemplate
        </header>
    }

    <div class="table-content">
        @if (!Items.Any())
        {
            <div class="empty-state">@EmptyMessage</div>
        }
        else
        {
            @foreach (var item in Items)
            {
                @RowTemplate(item)
            }
        }
    </div>

    @if (ShowPagination)
    {
        <div class="pagination">
            <!-- Pagination implementation -->
        </div>
    }
</div>
3. Accessibility and Unique IDs
Component Implementation
public class FormField : ComponentBase
{
    private string fieldId = $"field-{Guid.NewGuid():N}";
    private string labelId = $"label-{Guid.NewGuid():N}";
    private string errorId = $"error-{Guid.NewGuid():N}";

    [Parameter] public string Label { get; set; }
    [Parameter] public string Error { get; set; }
    [Parameter] public bool Required { get; set; }
}
Razor Implementation
<div class="form-field">
    <label id="@labelId" for="@fieldId">
        @Label
        @if (Required)
        {
            <span class="required" aria-label="required">*</span>
        }
    </label>

    <input id="@fieldId"
           aria-labelledby="@labelId"
           aria-describedby="@errorId"
           aria-required="@Required" />

    @if (!string.IsNullOrEmpty(Error))
    {
        <div id="@errorId" class="error-message" role="alert">
            @Error
        </div>
    }
</div>
4. Virtualization and Performance
Component Implementation
public class VirtualizedList<T> : ComponentBase
{
    [Parameter] public IEnumerable<T> Items { get; set; }
    [Parameter] public RenderFragment<T> ItemTemplate { get; set; }
    [Parameter] public int ItemHeight { get; set; } = 50;
    [Parameter] public Func<ItemsProviderRequest, ValueTask<ItemsProviderResult<T>>> ItemsProvider { get; set; }
}
Razor Implementation
<div class="virtualized-container" style="height: 500px; overflow-y: auto;">
    <Virtualize Items="@Items"
                ItemSize="@ItemHeight"
                ItemsProvider="@ItemsProvider"
                Context="item">
        <ItemContent>
            <div class="list-item" style="height: @(ItemHeight)px">
                @ItemTemplate(item)
            </div>
        </ItemContent>
        <Placeholder>
            <div class="loading-placeholder" style="height: @(ItemHeight)px">
                <div class="loading-animation"></div>
            </div>
        </Placeholder>
    </Virtualize>
</div>
Best Practices Summary
1. Parameter Organization
- Group related parameters with clear comments
- Provide meaningful default values
- Use parameter validation where appropriate
2. Template Composition
- Use RenderFragment for customizable sections
- Provide default templates when needed
- Enable granular control over component appearance
3. Accessibility
- Generate unique IDs for form elements
- Include proper ARIA attributes
- Support keyboard navigation
4. Performance
- Implement virtualization for large datasets
- Use loading states and placeholders
- Optimize rendering with appropriate conditions
Conclusion
Building effective Blazor components requires attention to both the C# implementation and Razor markup. By following these patterns and practices, you can create components that are:
- Highly reusable
- Performant
- Accessible
- Easy to maintain
- Flexible for different use cases
Remember to adapt these practices to your specific needs while maintaining clean component design principles.

by Joche Ojeda | Oct 11, 2024 | A.I, DevExpress, XAF
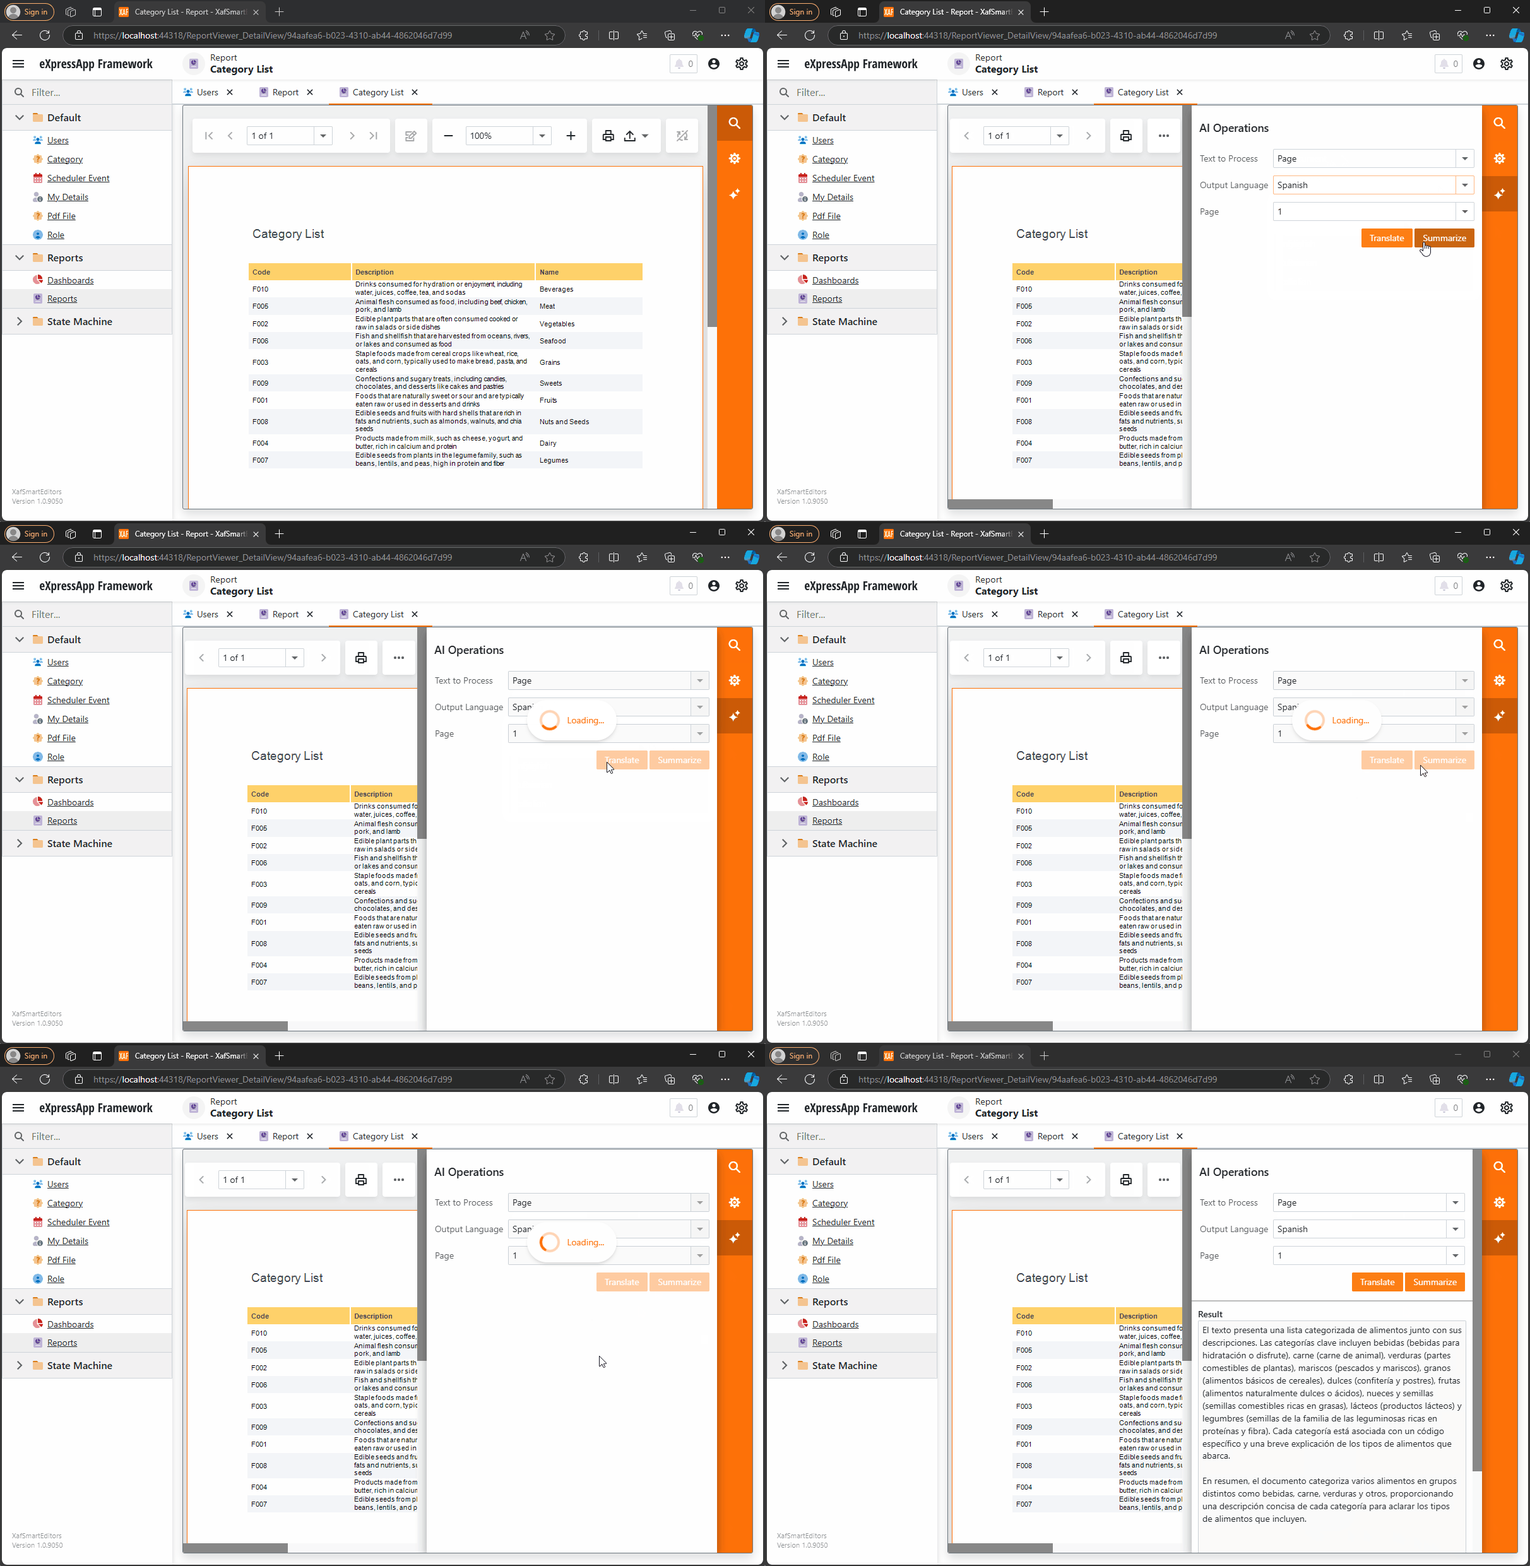
Today is Friday, so I decided to take it easy with my integration research. When I woke up, I decided that I just wanted to read the source code of DevExpress AI integrations to get inspired. I began by reading the official blog post about AI and reporting (DevExpress Blog Post). Then, as usual, I proceeded to fork the repository to make my own modifications.
After completing the typical cloning procedure in Visual Studio, I realized that to use the AI functionalities of XtraReport, you don’t need any special version of the report viewer.
The only requirement is to have the NuGet reference as shown below:
    <ItemGroup>
        <PackageReference Include="DevExpress.AIIntegration.Blazor.Reporting.Viewer" Version="24.2.1-alpha-24260" />
    </ItemGroup>
Then, add the report integration as shown below:
    config.AddBlazorReportingAIIntegration(config =>
    {
        config.SummarizeBehavior = SummarizeBehavior.Abstractive;
        config.AvailableLanguages = new List<LanguageItem>
        {
            new LanguageItem { Key = "de", Text = "German" },
            new LanguageItem { Key = "es", Text = "Spanish" },
            new LanguageItem { Key = "en", Text = "English" },
            new LanguageItem { Key = "ru", Text = "Russian" },
            new LanguageItem { Key = "it", Text = "Italian" }
        };
    });
After completing these steps, your report viewer will display a little star in the options menu, where you can invoke the AI operations.
You can find the source code for this example in my GitHub repository: https://github.com/egarim/XafSmartEditors
Till next time, XAF out!!!

by Joche Ojeda | Jul 26, 2023 | Blazor, C#, Sqlite, WebAssembly
In the evolving panorama of contemporary web application development, a technology that has particularly caught attention is Microsoft’s Blazor WebAssembly. This powerful tool allows for a transformative approach to managing and interacting with client-side data, offering innovative capabilities that are shaping the future of web applications.
Understanding Blazor WebAssembly
Blazor WebAssembly is a client-side web framework from Microsoft. It allows developers to build interactive web applications using C# instead of JavaScript. As the name suggests, it uses WebAssembly, a binary instruction format for a stack-based virtual machine, providing developers with the ability to run client-side web applications directly in the browser using .NET.
The Power of SQLite
SQLite, on the other hand, is a software library that provides a relational database management system (RDBMS). It operates directly on disk files without the need for a separate server process, making it ideal for applications that need local storage. It’s compact, requires zero-configuration, and supports most of the SQL standard, making it an excellent choice for client-side data storage and manipulation.
Combining Blazor WebAssembly with SQLite
By combining these two technologies, you can unlock the full potential of client-side data handling. Here’s how:
Self-Contained and Cross-Platform Development
Both Blazor WebAssembly and SQLite are self-contained systems, requiring no external dependencies. They also both provide excellent cross-platform support. This makes your applications highly portable and reduces the complexity of the development environment.
Offline Availability
SQLite enables the storage of data directly in the client’s browser, allowing your Blazor applications to work offline. Changes made offline can be synced with the server database once the application goes back online, providing a seamless user experience.
Superior Performance
Blazor WebAssembly runs directly in the browser, offering near-native performance. SQLite, being a lightweight yet powerful database, reads and writes directly to ordinary disk files, providing high-speed data access. This combination ensures your application runs quickly and smoothly.
Full .NET Support and Shared Codebase
With Blazor, you can use .NET for both client and server-side code, enabling code sharing and eliminating the need to switch between languages. Coupled with SQLite, developers can use Entity Framework Core to interact with the database, maintaining a consistent, .NET-centric development experience.
Where does the magic happens?
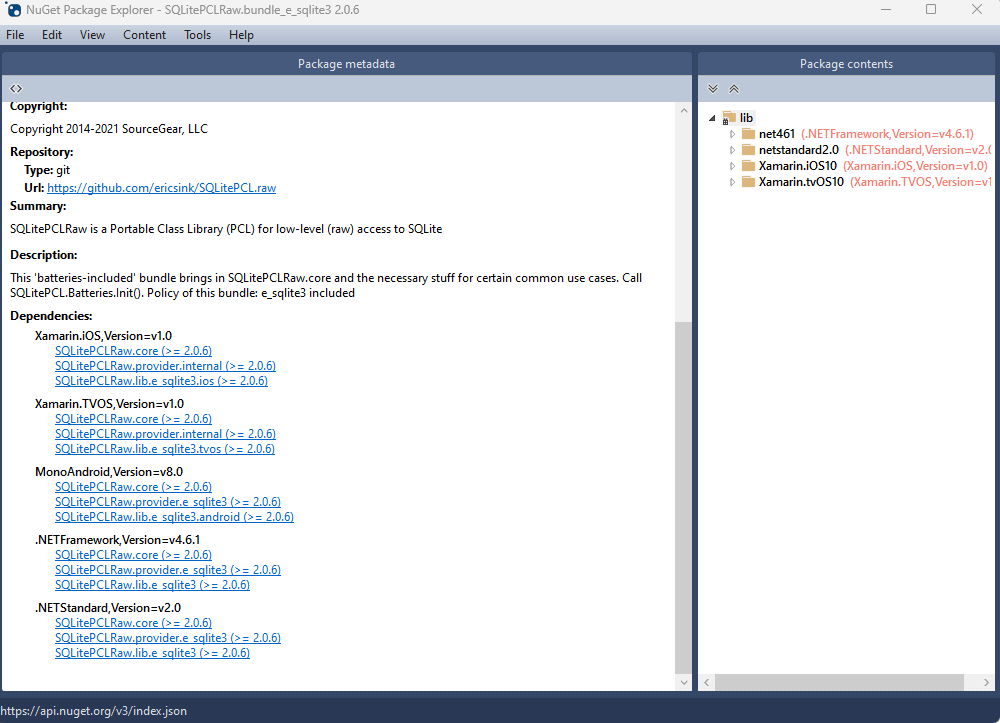
The functionality of SQLite with WebAssembly may vary based on your target framework. If you’re utilizing .NET 6 and Microsoft.Data.SQLite 6, your code will reference SQLitePCLRaw.bundle_e_sqlite3 version 2.0.6. This bundle doesn’t include the native SQLite reference, as demonstrated in the following image

This implies that you’ll need to rely on .NET 6’s native dependencies to include your custom version of lib.e_sqlite3, compiled specifically for WebAssembly. For more detailed information about native dependencies, please refer to the provided links.
https://github.com/egarim/XpoNet6WasmSqlite
https://learn.microsoft.com/en-us/aspnet/core/blazor/webassembly-native-dependencies?view=aspnetcore-6.0
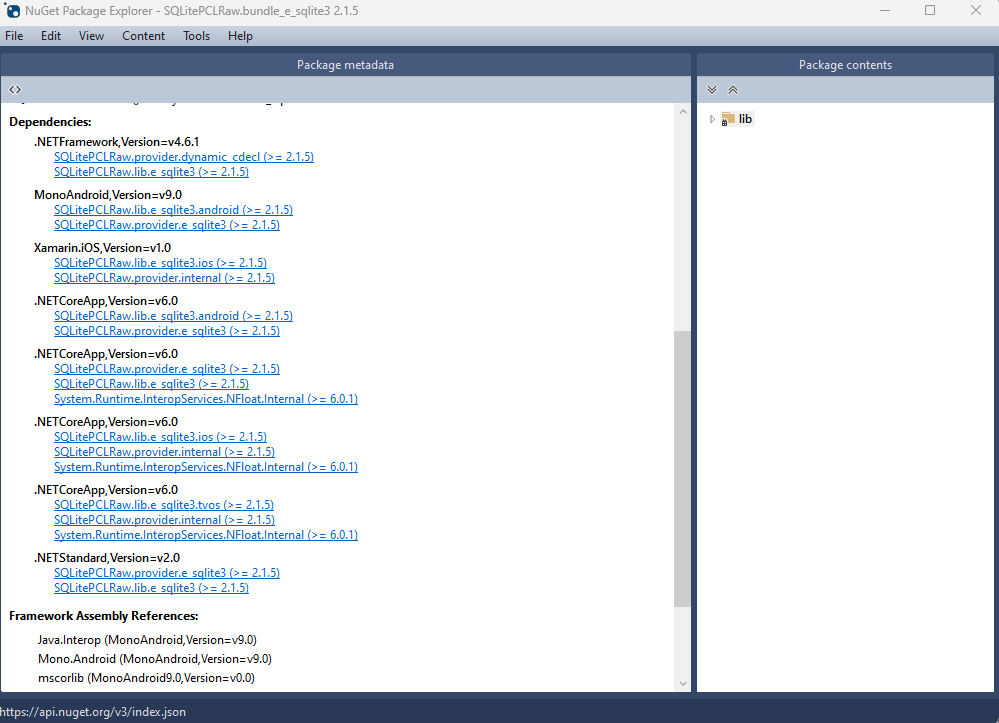
If you’re using .NET 7 or later, your reference from Microsoft.Data.SQLite will depend on SQLitePCLRaw.bundle_e_sqlite3 version 2.1.5. This bundle provides several targets for the native SQLite library (e_sqlite3), as can see in the accompanying image.

This indicates that we can utilize SQLite on any platform supported by .NET, provided that we supply the native reference for SQLite.
Conclusion
Blazor WebAssembly and SQLite together offer a compelling option for developers looking to leverage the power of client-side data. Their combination enables the development of web applications with high performance, offline availability, and a unified language platform.
This potent mix empowers developers to rethink what’s possible with web application development, pushing the boundaries of what we can achieve with client-side data storage and manipulation. In a world where user experience is paramount, the coupling of these technologies truly helps in unleashing the full potential of client-side data.


