
by Joche Ojeda | Mar 29, 2023 | Application Framework, Uncategorized, XAF, XPO
based on my experience with numerous application frameworks, I regard XAF as the most efficient in delivering robust solutions quickly and with minimal code. Our company has trained over 100 software firms in utilizing eXpressApp Framework (XAF) and XPO, leading me to believe that the issue typically stems from three factors:
The illusion of productivity
Many software developers perceive themselves as more productive when not using frameworks, as they often associate productivity with the volume of code they produce. This frequently involves reinventing the wheel, and more code does not necessarily bring them closer to their goals.
Grasping the business requirements
This factor is connected to the first, as an unclear or poorly understood business requirement can lead programmers to focus on trivial tasks, such as adding a row to a database, instead of tackling complex business scenarios. As a result, the application framework might be seen as an obstacle by the development team, since it already addresses basic tasks and forces them to confront challenging business problems early on, which they may then attribute to the framework.
Familiarity with both the application framework and the business problem
These two aspects are the primary challenges in Line-of-Business (LOB) software development. The general principle is that one must be equally well-versed in the business problem and the application framework. The worst-case scenario arises when there is limited technical knowledge and high business demands, which, surprisingly, is the most common situation.
In conclusion, the efficiency and effectiveness of application frameworks, such as XAF, in delivering robust solutions with minimal code are often undervalued due to misconceptions and challenges that developers face. Overcoming the illusion of productivity, ensuring a clear understanding of business requirements, and achieving a balance between technical and business expertise are crucial for harnessing the full potential of application frameworks. By addressing these challenges, development teams can unlock the true power of XAF and similar frameworks, streamlining the development process and paving the way for more successful software solutions that cater to complex business needs.

by Joche Ojeda | Mar 27, 2023 | Apache, Linux, Ubuntu, Uncategorized, WebServers
Cloud Storage
Cloud storage is useful for mobile and web apps because it provides an efficient and scalable way to store and retrieve data from anywhere in the world.
With cloud storage, mobile and web apps can easily scale their storage needs up or down depending on usage patterns. This means that developers don’t need to worry about running out of storage space or having to invest in expensive hardware to handle increased storage needs.
Files stored in the cloud can be accessed from anywhere in the world, as long as there is an internet connection. This makes it easy for mobile and web apps to store and retrieve data from different locations and devices.
Cloud services are typically offered as pay-as-you-go pricing model, which means that developers only pay for the storage and resources they actually use. This makes cloud storage an affordable option for mobile and web apps, especially those with limited budgets. also cloud providers typically have robust security measures in place to protect data from unauthorized access and ensure data privacy.
Amazon S3
Amazon S3 (Simple Storage Service) is a cloud-based storage service provided by Amazon Web Services (AWS). It is not an open-source technology, meaning that the source code of the service is not available for modification or redistribution by users. Instead, it is a proprietary technology owned and operated by AWS.
S3 Compatible services
An S3 compatible service is a cloud-based storage service that is designed to be compatible with the Amazon S3 (Simple Storage Service) API. This means that it provides a similar interface and functionality as Amazon S3, allowing users to easily migrate data and applications between the two services.
Some examples of S3 compatible services include:
- Wasabi: A cloud storage service that provides an S3-compatible interface with no egress fees or API request fees.
- DigitalOcean Spaces: A cloud storage service from DigitalOcean that provides an S3-compatible API with a simple pricing model.
- Google Cloud Storage: A cloud storage service from Google Cloud Platform that provides an S3-compatible API along with additional features like object versioning and lifecycle management.
- IBM Cloud Object Storage: A cloud storage service from IBM that provides an S3-compatible API along with features like built-in encryption and multi-region support.
- Contabo: is a cheap alternative with unlimited free transfer to AWS S3 and other vendors. Billing is simple and month-to-month at all-inclusive rate and you can easily migrate from S3
Simple Storage Service gives you a URL for each file by assigning a unique URL to each object stored in the S3 bucket. The URL includes the bucket name, the key (or path) to the object, and the S3 endpoint, which is used to access the object.
For example, if you have an S3 bucket named “my-bucket” and a file named “my-file.jpg” stored in the bucket, the URL to access the file would be:
https://my-bucket.s3.amazonaws.com/my-file.jpg
https://my-bucket.s3.amazonaws.com/my-file.jpg
https://my-bucket.s3.amazonaws.com/my-file.jpg
As you can see the URL includes the domain name of your cloud provider but even when there is nothing technically wrong with it, can bring some disadvantages.
Some common problems on how URLs are created in S3 storage
Here are some of the of disadvantages of not using a custom domain with Amazon S3 storage can cause several problems, including:
- URL appearance: When you access an S3 bucket using the default endpoint, the URL contains the bucket name and the Amazon S3 endpoint. The resulting URL can be long and difficult to remember, which can cause issues with branding and user experience.
- SEO: Using the default S3 endpoint can also negatively impact your search engine optimization (SEO) efforts, as search engines may view the URL as less trustworthy or relevant.
- SSL certificate: If you access an S3 bucket using the default endpoint, the SSL certificate presented to the user will be issued for the Amazon S3 endpoint, rather than your custom domain name. This can cause warnings to appear in the user’s browser, which can negatively impact trust and user experience.
- CORS: If you are using cross-origin resource sharing (CORS) to allow access to your S3 bucket from other domains, the default S3 endpoint may not allow those requests due to security restrictions.
- Maintenance: If you are using the default S3 endpoint, any changes to the S3 bucket or endpoint URLs may require updates to all references to the S3 bucket, which can be time-consuming and error-prone.
Overall, using a custom domain with an S3 storage can provide several benefits, including improved branding, better user experience, and stronger SEO.
There are several ways to provide a solution for the custom domain problem, most of the solutions you will find on the internet are related to cloud providers like Cloud Flare but in this article I want to propose a different approach of showing how this can be fixed using apache web server as a proxy, my goal is not to provide a step by step guide on how to setup a proxy but to provide the conceptual framework to understand how the proxy works
What is Apache
The Apache HTTP Server, commonly referred to as Apache web server, is a free and open-source cross-platform web server software developed and maintained by the Apache Software Foundation. It is one of the most widely used web servers in the world, serving as the backbone for many popular websites and web applications.
Apache web server is designed to be highly configurable and extensible, with a modular architecture that allows users to add or remove functionality as needed. It supports a wide range of features, including dynamic content generation, SSL/TLS encryption, proxying and caching, and authentication and authorization.
Apache web server is also highly portable, running on a wide range of operating systems including Windows, Linux, macOS, and Unix. It can be configured using a variety of tools and languages, including configuration files, command-line utilities, and programming languages such as Perl, PHP, and Python.
Overall, Apache web server is a versatile and powerful web server that provides a stable and reliable platform for serving web content and applications.
What is an Apache proxy
An Apache proxy, also known as an Apache reverse proxy, is a module of the Apache HTTP Server that allows the server to act as an intermediary between clients and other servers.
With an Apache proxy, incoming requests from clients are forwarded to one or more backend servers, which handle the request and return a response. The Apache proxy then forwards the response back to the client.
This can be useful for a variety of reasons, including load balancing, caching, and security. For example, an Apache proxy can be used to distribute incoming traffic across multiple backend servers to improve performance and availability. It can also be used to cache responses from backend servers to reduce the load on those servers and improve response times.
In addition, an Apache proxy can be used to add an extra layer of security to incoming traffic, by acting as a firewall and only allowing traffic from trusted sources.
Setting up an Apache proxy involves configuring the Apache HTTP Server to act as a reverse proxy and directing traffic to one or more backend servers. This can be done using the Apache mod_proxy module, which provides the necessary functionality to act as a reverse proxy.
Apache proxy flow
+-------------------+ +-------------+
+----------+ | Apache Web Server | |Amazon S3 |
| | | (Virtual Host) | | |
| Client +----> | example.com +----> | bucket-name|
+----------+ +-------------------+ +-------------+
                  +-------------------+      +-------------+
+----------+      | Apache Web Server |      |Amazon S3     |
|          |      |   (Virtual Host)  |      |             |
|  Client  +----> |   example.com     +----> |  bucket-name|
|          |      |   (HTTPS)         |      |             |
+----------+      +-------------------+      +-------------+
+-------------------+ +-------------+
+----------+ | Apache Web Server | |Amazon S3 |
| | | (Virtual Host) | | |
| Client +----> | example.com +----> | bucket-name|
| | | (HTTPS) | | |
+----------+ +-------------------+ +-------------+
Apache proxy configuration
#this is the configuration of the virtual hosting
SuexecUserGroup "#1010" "#1010"
ServerName files.jocheojeda.com
DocumentRoot /home/files/public_html
ErrorLog /var/log/virtualmin/files.jocheojeda.com_error_log
CustomLog /var/log/virtualmin/files.jocheojeda.com_access_log combined
ScriptAlias /cgi-bin/ /home/files/cgi-bin/
ScriptAlias /awstats/ /home/files/cgi-bin/
DirectoryIndex index.php index.php4 index.php5 index.htm index.html
<Directory /home/files/public_html>
Options -Indexes +IncludesNOEXEC +SymLinksIfOwnerMatch +ExecCGI
AllowOverride All Options=ExecCGI,Includes,IncludesNOEXEC,Indexes,MultiViews,SymLinksIfOwnerMatch
AddType application/x-httpd-php .php
AddHandler fcgid-script .php
AddHandler fcgid-script .php7.4
FCGIWrapper /home/files/fcgi-bin/php7.4.fcgi .php
FCGIWrapper /home/files/fcgi-bin/php7.4.fcgi .php7.4
<Directory /home/files/cgi-bin>
AllowOverride All Options=ExecCGI,Includes,IncludesNOEXEC,Indexes,MultiViews,SymLinksIfOwnerMatch
FcgidMaxRequestLen 1073741824
AuthName "files.jocheojeda.com statistics"
AuthUserFile /home/files/.awstats-htpasswd
#these 2 likes are the one who forward the traffic from the custom domain files.jocheojeda.com to the contabo storage
ProxyPass / https://usc1.contabostorage.com/ade25b1c43c1457b87f0716a629d0ff8:files.jocheojeda/
ProxyPassReverse / https://usc1.contabostorage.com/ade25b1c43c1457b87f0716a629d0ff8:files.jocheojeda/
#this is the configuration of the virtual hosting
SuexecUserGroup "#1010" "#1010"
ServerName files.jocheojeda.com
DocumentRoot /home/files/public_html
ErrorLog /var/log/virtualmin/files.jocheojeda.com_error_log
CustomLog /var/log/virtualmin/files.jocheojeda.com_access_log combined
ScriptAlias /cgi-bin/ /home/files/cgi-bin/
ScriptAlias /awstats/ /home/files/cgi-bin/
DirectoryIndex index.php index.php4 index.php5 index.htm index.html
<Directory /home/files/public_html>
    Options -Indexes +IncludesNOEXEC +SymLinksIfOwnerMatch +ExecCGI
    Require all granted
    AllowOverride All Options=ExecCGI,Includes,IncludesNOEXEC,Indexes,MultiViews,SymLinksIfOwnerMatch
    AddType application/x-httpd-php .php
    AddHandler fcgid-script .php
    AddHandler fcgid-script .php7.4
    FCGIWrapper /home/files/fcgi-bin/php7.4.fcgi .php
    FCGIWrapper /home/files/fcgi-bin/php7.4.fcgi .php7.4
</Directory>
<Directory /home/files/cgi-bin>
    Require all granted
    AllowOverride All Options=ExecCGI,Includes,IncludesNOEXEC,Indexes,MultiViews,SymLinksIfOwnerMatch
</Directory>
ProxyPass /.well-known !
RewriteEngine on
RemoveHandler .php
RemoveHandler .php7.4
FcgidMaxRequestLen 1073741824
<Files awstats.pl>
    AuthName "files.jocheojeda.com statistics"
    AuthType Basic
    AuthUserFile /home/files/.awstats-htpasswd
    require valid-user
</Files>
#these 2 likes are the one who forward the traffic from the custom domain files.jocheojeda.com to the contabo storage
ProxyPass / https://usc1.contabostorage.com/ade25b1c43c1457b87f0716a629d0ff8:files.jocheojeda/
ProxyPassReverse / https://usc1.contabostorage.com/ade25b1c43c1457b87f0716a629d0ff8:files.jocheojeda/
SSLProxyEngine on
#this is the configuration of the virtual hosting
SuexecUserGroup "#1010" "#1010"
ServerName files.jocheojeda.com
DocumentRoot /home/files/public_html
ErrorLog /var/log/virtualmin/files.jocheojeda.com_error_log
CustomLog /var/log/virtualmin/files.jocheojeda.com_access_log combined
ScriptAlias /cgi-bin/ /home/files/cgi-bin/
ScriptAlias /awstats/ /home/files/cgi-bin/
DirectoryIndex index.php index.php4 index.php5 index.htm index.html
<Directory /home/files/public_html>
Options -Indexes +IncludesNOEXEC +SymLinksIfOwnerMatch +ExecCGI
Require all granted
AllowOverride All Options=ExecCGI,Includes,IncludesNOEXEC,Indexes,MultiViews,SymLinksIfOwnerMatch
AddType application/x-httpd-php .php
AddHandler fcgid-script .php
AddHandler fcgid-script .php7.4
FCGIWrapper /home/files/fcgi-bin/php7.4.fcgi .php
FCGIWrapper /home/files/fcgi-bin/php7.4.fcgi .php7.4
</Directory>
<Directory /home/files/cgi-bin>
Require all granted
AllowOverride All Options=ExecCGI,Includes,IncludesNOEXEC,Indexes,MultiViews,SymLinksIfOwnerMatch
</Directory>
ProxyPass /.well-known !
RewriteEngine on
RemoveHandler .php
RemoveHandler .php7.4
FcgidMaxRequestLen 1073741824
<Files awstats.pl>
AuthName "files.jocheojeda.com statistics"
AuthType Basic
AuthUserFile /home/files/.awstats-htpasswd
require valid-user
</Files>
#these 2 likes are the one who forward the traffic from the custom domain files.jocheojeda.com to the contabo storage
ProxyPass / https://usc1.contabostorage.com/ade25b1c43c1457b87f0716a629d0ff8:files.jocheojeda/
ProxyPassReverse / https://usc1.contabostorage.com/ade25b1c43c1457b87f0716a629d0ff8:files.jocheojeda/ SSLProxyEngine on
Where the magic happens
You only need 2 lines in the configuration when you already have an apache virtual hosting already running to proxy the request from the client to the S3 storage service
ProxyPass / https://usc1.contabostorage.com/ade25b1c43c1457b87f0716a629d0ff8:files.jocheojeda/
ProxyPassReverse / https://usc1.contabostorage.com/ade25b1c43c1457b87f0716a629d0ff8:files.jocheojeda/ SSLProxyEngine on
ProxyPass / https://usc1.contabostorage.com/ade25b1c43c1457b87f0716a629d0ff8:files.jocheojeda/
ProxyPassReverse / https://usc1.contabostorage.com/ade25b1c43c1457b87f0716a629d0ff8:files.jocheojeda/ SSLProxyEngine on
ProxyPass / https://usc1.contabostorage.com/ade25b1c43c1457b87f0716a629d0ff8:files.jocheojeda/
ProxyPassReverse / https://usc1.contabostorage.com/ade25b1c43c1457b87f0716a629d0ff8:files.jocheojeda/ SSLProxyEngine on
Conclusions
As you can see is really easy to fix the problem of custom domains for an S3 storage, specially if you already have an apache webserver with virtual hosting running
by Joche Ojeda | Mar 21, 2023 | Linux, netcore, Oqtane, Ubuntu, Uncategorized
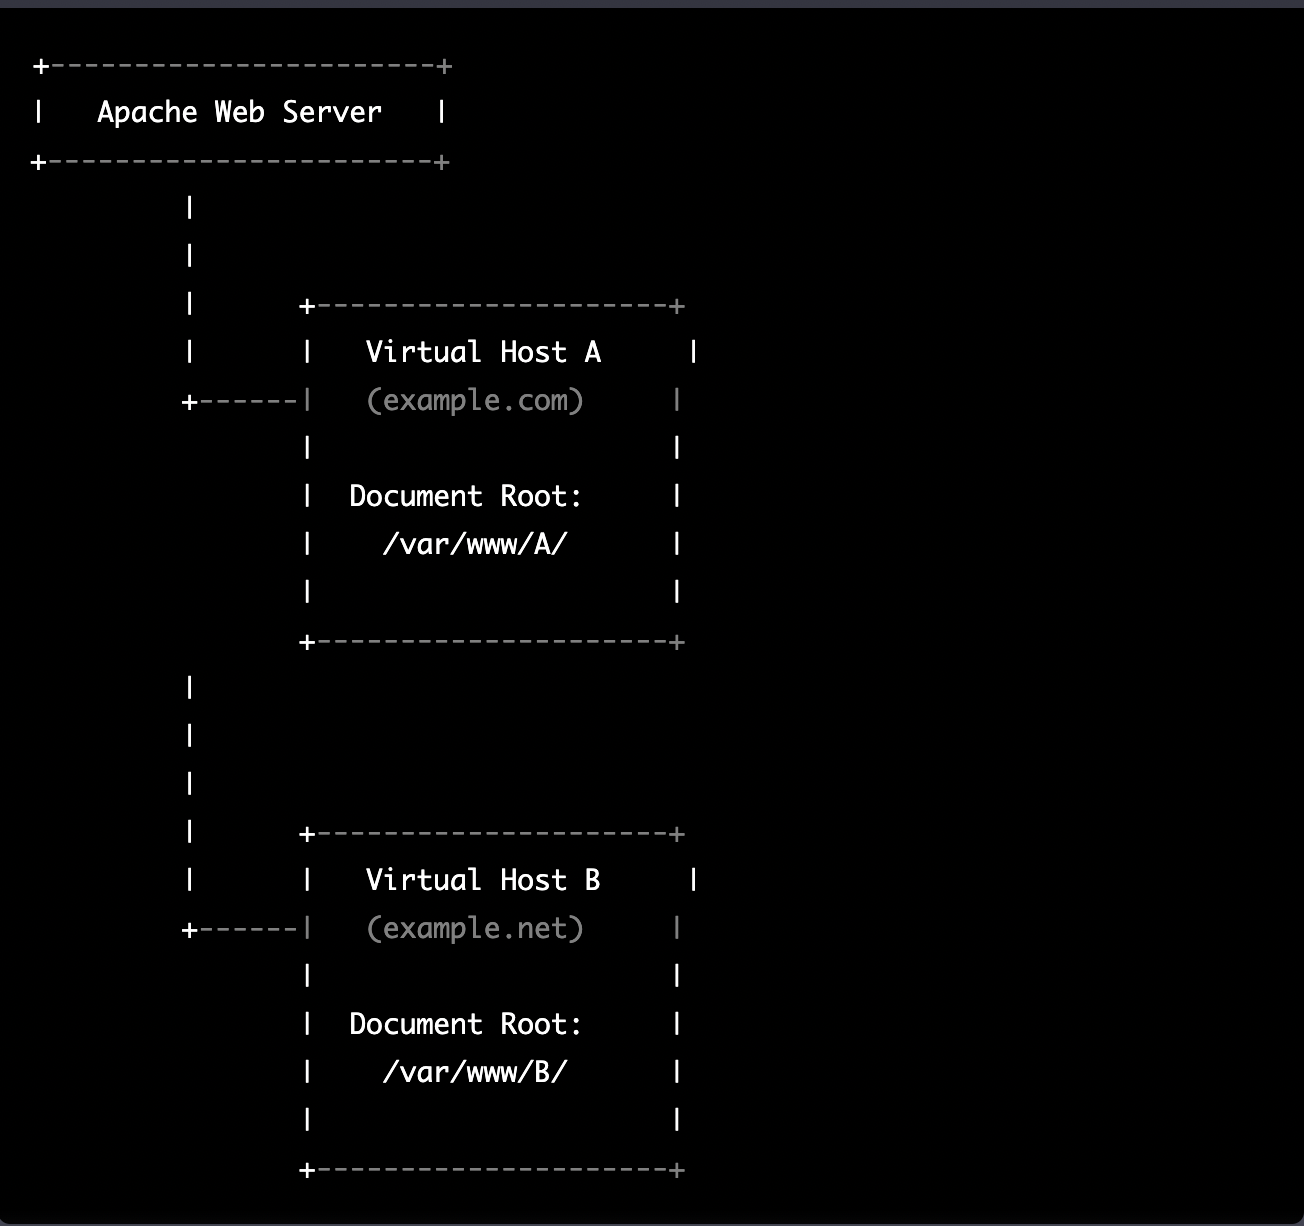
Virtual hosting is a technique used by Apache (and other web servers) to host multiple websites on a single server. With virtual hosting, a single physical server can host multiple virtual servers, each with its own domain name, IP address, and content.
Virtual hosting can be implemented in two ways:
- Name-based virtual hosting: In this approach, the server uses the domain name provided in the HTTP request to determine which virtual host should serve the request. For example, if a user requests a page from “example.com”, the server will use the virtual host configured for that domain and serve the appropriate content.
- IP-based virtual hosting: In this approach, each virtual host is assigned a separate IP address, and the server uses the IP address in the HTTP request to determine which virtual host should serve the request. For example, if a user requests a page from the IP address assigned to “example.com”, the server will use the virtual host configured for that IP address and serve the appropriate content.
Virtual hosting allows a server to serve multiple websites, each with its own domain name and content, using a single physical server. This makes hosting more efficient and cost-effective, especially for smaller websites that don’t require dedicated servers.
The following diagram represents the most common virtual hosting setup
+-----------------------+
+-----------------------+
| +---------------------+
| +---------------------+
+-----------------------+
|   Apache Web Server   |
+-----------------------+
         |
         |
         |      +---------------------+
         |      |   Virtual Host A     |
         +------|   (example.com)     |
                |                     |
                |  Document Root:     |
                |    /var/www/A/      |
                |                     |
                +---------------------+
         |
         |
         |
         |      +---------------------+
         |      |   Virtual Host B     |
         +------|   (example.net)     |
                |                     |
                |  Document Root:     |
                |    /var/www/B/      |
                |                     |
                +---------------------+
+-----------------------+
| Apache Web Server |
+-----------------------+
|
|
| +---------------------+
| | Virtual Host A |
+------| (example.com) |
| |
| Document Root: |
| /var/www/A/ |
| |
+---------------------+
|
|
|
| +---------------------+
| | Virtual Host B |
+------| (example.net) |
| |
| Document Root: |
| /var/www/B/ |
| |
+---------------------+
ASP.NET Core and Blazor applications have the capability to run their own in-process web server, Kestrel. Kestrel can be bound to a specific IP address or port number, enabling the applications to be hosted in virtual environments. To accomplish this, each application can be bound to a unique port number.
+-----------------------+
+-----------------------+
| +---------------------+
| +---------------------+
+-----------------------+
|   Apache Web Server   |
+-----------------------+
         |
         |
         |      +---------------------+
         |      |   Virtual Host A    |
         +------|   (example.com)     |
                |                     |
                |  Proxy to:          |
                |http://localhost:8016|
                |                     |
                +---------------------+
         |
         |
         |      +---------------------+
         |      |   Virtual Host B    |
         +------|   (example.net)     |
                |                     |
                |  Proxy to:          |
                |http://localhost:8017|
                |                     |
                +---------------------+
+-----------------------+
| Apache Web Server |
+-----------------------+
|
|
| +---------------------+
| | Virtual Host A |
+------| (example.com) |
| |
| Proxy to: |
|http://localhost:8016|
| |
+---------------------+
|
|
| +---------------------+
| | Virtual Host B |
+------| (example.net) |
| |
| Proxy to: |
|http://localhost:8017|
| |
+---------------------+
As shown in the diagram, physical folders for the document root are no longer utilized. Rather, a proxy is created to the Kestrel web server, which runs our ASP.NET Core applications
To bind our ASP.NET Core applications to a specific IP address or port number, there are multiple methods available. Detailed documentation on this subject can be found at the following link: https://learn.microsoft.com/en-us/aspnet/core/fundamentals/servers/kestrel/endpoints?view=aspnetcore-7.0#configureiconfiguration
There are various approaches that can be used based on the specific use case. For the sake of simplicity in this example, we will be utilizing the configuration method. This involves appending the configuration JSON for the Kestrel web server, as shown in the following example.
"Url": "http://localhost:8016"
{
  "Kestrel": {
    "Endpoints": {
      "Http": {
        "Url": "http://localhost:8016"
      }
    }
  }
}
{
"Kestrel": {
"Endpoints": {
"Http": {
"Url": "http://localhost:8016"
}
}
}
}
So here is how our configuration files should look like
Example.com (Host A)
"RenderMode": "ServerPrerendered",
"DefaultDBType": "Oqtane.Database.PostgreSQL.PostgreSQLDatabase, Oqtane.Database.PostgreSQL"
"DefaultConnection": "Server=127.0.0.1;Port=5432;Database=example.com;User ID=example.com;Password=1234567890;"
"Url": "http://localhost:8016"
"ControlType": "Oqtane.Installer.Controls.LocalDBConfig, Oqtane.Client",
"DBType": "Oqtane.Database.SqlServer.SqlServerDatabase, Oqtane.Database.SqlServer"
"ControlType": "Oqtane.Installer.Controls.SqlServerConfig, Oqtane.Client",
"DBType": "Oqtane.Database.SqlServer.SqlServerDatabase, Oqtane.Database.SqlServer"
"ControlType": "Oqtane.Installer.Controls.SqliteConfig, Oqtane.Client",
"DBType": "Oqtane.Database.Sqlite.SqliteDatabase, Oqtane.Database.Sqlite"
"ControlType": "Oqtane.Installer.Controls.MySQLConfig, Oqtane.Client",
"DBType": "Oqtane.Database.MySQL.MySQLDatabase, Oqtane.Database.MySQL"
"ControlType": "Oqtane.Installer.Controls.PostgreSQLConfig, Oqtane.Client",
"DBType": "Oqtane.Database.PostgreSQL.PostgreSQLDatabase, Oqtane.Database.PostgreSQL"
"InstallationId": "f5789fa4-895c-45d7-bc26-03eb166e008a"
{
  "Runtime": "Server",
  "RenderMode": "ServerPrerendered",
  "Database": {
    "DefaultDBType": "Oqtane.Database.PostgreSQL.PostgreSQLDatabase, Oqtane.Database.PostgreSQL"
  },
  "ConnectionStrings": {
    "DefaultConnection": "Server=127.0.0.1;Port=5432;Database=example.com;User ID=example.com;Password=1234567890;"
  },
  "Kestrel": {
  "Endpoints": {
    "Http": {
      "Url": "http://localhost:8016"
    }
   }
  },
  "Installation": {
    "DefaultAlias": "",
    "HostPassword": "",
    "HostEmail": "",
    "SiteTemplate": "",
    "DefaultTheme": "",
    "DefaultContainer": ""
  },
  "Localization": {
    "DefaultCulture": "en"
  },
  "AvailableDatabases": [
    {
      "Name": "LocalDB",
      "ControlType": "Oqtane.Installer.Controls.LocalDBConfig, Oqtane.Client",
      "DBType": "Oqtane.Database.SqlServer.SqlServerDatabase, Oqtane.Database.SqlServer"
    },
    {
      "Name": "SQL Server",
      "ControlType": "Oqtane.Installer.Controls.SqlServerConfig, Oqtane.Client",
      "DBType": "Oqtane.Database.SqlServer.SqlServerDatabase, Oqtane.Database.SqlServer"
    },
    {
      "Name": "SQLite",
      "ControlType": "Oqtane.Installer.Controls.SqliteConfig, Oqtane.Client",
      "DBType": "Oqtane.Database.Sqlite.SqliteDatabase, Oqtane.Database.Sqlite"
    },
    {
      "Name": "MySQL",
      "ControlType": "Oqtane.Installer.Controls.MySQLConfig, Oqtane.Client",
      "DBType": "Oqtane.Database.MySQL.MySQLDatabase, Oqtane.Database.MySQL"
    },
    {
      "Name": "PostgreSQL",
      "ControlType": "Oqtane.Installer.Controls.PostgreSQLConfig, Oqtane.Client",
      "DBType": "Oqtane.Database.PostgreSQL.PostgreSQLDatabase, Oqtane.Database.PostgreSQL"
    }
  ],
  "Logging": {
    "FileLogger": {
      "LogLevel": {
        "Default": "Error"
      }
    },
    "LogLevel": {
      "Default": "Information"
    }
  },
  "InstallationId": "f5789fa4-895c-45d7-bc26-03eb166e008a"
}
{
"Runtime": "Server",
"RenderMode": "ServerPrerendered",
"Database": {
"DefaultDBType": "Oqtane.Database.PostgreSQL.PostgreSQLDatabase, Oqtane.Database.PostgreSQL"
},
"ConnectionStrings": {
"DefaultConnection": "Server=127.0.0.1;Port=5432;Database=example.com;User ID=example.com;Password=1234567890;"
},
"Kestrel": {
"Endpoints": {
"Http": {
"Url": "http://localhost:8016"
}
}
},
"Installation": {
"DefaultAlias": "",
"HostPassword": "",
"HostEmail": "",
"SiteTemplate": "",
"DefaultTheme": "",
"DefaultContainer": ""
},
"Localization": {
"DefaultCulture": "en"
},
"AvailableDatabases": [
{
"Name": "LocalDB",
"ControlType": "Oqtane.Installer.Controls.LocalDBConfig, Oqtane.Client",
"DBType": "Oqtane.Database.SqlServer.SqlServerDatabase, Oqtane.Database.SqlServer"
},
{
"Name": "SQL Server",
"ControlType": "Oqtane.Installer.Controls.SqlServerConfig, Oqtane.Client",
"DBType": "Oqtane.Database.SqlServer.SqlServerDatabase, Oqtane.Database.SqlServer"
},
{
"Name": "SQLite",
"ControlType": "Oqtane.Installer.Controls.SqliteConfig, Oqtane.Client",
"DBType": "Oqtane.Database.Sqlite.SqliteDatabase, Oqtane.Database.Sqlite"
},
{
"Name": "MySQL",
"ControlType": "Oqtane.Installer.Controls.MySQLConfig, Oqtane.Client",
"DBType": "Oqtane.Database.MySQL.MySQLDatabase, Oqtane.Database.MySQL"
},
{
"Name": "PostgreSQL",
"ControlType": "Oqtane.Installer.Controls.PostgreSQLConfig, Oqtane.Client",
"DBType": "Oqtane.Database.PostgreSQL.PostgreSQLDatabase, Oqtane.Database.PostgreSQL"
}
],
"Logging": {
"FileLogger": {
"LogLevel": {
"Default": "Error"
}
},
"LogLevel": {
"Default": "Information"
}
},
"InstallationId": "f5789fa4-895c-45d7-bc26-03eb166e008a"
}
Example.net (Host B)
"RenderMode": "ServerPrerendered",
"DefaultDBType": "Oqtane.Database.PostgreSQL.PostgreSQLDatabase, Oqtane.Database.PostgreSQL"
"DefaultConnection": "Server=127.0.0.1;Port=5432;Database=example.net;User ID=example.net;Password=1234567890;"
"Url": "http://localhost:8017"
"ControlType": "Oqtane.Installer.Controls.LocalDBConfig, Oqtane.Client",
"DBType": "Oqtane.Database.SqlServer.SqlServerDatabase, Oqtane.Database.SqlServer"
"ControlType": "Oqtane.Installer.Controls.SqlServerConfig, Oqtane.Client",
"DBType": "Oqtane.Database.SqlServer.SqlServerDatabase, Oqtane.Database.SqlServer"
"ControlType": "Oqtane.Installer.Controls.SqliteConfig, Oqtane.Client",
"DBType": "Oqtane.Database.Sqlite.SqliteDatabase, Oqtane.Database.Sqlite"
"ControlType": "Oqtane.Installer.Controls.MySQLConfig, Oqtane.Client",
"DBType": "Oqtane.Database.MySQL.MySQLDatabase, Oqtane.Database.MySQL"
"ControlType": "Oqtane.Installer.Controls.PostgreSQLConfig, Oqtane.Client",
"DBType": "Oqtane.Database.PostgreSQL.PostgreSQLDatabase, Oqtane.Database.PostgreSQL"
"InstallationId": "f5789fa4-895c-45d7-bc26-03eb166e008a"
{
  "Runtime": "Server",
  "RenderMode": "ServerPrerendered",
  "Database": {
    "DefaultDBType": "Oqtane.Database.PostgreSQL.PostgreSQLDatabase, Oqtane.Database.PostgreSQL"
  },
  "ConnectionStrings": {
    "DefaultConnection": "Server=127.0.0.1;Port=5432;Database=example.net;User ID=example.net;Password=1234567890;"
  },
  {
    "Kestrel": {
    "Endpoints": {
      "Http": {
        "Url": "http://localhost:8017"
      }
     }
    }
  },
  "Installation": {
    "DefaultAlias": "",
    "HostPassword": "",
    "HostEmail": "",
    "SiteTemplate": "",
    "DefaultTheme": "",
    "DefaultContainer": ""
  },
  "Localization": {
    "DefaultCulture": "en"
  },
  "AvailableDatabases": [
    {
      "Name": "LocalDB",
      "ControlType": "Oqtane.Installer.Controls.LocalDBConfig, Oqtane.Client",
      "DBType": "Oqtane.Database.SqlServer.SqlServerDatabase, Oqtane.Database.SqlServer"
    },
    {
      "Name": "SQL Server",
      "ControlType": "Oqtane.Installer.Controls.SqlServerConfig, Oqtane.Client",
      "DBType": "Oqtane.Database.SqlServer.SqlServerDatabase, Oqtane.Database.SqlServer"
    },
    {
      "Name": "SQLite",
      "ControlType": "Oqtane.Installer.Controls.SqliteConfig, Oqtane.Client",
      "DBType": "Oqtane.Database.Sqlite.SqliteDatabase, Oqtane.Database.Sqlite"
    },
    {
      "Name": "MySQL",
      "ControlType": "Oqtane.Installer.Controls.MySQLConfig, Oqtane.Client",
      "DBType": "Oqtane.Database.MySQL.MySQLDatabase, Oqtane.Database.MySQL"
    },
    {
      "Name": "PostgreSQL",
      "ControlType": "Oqtane.Installer.Controls.PostgreSQLConfig, Oqtane.Client",
      "DBType": "Oqtane.Database.PostgreSQL.PostgreSQLDatabase, Oqtane.Database.PostgreSQL"
    }
  ],
  "Logging": {
    "FileLogger": {
      "LogLevel": {
        "Default": "Error"
      }
    },
    "LogLevel": {
      "Default": "Information"
    }
  },
  "InstallationId": "f5789fa4-895c-45d7-bc26-03eb166e008a"
}
{
"Runtime": "Server",
"RenderMode": "ServerPrerendered",
"Database": {
"DefaultDBType": "Oqtane.Database.PostgreSQL.PostgreSQLDatabase, Oqtane.Database.PostgreSQL"
},
"ConnectionStrings": {
"DefaultConnection": "Server=127.0.0.1;Port=5432;Database=example.net;User ID=example.net;Password=1234567890;"
},
{
"Kestrel": {
"Endpoints": {
"Http": {
"Url": "http://localhost:8017"
}
}
}
},
"Installation": {
"DefaultAlias": "",
"HostPassword": "",
"HostEmail": "",
"SiteTemplate": "",
"DefaultTheme": "",
"DefaultContainer": ""
},
"Localization": {
"DefaultCulture": "en"
},
"AvailableDatabases": [
{
"Name": "LocalDB",
"ControlType": "Oqtane.Installer.Controls.LocalDBConfig, Oqtane.Client",
"DBType": "Oqtane.Database.SqlServer.SqlServerDatabase, Oqtane.Database.SqlServer"
},
{
"Name": "SQL Server",
"ControlType": "Oqtane.Installer.Controls.SqlServerConfig, Oqtane.Client",
"DBType": "Oqtane.Database.SqlServer.SqlServerDatabase, Oqtane.Database.SqlServer"
},
{
"Name": "SQLite",
"ControlType": "Oqtane.Installer.Controls.SqliteConfig, Oqtane.Client",
"DBType": "Oqtane.Database.Sqlite.SqliteDatabase, Oqtane.Database.Sqlite"
},
{
"Name": "MySQL",
"ControlType": "Oqtane.Installer.Controls.MySQLConfig, Oqtane.Client",
"DBType": "Oqtane.Database.MySQL.MySQLDatabase, Oqtane.Database.MySQL"
},
{
"Name": "PostgreSQL",
"ControlType": "Oqtane.Installer.Controls.PostgreSQLConfig, Oqtane.Client",
"DBType": "Oqtane.Database.PostgreSQL.PostgreSQLDatabase, Oqtane.Database.PostgreSQL"
}
],
"Logging": {
"FileLogger": {
"LogLevel": {
"Default": "Error"
}
},
"LogLevel": {
"Default": "Information"
}
},
"InstallationId": "f5789fa4-895c-45d7-bc26-03eb166e008a"
}
As demonstrated, utilizing Oqtane in virtual hosting environments is a straightforward process. There is no need to recompile the source code, as configuring the application for virtual hosting can be easily accomplished through a single configuration section in the appsettings.json file.
by Joche Ojeda | Mar 20, 2023 | netcore, Oqtane, Uncategorized
In the preceding blog post, we explored the process of running Oqtane on Ubuntu Linux and successfully confirmed its functionality. Now, let us delve deeper and proceed to package the installation binaries specifically tailored for Ubuntu Linux deployment.
As a frequent publisher of Blazor applications to Linux servers, I find the process to be quite straightforward. Utilizing the .NET CLI, one can simply execute the following command to publish the app for Linux:
dotnet publish --runtime linux-x64
dotnet publish --runtime linux-x64
dotnet publish --runtime linux-x64
On this occasion, my customary approach to publishing encountered an obstacle, indicating additional steps were required. Consequently, I submitted an issue to the Oqtane GitHub repository, where Leigh Pointer from the Oqtane community kindly provided guidance in the correct direction. The GitHub issue can be viewed here.
The first file that I changed was
dotnet clean -c Release ..\Oqtane.Databases.sln
dotnet clean -c Release ..\Oqtane.sln
dotnet build -c Release ..\Oqtane.Databases.sln
dotnet build -c Release ..\Oqtane.sln
nuget.exe pack Oqtane.Client.nuspec
nuget.exe pack Oqtane.Server.nuspec
nuget.exe pack Oqtane.Shared.nuspec
nuget.exe pack Oqtane.Framework.nuspec
del /F/Q/S "..\Oqtane.Server\bin\Release\net6.0\publish" > NUL
rmdir /Q/S "..\Oqtane.Server\bin\Release\net6.0\publish"
dotnet publish ..\Oqtane.Server\Oqtane.Server.csproj /p:Configuration=Release
del /F/Q/S "..\Oqtane.Server\bin\Release\net6.0\publish\wwwroot\Content" > NUL
rmdir /Q/S "..\Oqtane.Server\bin\Release\net6.0\publish\wwwroot\Content"
setlocal ENABLEDELAYEDEXPANSION
set retain=Oqtane.Modules.Admin.Login,Oqtane.Modules.HtmlText,Templates
for /D %%i in ("..\Oqtane.Server\bin\Release\net6.0\publish\wwwroot\Modules\*") do (
for %%j in (%retain%) do (
if "%%~nxi" == "%%j" set /A found=1
if not !found! == 1 rmdir /Q/S "%%i"
set retain=Oqtane.Themes.BlazorTheme,Oqtane.Themes.OqtaneTheme,Templates
for /D %%i in ("..\Oqtane.Server\bin\Release\net6.0\publish\wwwroot\Themes\*") do (
for %%j in (%retain%) do (
if "%%~nxi" == "%%j" set /A found=1
if not !found! == 1 rmdir /Q/S "%%i"
del "..\Oqtane.Server\bin\Release\net6.0\publish\appsettings.json"
ren "..\Oqtane.Server\bin\Release\net6.0\publish\appsettings.release.json" "appsettings.json"
C:\Windows\System32\WindowsPowerShell\v1.0\powershell.exe ".\install.ps1"
del "..\Oqtane.Server\bin\Release\net6.0\publish\appsettings.json"
del "..\Oqtane.Server\bin\Release\net6.0\publish\web.config"
C:\Windows\System32\WindowsPowerShell\v1.0\powershell.exe ".\upgrade.ps1"
dotnet clean -c Release ..\Oqtane.Updater.sln
dotnet build -c Release ..\Oqtane.Updater.sln
dotnet publish ..\Oqtane.Updater\Oqtane.Updater.csproj /p:Configuration=Release
nuget.exe pack Oqtane.Updater.nuspec
del "*.nupkg"
del "*.zip"
dotnet clean -c Release ..\Oqtane.Databases.sln
dotnet clean -c Release ..\Oqtane.sln
dotnet build -c Release ..\Oqtane.Databases.sln
dotnet build -c Release ..\Oqtane.sln
nuget.exe pack Oqtane.Client.nuspec
nuget.exe pack Oqtane.Server.nuspec
nuget.exe pack Oqtane.Shared.nuspec
nuget.exe pack Oqtane.Framework.nuspec
del /F/Q/S "..\Oqtane.Server\bin\Release\net6.0\publish" > NUL
rmdir /Q/S "..\Oqtane.Server\bin\Release\net6.0\publish"
dotnet publish ..\Oqtane.Server\Oqtane.Server.csproj /p:Configuration=Release
del /F/Q/S "..\Oqtane.Server\bin\Release\net6.0\publish\wwwroot\Content" > NUL
rmdir /Q/S "..\Oqtane.Server\bin\Release\net6.0\publish\wwwroot\Content"
setlocal ENABLEDELAYEDEXPANSION
set retain=Oqtane.Modules.Admin.Login,Oqtane.Modules.HtmlText,Templates
for /D %%i in ("..\Oqtane.Server\bin\Release\net6.0\publish\wwwroot\Modules\*") do (
set /A found=0
for %%j in (%retain%) do (
if "%%~nxi" == "%%j" set /A found=1
)
if not !found! == 1 rmdir /Q/S "%%i"
)
set retain=Oqtane.Themes.BlazorTheme,Oqtane.Themes.OqtaneTheme,Templates
for /D %%i in ("..\Oqtane.Server\bin\Release\net6.0\publish\wwwroot\Themes\*") do (
set /A found=0
for %%j in (%retain%) do (
if "%%~nxi" == "%%j" set /A found=1
)
if not !found! == 1 rmdir /Q/S "%%i"
)
del "..\Oqtane.Server\bin\Release\net6.0\publish\appsettings.json"
ren "..\Oqtane.Server\bin\Release\net6.0\publish\appsettings.release.json" "appsettings.json"
C:\Windows\System32\WindowsPowerShell\v1.0\powershell.exe ".\install.ps1"
del "..\Oqtane.Server\bin\Release\net6.0\publish\appsettings.json"
del "..\Oqtane.Server\bin\Release\net6.0\publish\web.config"
C:\Windows\System32\WindowsPowerShell\v1.0\powershell.exe ".\upgrade.ps1"
dotnet clean -c Release ..\Oqtane.Updater.sln
dotnet build -c Release ..\Oqtane.Updater.sln
dotnet publish ..\Oqtane.Updater\Oqtane.Updater.csproj /p:Configuration=Release
nuget.exe pack Oqtane.Updater.nuspec
pause
and this is my modified version
dotnet clean -c Release ..\Oqtane.Databases.sln
dotnet clean -c Release ..\Oqtane.sln
dotnet build -c Release ..\Oqtane.Databases.sln
dotnet build -c Release ..\Oqtane.sln
nuget.exe pack Oqtane.Client.nuspec
nuget.exe pack Oqtane.Server.nuspec
nuget.exe pack Oqtane.Shared.nuspec
nuget.exe pack Oqtane.Framework.nuspec
del /F/Q/S "..\Oqtane.Server\bin\Release\net6.0\publish" > NUL
rmdir /Q/S "..\Oqtane.Server\bin\Release\net6.0\publish"
dotnet publish ..\Oqtane.Server\Oqtane.Server.csproj /p:Configuration=Release --runtime linux-x64 --self-contained true
del /F/Q/S "..\Oqtane.Server\bin\Release\net6.0\publish\wwwroot\Content" > NUL
rmdir /Q/S "..\Oqtane.Server\bin\Release\net6.0\publish\wwwroot\Content"
setlocal ENABLEDELAYEDEXPANSION
set retain=Oqtane.Modules.Admin.Login,Oqtane.Modules.HtmlText,Templates
for /D %%i in ("..\Oqtane.Server\bin\Release\net6.0\publish\wwwroot\Modules\*") do (
for %%j in (%retain%) do (
if "%%~nxi" == "%%j" set /A found=1
if not !found! == 1 rmdir /Q/S "%%i"
set retain=Oqtane.Themes.BlazorTheme,Oqtane.Themes.OqtaneTheme,Templates
for /D %%i in ("..\Oqtane.Server\bin\Release\net6.0\publish\wwwroot\Themes\*") do (
for %%j in (%retain%) do (
if "%%~nxi" == "%%j" set /A found=1
if not !found! == 1 rmdir /Q/S "%%i"
del "..\Oqtane.Server\bin\Release\net6.0\publish\appsettings.json"
ren "..\Oqtane.Server\bin\Release\net6.0\publish\appsettings.release.json" "appsettings.json"
C:\Windows\System32\WindowsPowerShell\v1.0\powershell.exe ".\install.ps1"
del "..\Oqtane.Server\bin\Release\net6.0\publish\appsettings.json"
del "..\Oqtane.Server\bin\Release\net6.0\publish\web.config"
C:\Windows\System32\WindowsPowerShell\v1.0\powershell.exe ".\upgrade.ps1"
dotnet clean -c Release ..\Oqtane.Updater.sln
dotnet build -c Release ..\Oqtane.Updater.sln
dotnet publish ..\Oqtane.Updater\Oqtane.Updater.csproj /p:Configuration=Release --runtime linux-x64 --self-contained true
del "*.nupkg"
del "*.zip"
dotnet clean -c Release ..\Oqtane.Databases.sln
dotnet clean -c Release ..\Oqtane.sln
dotnet build -c Release ..\Oqtane.Databases.sln
dotnet build -c Release ..\Oqtane.sln
nuget.exe pack Oqtane.Client.nuspec
nuget.exe pack Oqtane.Server.nuspec
nuget.exe pack Oqtane.Shared.nuspec
nuget.exe pack Oqtane.Framework.nuspec
del /F/Q/S "..\Oqtane.Server\bin\Release\net6.0\publish" > NUL
rmdir /Q/S "..\Oqtane.Server\bin\Release\net6.0\publish"
dotnet publish ..\Oqtane.Server\Oqtane.Server.csproj /p:Configuration=Release --runtime linux-x64 --self-contained true
del /F/Q/S "..\Oqtane.Server\bin\Release\net6.0\publish\wwwroot\Content" > NUL
rmdir /Q/S "..\Oqtane.Server\bin\Release\net6.0\publish\wwwroot\Content"
setlocal ENABLEDELAYEDEXPANSION
set retain=Oqtane.Modules.Admin.Login,Oqtane.Modules.HtmlText,Templates
for /D %%i in ("..\Oqtane.Server\bin\Release\net6.0\publish\wwwroot\Modules\*") do (
set /A found=0
for %%j in (%retain%) do (
if "%%~nxi" == "%%j" set /A found=1
)
if not !found! == 1 rmdir /Q/S "%%i"
)
set retain=Oqtane.Themes.BlazorTheme,Oqtane.Themes.OqtaneTheme,Templates
for /D %%i in ("..\Oqtane.Server\bin\Release\net6.0\publish\wwwroot\Themes\*") do (
set /A found=0
for %%j in (%retain%) do (
if "%%~nxi" == "%%j" set /A found=1
)
if not !found! == 1 rmdir /Q/S "%%i"
)
del "..\Oqtane.Server\bin\Release\net6.0\publish\appsettings.json"
ren "..\Oqtane.Server\bin\Release\net6.0\publish\appsettings.release.json" "appsettings.json"
C:\Windows\System32\WindowsPowerShell\v1.0\powershell.exe ".\install.ps1"
del "..\Oqtane.Server\bin\Release\net6.0\publish\appsettings.json"
del "..\Oqtane.Server\bin\Release\net6.0\publish\web.config"
C:\Windows\System32\WindowsPowerShell\v1.0\powershell.exe ".\upgrade.ps1"
dotnet clean -c Release ..\Oqtane.Updater.sln
dotnet build -c Release ..\Oqtane.Updater.sln
dotnet publish ..\Oqtane.Updater\Oqtane.Updater.csproj /p:Configuration=Release --runtime linux-x64 --self-contained true
pause
The script is basically the same I just appended the runtime target parameter and the self contained parameter, lie this: “-runtime linux-x64 –self-contained true” in the 2 lines specified below
line 13: dotnet publish ..\Oqtane.Server\Oqtane.Server.csproj /p:Configuration=Release --runtime linux-x64 --self-contained true
line 41: dotnet publish ..\Oqtane.Updater\Oqtane.Updater.csproj /p:Configuration=Release --runtime linux-x64 --self-contained true
line 13: dotnet publish ..\Oqtane.Server\Oqtane.Server.csproj /p:Configuration=Release --runtime linux-x64 --self-contained true
line 41: dotnet publish ..\Oqtane.Updater\Oqtane.Updater.csproj /p:Configuration=Release --runtime linux-x64 --self-contained true
line 13: dotnet publish ..\Oqtane.Server\Oqtane.Server.csproj /p:Configuration=Release --runtime linux-x64 --self-contained true
line 41: dotnet publish ..\Oqtane.Updater\Oqtane.Updater.csproj /p:Configuration=Release --runtime linux-x64 --self-contained true
After I changed the publishing parameters the path of the published files changed, now they are in a folder that with the same name of the target runtime, that means that I need to update 2 more files “install.ps1” and “upgrade.ps1”
install.ps1
Compress-Archive -Path "..\Oqtane.Server\bin\Release\net6.0\linux-x64\publish\*" -DestinationPath "Oqtane.Framework.3.4.0.Install.zip" -Force
Compress-Archive -Path "..\Oqtane.Server\bin\Release\net6.0\linux-x64\publish\*" -DestinationPath "Oqtane.Framework.3.4.0.Install.zip" -Force
Compress-Archive -Path "..\Oqtane.Server\bin\Release\net6.0\linux-x64\publish\*" -DestinationPath "Oqtane.Framework.3.4.0.Install.zip" -Force
upgrade.ps1
Compress-Archive -Path "..\Oqtane.Server\bin\Release\net6.0\linux-x64\publish\*" -DestinationPath "Oqtane.Framework.3.4.0.Upgrade.zip" -Force
Compress-Archive -Path "..\Oqtane.Server\bin\Release\net6.0\linux-x64\publish\*" -DestinationPath "Oqtane.Framework.3.4.0.Upgrade.zip" -Force
Compress-Archive -Path "..\Oqtane.Server\bin\Release\net6.0\linux-x64\publish\*" -DestinationPath "Oqtane.Framework.3.4.0.Upgrade.zip" -Force
So after those little changes we are ready to compile oqtane to target Linux runtime as a self contained app

by Joche Ojeda | Nov 24, 2022 | Uncategorized
Modern AspNetCore applications use the built-in web server kestrel,this server is usually bound to the localhost address using the ports 5000 and 5001 for http and https.
But what if you want to run 2 applications in the same server? then you have a problem because if you use the default ports one of the applications will not start correctly.
This can easily be solved by changing the default ports in your WebHostBuilder as shown below
public static IHostBuilder CreateHostBuilder(string[] args) =>
Host.CreateDefaultBuilder(args)
.ConfigureWebHostDefaults(webBuilder => {
webBuilder.UseUrls("http://0.0.0.0:8016");
webBuilder.UseStartup<Startup>();
public static IHostBuilder CreateHostBuilder(string[] args) =>
    Host.CreateDefaultBuilder(args)
   .ConfigureWebHostDefaults(webBuilder => {
       webBuilder.UseUrls("http://0.0.0.0:8016");
       webBuilder.UseStartup<Startup>();
   });
public static IHostBuilder CreateHostBuilder(string[] args) =>
Host.CreateDefaultBuilder(args)
.ConfigureWebHostDefaults(webBuilder => {
webBuilder.UseUrls("http://0.0.0.0:8016");
webBuilder.UseStartup<Startup>();
});
The problem with the example above is that the URLs are hardcoded, so here is a better solution
public static IHostBuilder CreateHostBuilder(string[] args) =>
Host.CreateDefaultBuilder(args)
.ConfigureWebHostDefaults(webBuilder => {
var config = new ConfigurationBuilder()
.SetBasePath(Directory.GetCurrentDirectory())
.AddJsonFile("hosting.json", optional: true)
.AddJsonFile("appsettings.json", optional: true, reloadOnChange: true)
.AddEnvironmentVariables()
webBuilder.UseUrls(config["server.urls"]);
webBuilder.UseStartup<Startup>();
public static IHostBuilder CreateHostBuilder(string[] args) =>
  Host.CreateDefaultBuilder(args)
  .ConfigureWebHostDefaults(webBuilder => {
      var config = new ConfigurationBuilder()
      .SetBasePath(Directory.GetCurrentDirectory())
      .AddJsonFile("hosting.json", optional: true)
      .AddJsonFile("appsettings.json", optional: true, reloadOnChange: true)
      .AddCommandLine(args)
      .AddEnvironmentVariables()
      .Build();

      webBuilder.UseUrls(config["server.urls"]);
      webBuilder.UseStartup<Startup>();
  });
public static IHostBuilder CreateHostBuilder(string[] args) =>
Host.CreateDefaultBuilder(args)
.ConfigureWebHostDefaults(webBuilder => {
var config = new ConfigurationBuilder()
.SetBasePath(Directory.GetCurrentDirectory())
.AddJsonFile("hosting.json", optional: true)
.AddJsonFile("appsettings.json", optional: true, reloadOnChange: true)
.AddCommandLine(args)
.AddEnvironmentVariables()
.Build();
webBuilder.UseUrls(config["server.urls"]);
webBuilder.UseStartup<Startup>();
});
the example above uses a configuration builder to merge the appsettings.json and the hosting.json in a single configuration object, then with use the value of the property “server.urls” as base URL/port for our application
Here is the content of the hosting.json file
"server.urls": "http://0.0.0.0:8016"
{
    "server.urls": "http://0.0.0.0:8016"
}
{
"server.urls": "http://0.0.0.0:8016"
}

by Joche Ojeda | Nov 24, 2022 | Uncategorized
Sometime we want to reuse our Blazor components in another apps, the best way to do this is to create a razor library, this process of create a razor library is not different from create a normal class library to share code. There is only one exception, razor components might need to reference JavaScript or CSS files. This problem can be easily solve in 2 steps as shown below.
1) Create a class that inherits from TagHelperComponent,,this class should include the tags that you want to include in the html header section of your app
using Microsoft.AspNetCore.Html;
using Microsoft.AspNetCore.Razor.TagHelpers;
using System.Collections.Generic;
using System.Threading.Tasks;
[HtmlTargetElement("head")]
public class MyTagHelper: TagHelperComponent
<script src=""_content/ZXingBlazor/lib/barcodereader/zxing.js""></script>
<script src = ""_content/ZXingBlazor/lib/barcodereader/barcode.js"" ></ script >
<script src = ""_content/Mobsites.Blazor.SignaturePad/bundle.js"" ></ script >
< link href=""_content/Mobsites.Blazor.SignaturePad/bundle.css"" rel=""stylesheet"" />
< link href=""_content/Ultra.PropertyEditors.Module.Blazor/js/signaturepropertyeditor.js""/>
<link href = ""//cdn.quilljs.com/1.3.6/quill.snow.css"" rel=""stylesheet"">
<link href = ""//cdn.quilljs.com/1.3.6/quill.bubble.css"" rel=""stylesheet"">
<script src = ""https://cdn.quilljs.com/1.3.6/quill.js"" ></ script >
<script src=""_content/Blazored.TextEditor/quill-blot-formatter.min.js""></script>
<script src = ""_content/Blazored.TextEditor/Blazored-BlazorQuill.js"" ></ script >
public override Task ProcessAsync(TagHelperContext context, TagHelperOutput output)
if (string.Equals(context.TagName, "head", StringComparison.OrdinalIgnoreCase))
output.PostContent.AppendHtml(Tags).AppendLine();
return Task.CompletedTask;
using Microsoft.AspNetCore.Html;
using Microsoft.AspNetCore.Razor.TagHelpers;
using System;
using System.Collections.Generic;
using System.Linq;
using System.Text;
using System.Threading.Tasks;


namespace MyBlazorApp
{
  [HtmlTargetElement("head")]
  public class MyTagHelper: TagHelperComponent
  {
    private string Tags=
@"
        <!-- ZXingBlazor -->
        <script src=""_content/ZXingBlazor/lib/barcodereader/zxing.js""></script>
        <script src = ""_content/ZXingBlazor/lib/barcodereader/barcode.js"" ></ script >
        < !--ZXingBlazor-- >
        < !--Signature Pad  -->
        <script src = ""_content/Mobsites.Blazor.SignaturePad/bundle.js"" ></ script >
        < link href=""_content/Mobsites.Blazor.SignaturePad/bundle.css"" rel=""stylesheet"" />
        < link href=""_content/Ultra.PropertyEditors.Module.Blazor/js/signaturepropertyeditor.js""/>
        <!-- Signature Pad  -->
        <!-- HTML Editor  -->
        <link href = ""//cdn.quilljs.com/1.3.6/quill.snow.css"" rel=""stylesheet"">
        <link href = ""//cdn.quilljs.com/1.3.6/quill.bubble.css"" rel=""stylesheet"">
        <script src = ""https://cdn.quilljs.com/1.3.6/quill.js"" ></ script >
        <script src=""_content/Blazored.TextEditor/quill-blot-formatter.min.js""></script>
        <script src = ""_content/Blazored.TextEditor/Blazored-BlazorQuill.js"" ></ script >
        < !--HTML Editor  -->
";
    public override Task ProcessAsync(TagHelperContext context, TagHelperOutput output)
    {
      if (string.Equals(context.TagName, "head", StringComparison.OrdinalIgnoreCase))
      {
        output.PostContent.AppendHtml(Tags).AppendLine();
      }
      return Task.CompletedTask;
    }
  }
}
using Microsoft.AspNetCore.Html;
using Microsoft.AspNetCore.Razor.TagHelpers;
using System;
using System.Collections.Generic;
using System.Linq;
using System.Text;
using System.Threading.Tasks;
namespace MyBlazorApp
{
[HtmlTargetElement("head")]
public class MyTagHelper: TagHelperComponent
{
private string Tags=
@"
<!-- ZXingBlazor -->
<script src=""_content/ZXingBlazor/lib/barcodereader/zxing.js""></script>
<script src = ""_content/ZXingBlazor/lib/barcodereader/barcode.js"" ></ script >
< !--ZXingBlazor-- >
< !--Signature Pad -->
<script src = ""_content/Mobsites.Blazor.SignaturePad/bundle.js"" ></ script >
< link href=""_content/Mobsites.Blazor.SignaturePad/bundle.css"" rel=""stylesheet"" />
< link href=""_content/Ultra.PropertyEditors.Module.Blazor/js/signaturepropertyeditor.js""/>
<!-- Signature Pad -->
<!-- HTML Editor -->
<link href = ""//cdn.quilljs.com/1.3.6/quill.snow.css"" rel=""stylesheet"">
<link href = ""//cdn.quilljs.com/1.3.6/quill.bubble.css"" rel=""stylesheet"">
<script src = ""https://cdn.quilljs.com/1.3.6/quill.js"" ></ script >
<script src=""_content/Blazored.TextEditor/quill-blot-formatter.min.js""></script>
<script src = ""_content/Blazored.TextEditor/Blazored-BlazorQuill.js"" ></ script >
< !--HTML Editor -->
";
public override Task ProcessAsync(TagHelperContext context, TagHelperOutput output)
{
if (string.Equals(context.TagName, "head", StringComparison.OrdinalIgnoreCase))
{
output.PostContent.AppendHtml(Tags).AppendLine();
}
return Task.CompletedTask;
}
}
}
*Note: to reference JavaScript or CSS from any razor library you can use the following syntax,please notice the doble quotes.
<script src=""_content/MyAssemblyName/PathToMyJavaScript/MyJavaScriptFile.js""></script>
<script src=""_content/MyAssemblyName/PathToMyJavaScript/MyJavaScriptFile.js""></script>
<script src=""_content/MyAssemblyName/PathToMyJavaScript/MyJavaScriptFile.js""></script>
2) Create an extension method in the “Microsoft.Extensions.DependencyInjection” namespace so you can easily add your tag helper to the service collection
using Microsoft.AspNetCore.Razor.TagHelpers;
using Microsoft.Extensions.DependencyInjection;
using System.Collections.Generic;
using System.Threading.Tasks;
namespace Microsoft.Extensions.DependencyInjection
public static class StartupExtensions
public static IServiceCollection AddMyHtmlTags(this IServiceCollection services)
services.AddTransient<ITagHelperComponent, MyTagHelper>();
using Microsoft.AspNetCore.Razor.TagHelpers;
using Microsoft.Extensions.DependencyInjection;
using System;
using System.Collections.Generic;
using System.Linq;
using System.Text;
using System.Threading.Tasks;

namespace Microsoft.Extensions.DependencyInjection
{
  public static class StartupExtensions
  {
    public static IServiceCollection AddMyHtmlTags(this IServiceCollection services)
    {
      services.AddTransient<ITagHelperComponent, MyTagHelper>();
      return services;
    }
  }
}
using Microsoft.AspNetCore.Razor.TagHelpers;
using Microsoft.Extensions.DependencyInjection;
using System;
using System.Collections.Generic;
using System.Linq;
using System.Text;
using System.Threading.Tasks;
namespace Microsoft.Extensions.DependencyInjection
{
public static class StartupExtensions
{
public static IServiceCollection AddMyHtmlTags(this IServiceCollection services)
{
services.AddTransient<ITagHelperComponent, MyTagHelper>();
return services;
}
}
}
Here is an example on how to use your new extension in your startup class
public void ConfigureServices(IServiceCollection services
services.AddMyHtmlTags();
 public void ConfigureServices(IServiceCollection services
 {
   services.AddMyHtmlTags();
 }
public void ConfigureServices(IServiceCollection services
{
services.AddMyHtmlTags();
}