
by Joche Ojeda | Mar 13, 2025 | netcore, Uno Platform
For the past two weeks, I’ve been experimenting with the Uno Platform in two ways: creating small prototypes to explore features I’m curious about and downloading example applications from the Uno Gallery. In this article, I’ll explain the first steps you need to take when creating an Uno Platform application, the decisions you’ll face, and what I’ve found useful so far in my journey.
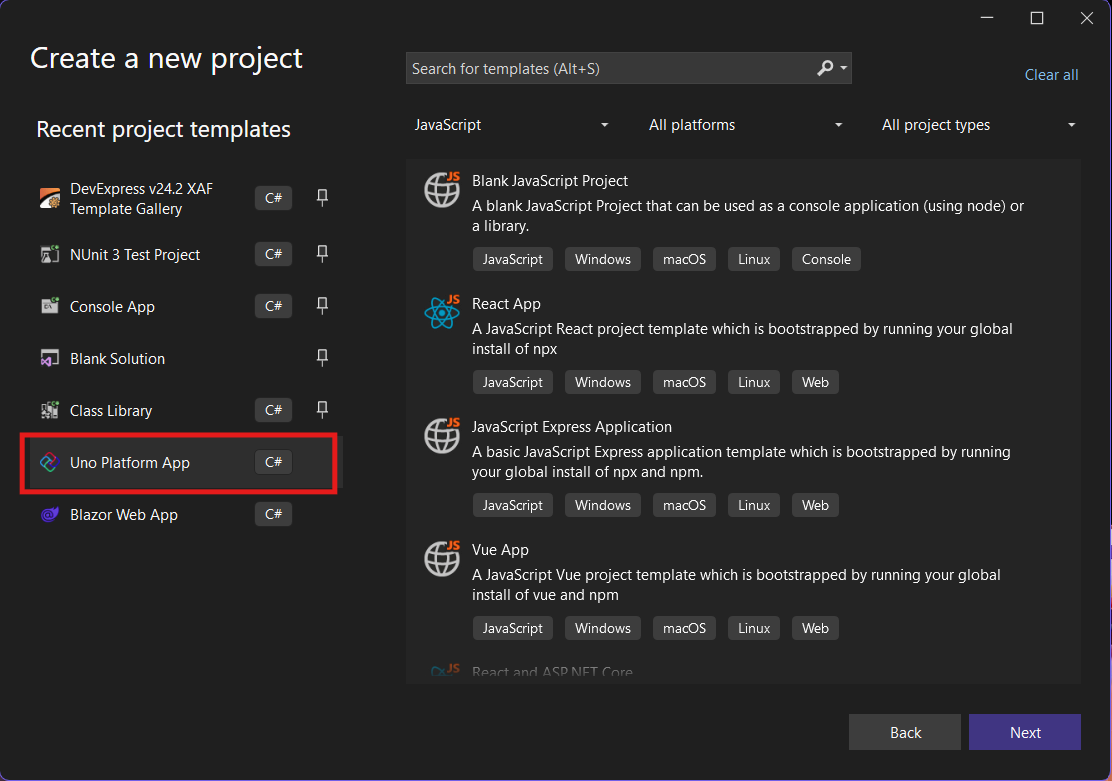
Step 1: Create a New Project
I’m using Visual Studio 2022, though the extensions and templates work well with previous versions too. I have both studio versions installed, and Uno Platform works well in both.
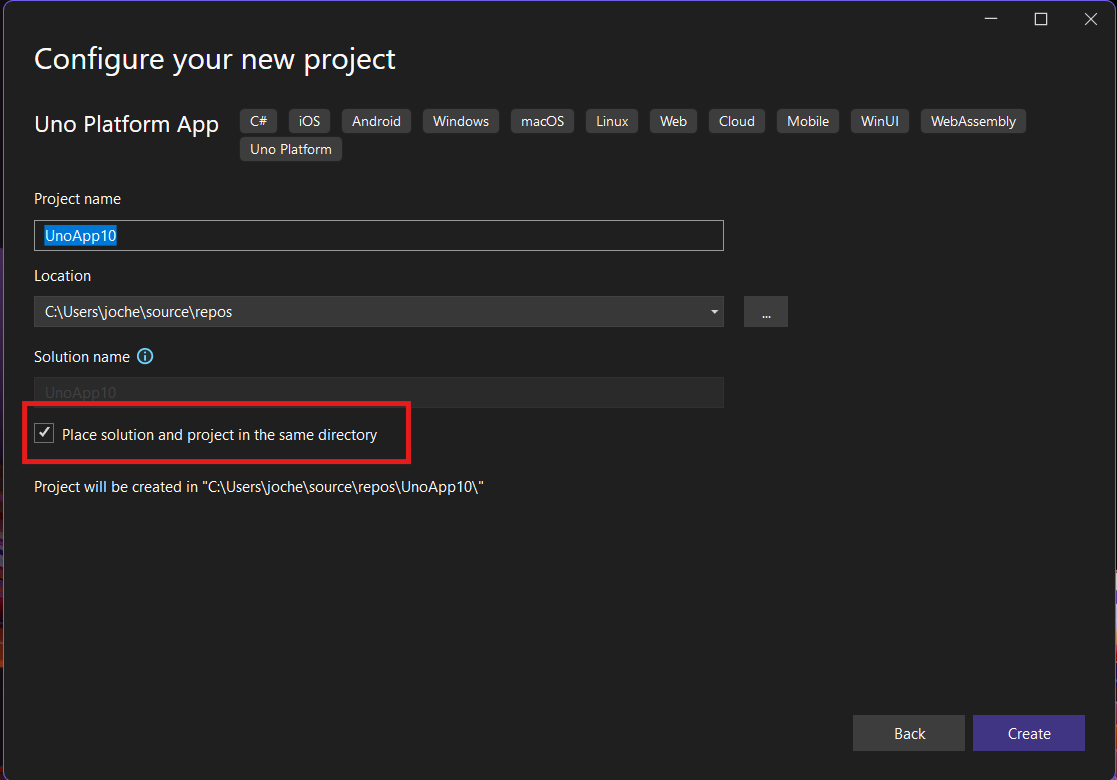
Step 2: Project Setup
After naming your project, it’s important to select “Place solution and project in the same directory” because of the solution layout requirements. You need the directory properties file to move forward. I’ll talk more about the solution structure in a future post, but for now, know that without checking this option, you won’t be able to proceed properly.
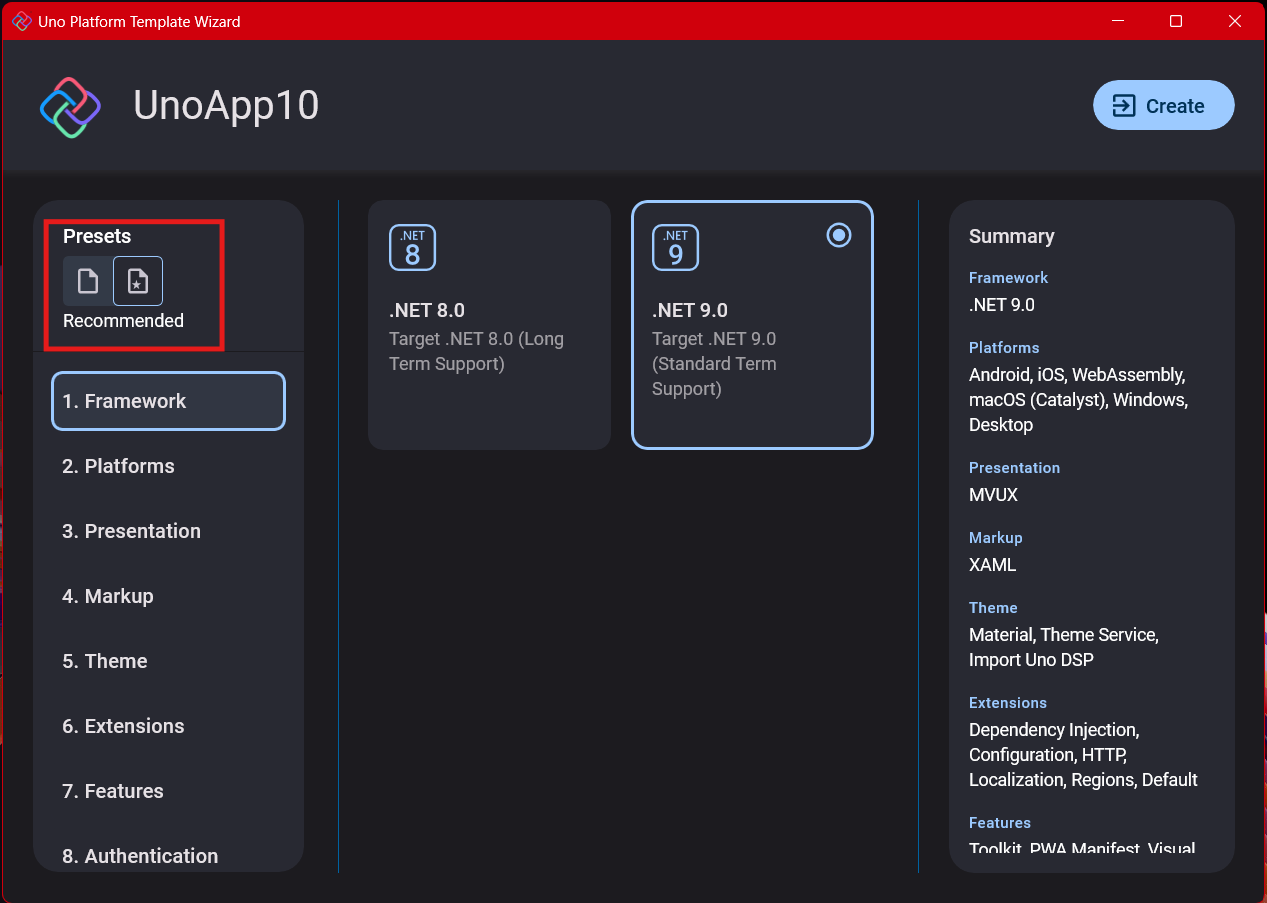
Step 3: The Configuration Wizard
The Uno Platform team has created a comprehensive wizard that guides you through various configuration options. It might seem overwhelming at first, but it’s better to have this guided approach where you can make one decision at a time.
Your first decision is which target framework to use. They recommend .NET 9, which I like, but in my test project, I’m working with .NET 8 because I’m primarily focused on WebAssembly output. Uno offers multi-threading in Web Assembly with .NET 8, which is why I chose it, but for new projects, .NET 9 is likely the better choice.
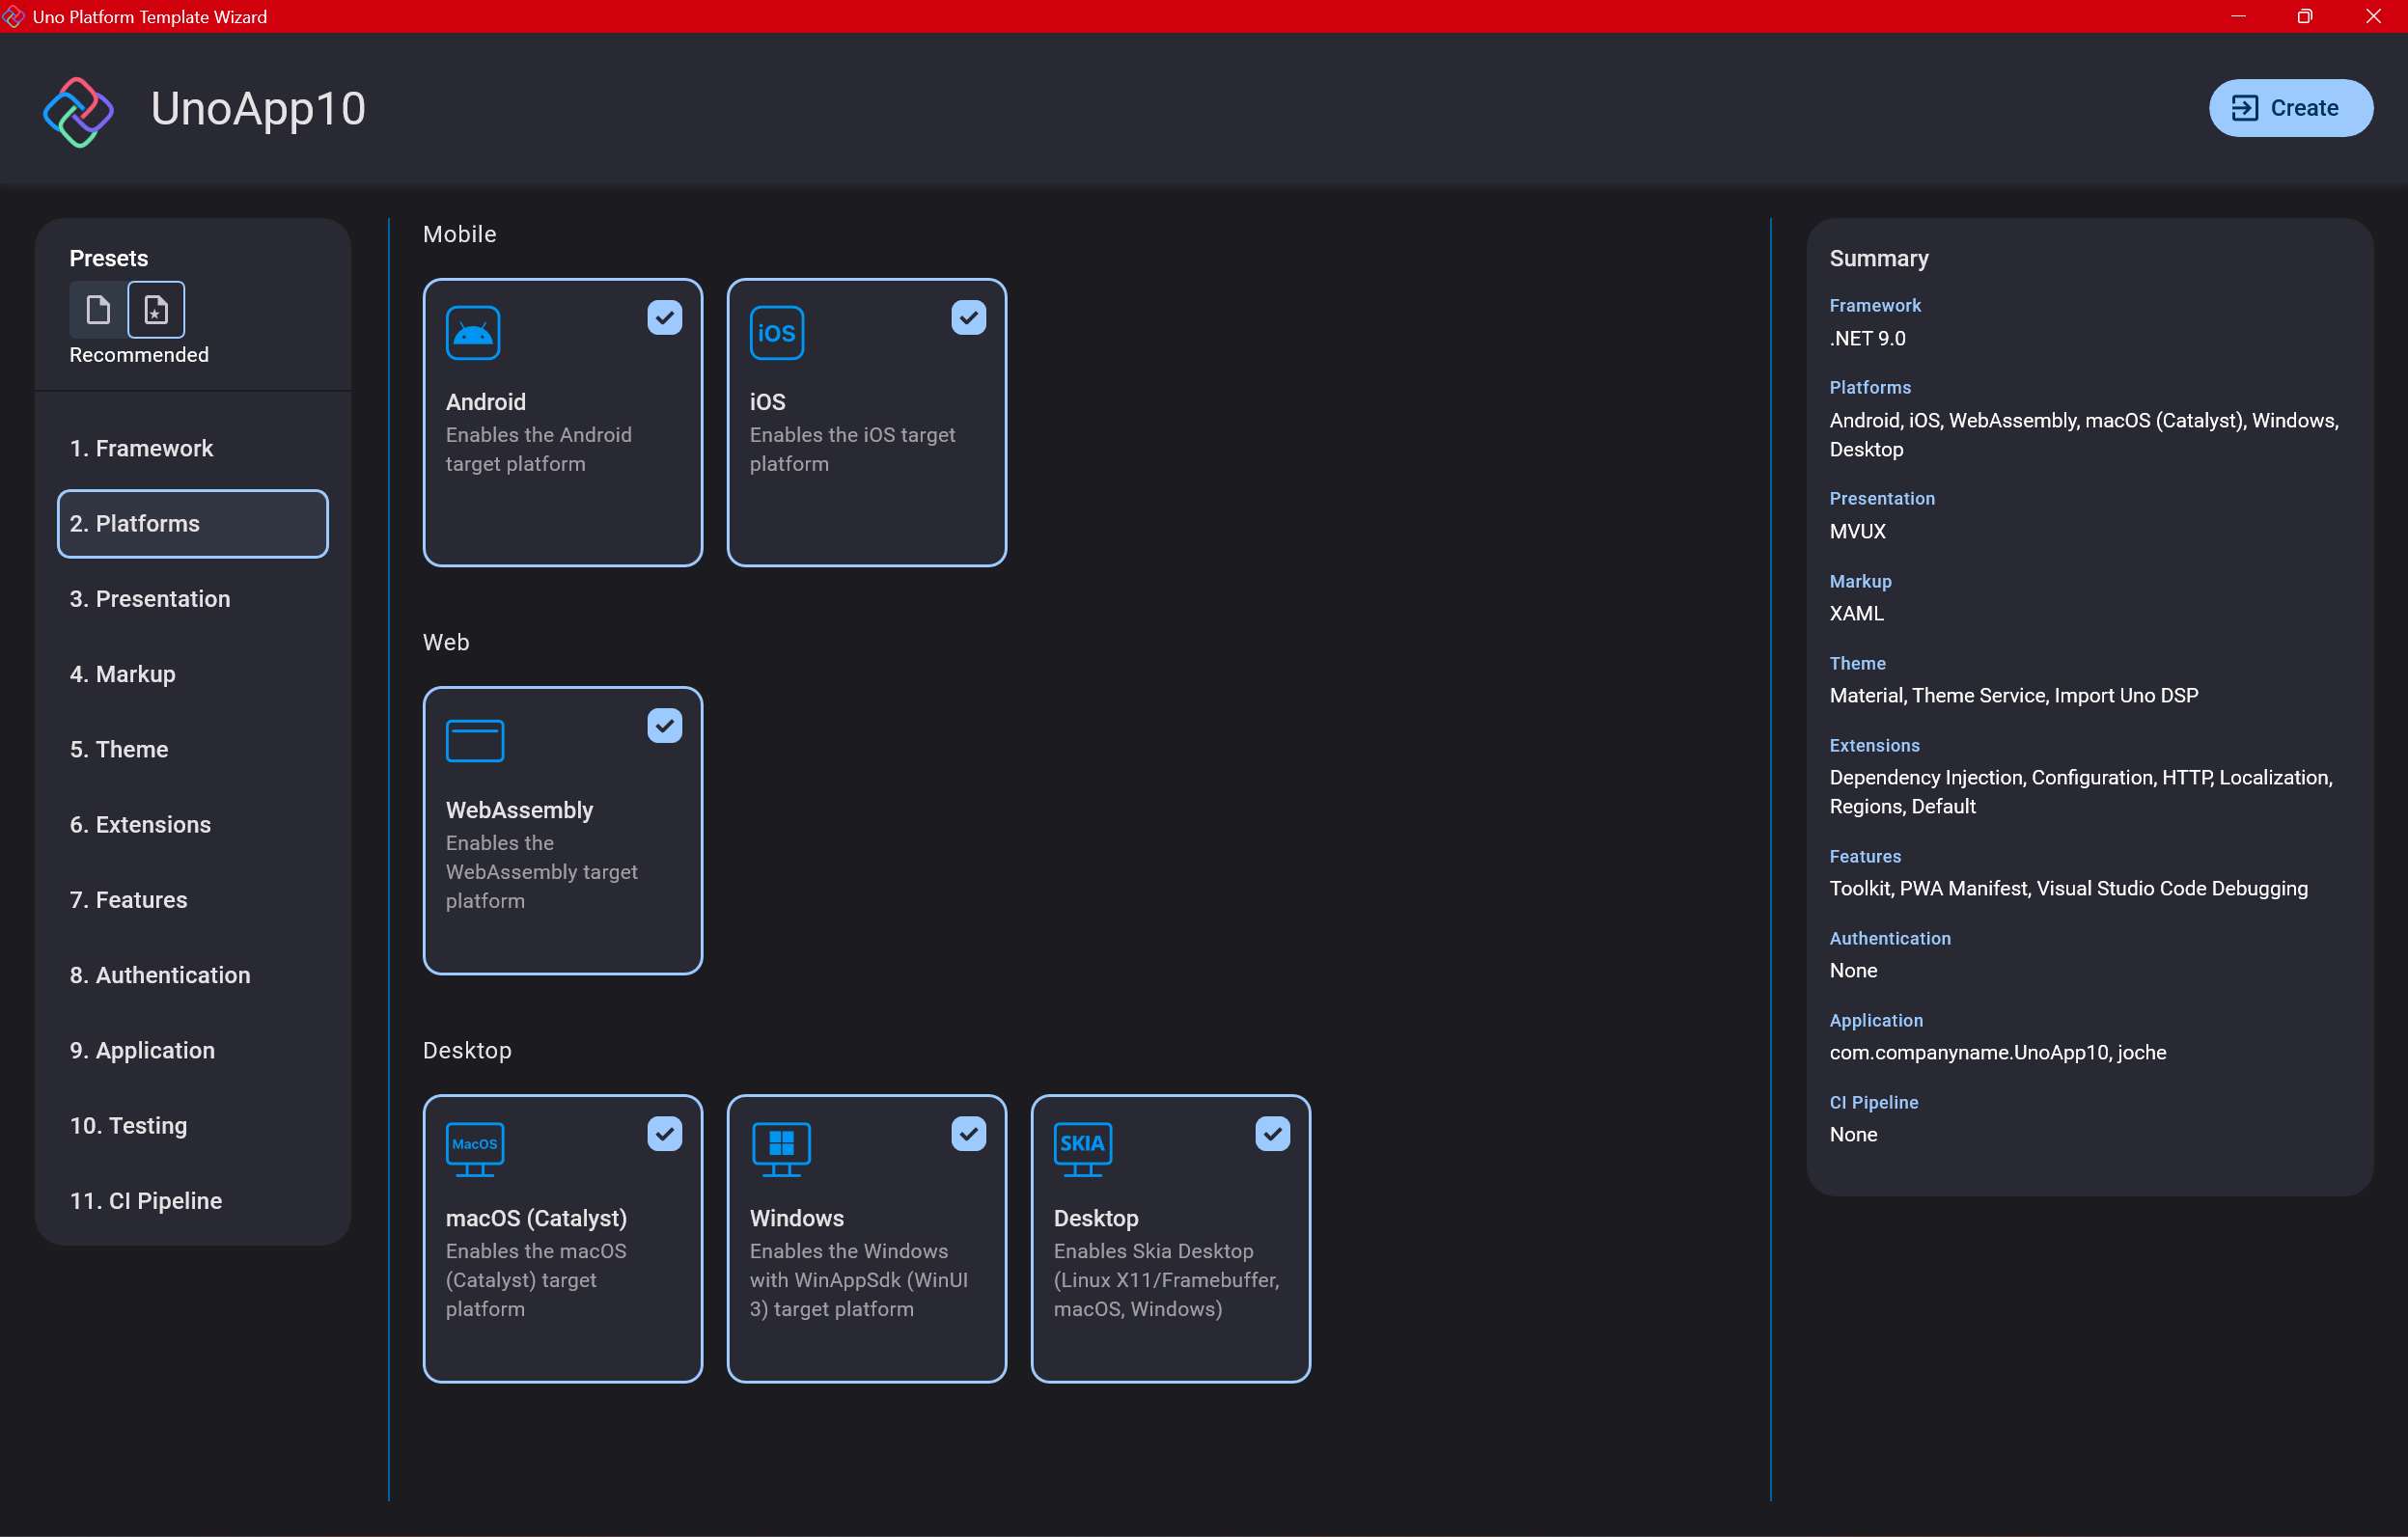
Step 4: Target Platforms
Next, you need to select which platforms you want to target. I always select all of them because the most beautiful aspect of the Uno Platform is true multi-targeting with a single codebase.
In the past (during the Xamarin era), you needed multiple projects with a complex directory structure. With Uno, it’s actually a single unified project, creating a clean solution layout. So while you can select just WebAssembly if that’s your only focus, I think you get the most out of Uno by multi-targeting.
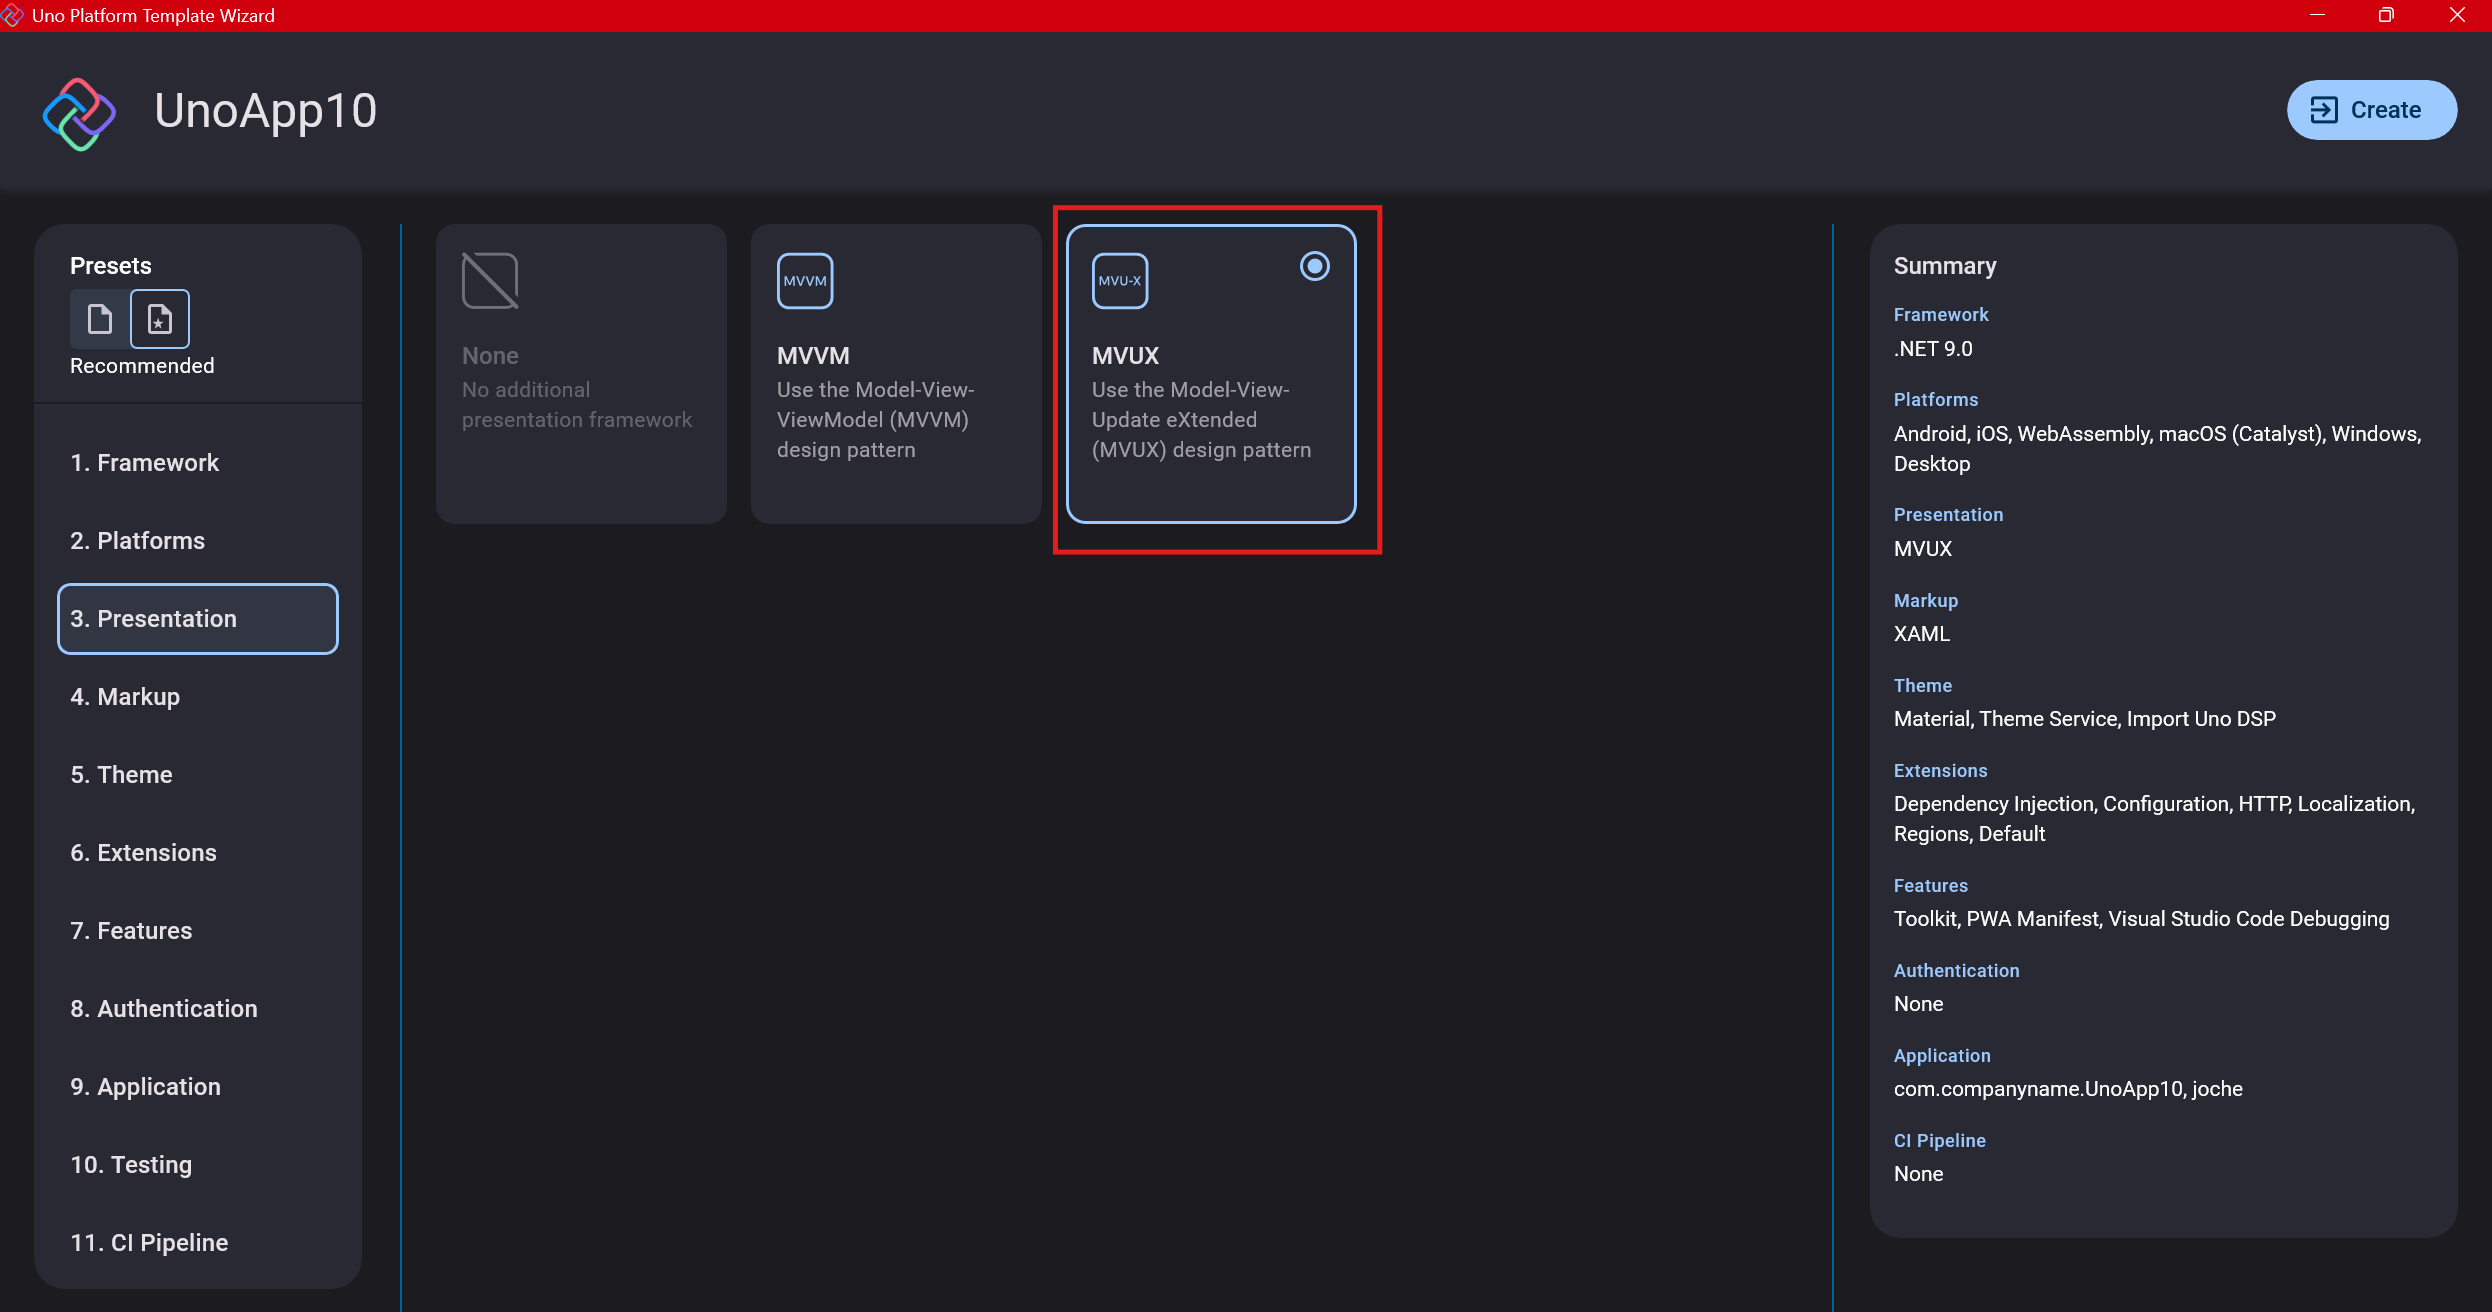
Step 5: Presentation Pattern
The next question is which presentation pattern you want to use. I would suggest MVUX, though I still have some doubts as I haven’t tried MVVM with Uno yet. MVVM is the more common pattern that most programmers understand, while MVUX is the new approach.
One challenge is that when you check the official Uno sample repository, the examples come in every presentation pattern flavor. Sometimes you’ll find a solution for your task in one pattern but not another, so you may need to translate between them. You’ll likely find more examples using MVVM.
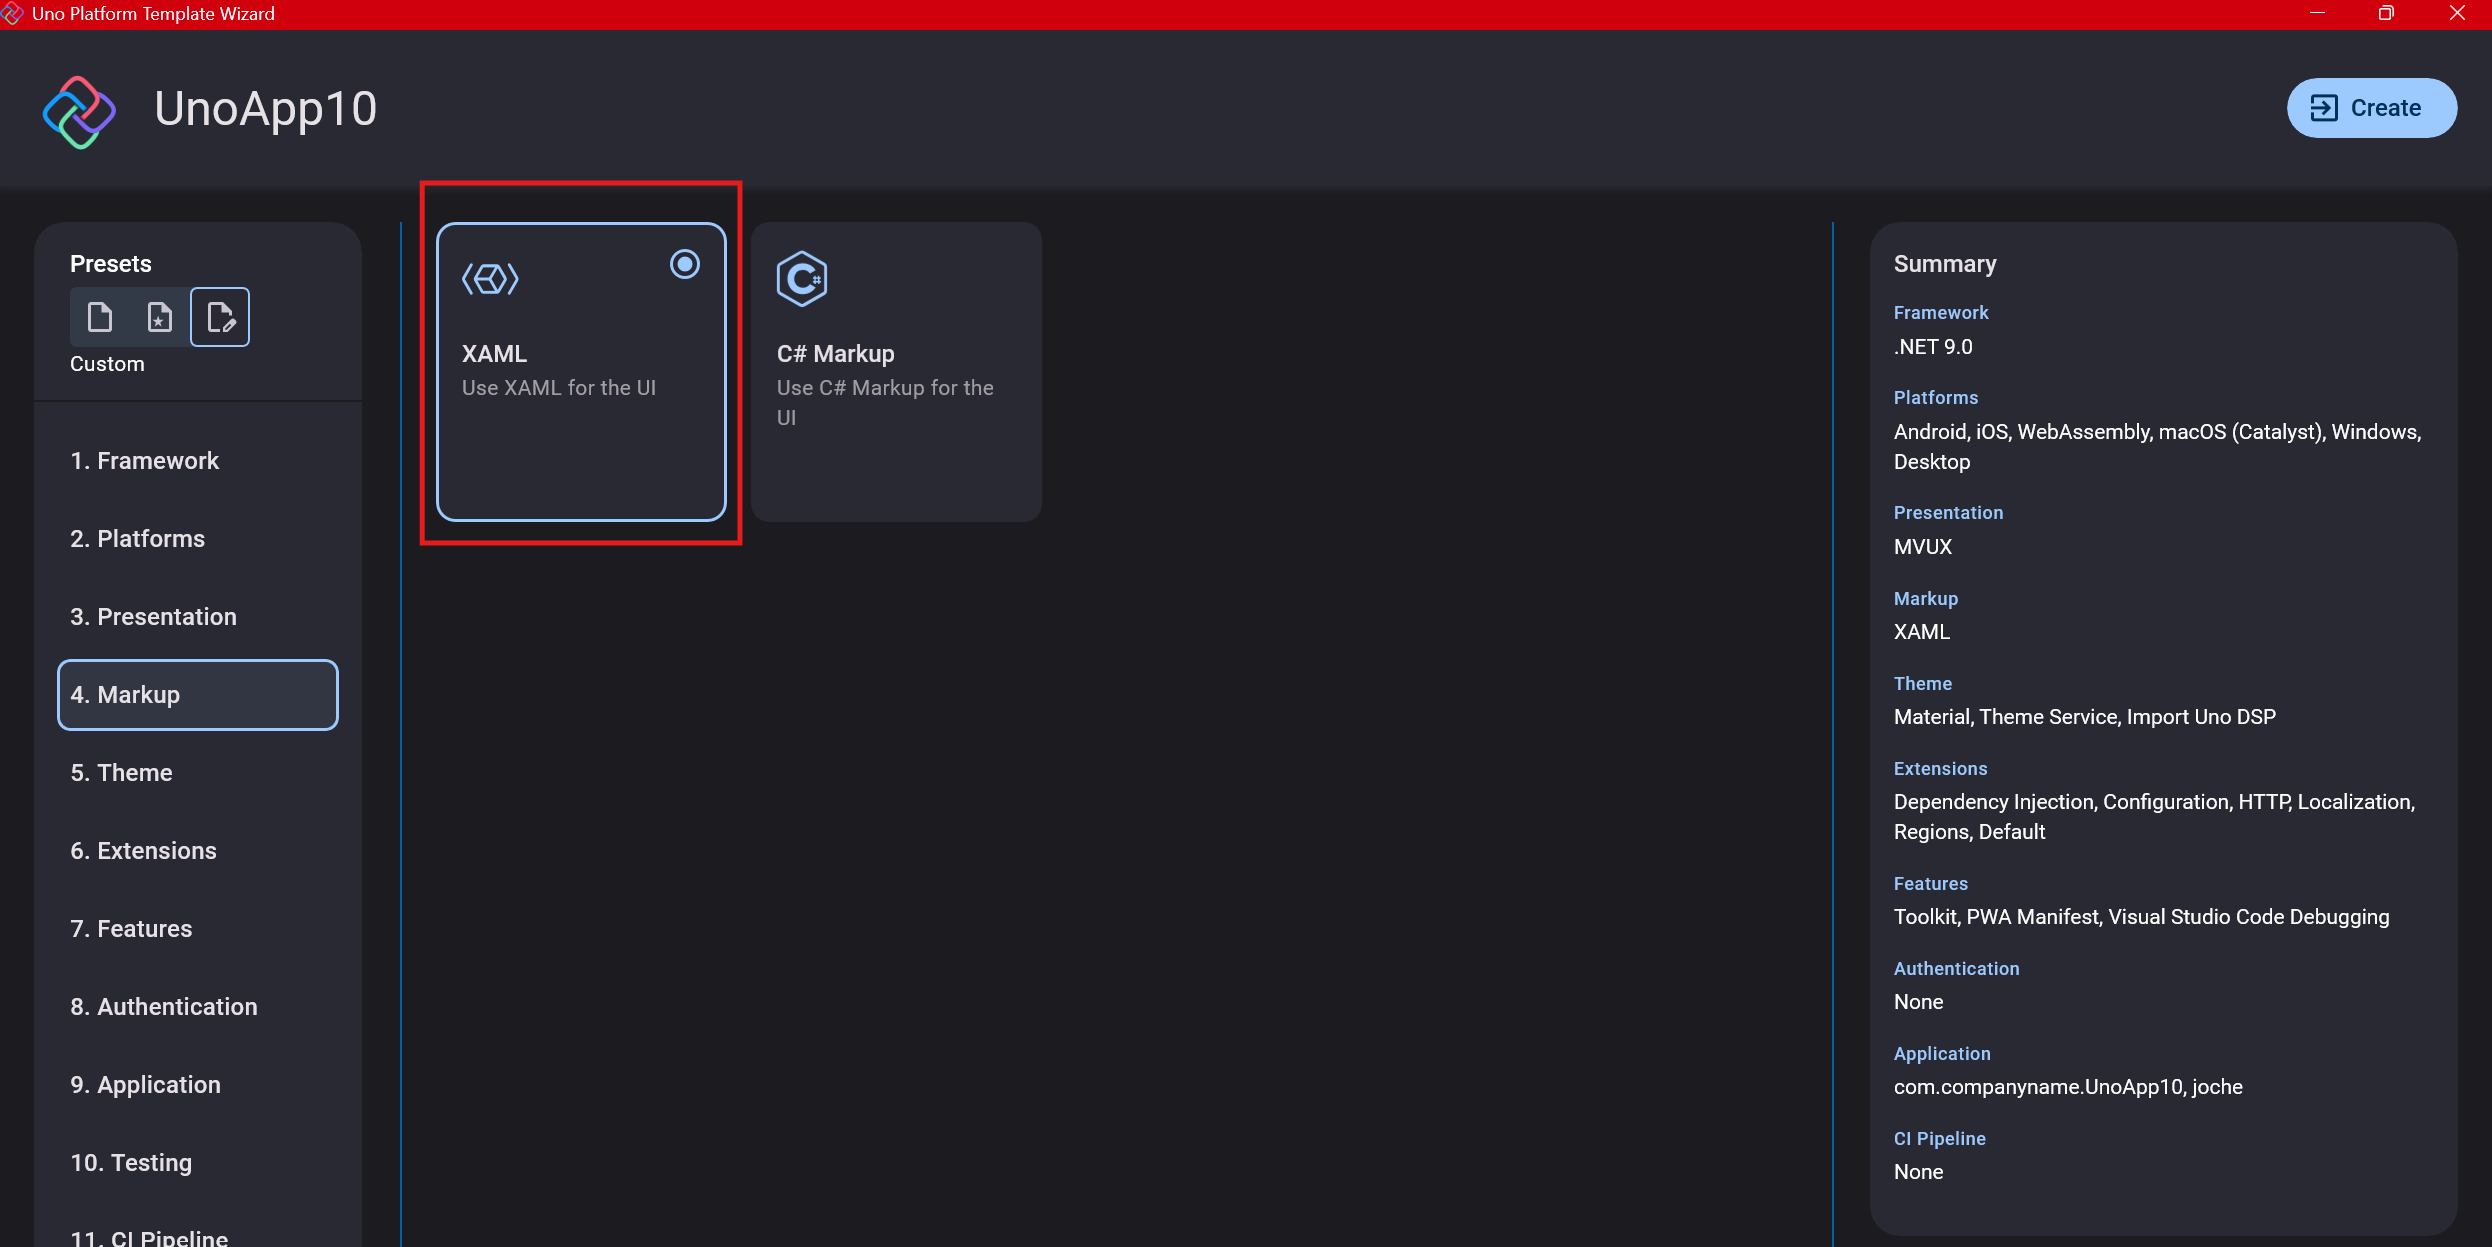
Step 6: Markup Language
For markup, I recommend selecting XAML. In my first project, I tried using C# markup, which worked well until I reached some roadblocks I couldn’t overcome. I didn’t want to get stuck trying to solve one specific layout issue, so I switched. For beginners, I suggest starting with XAML.
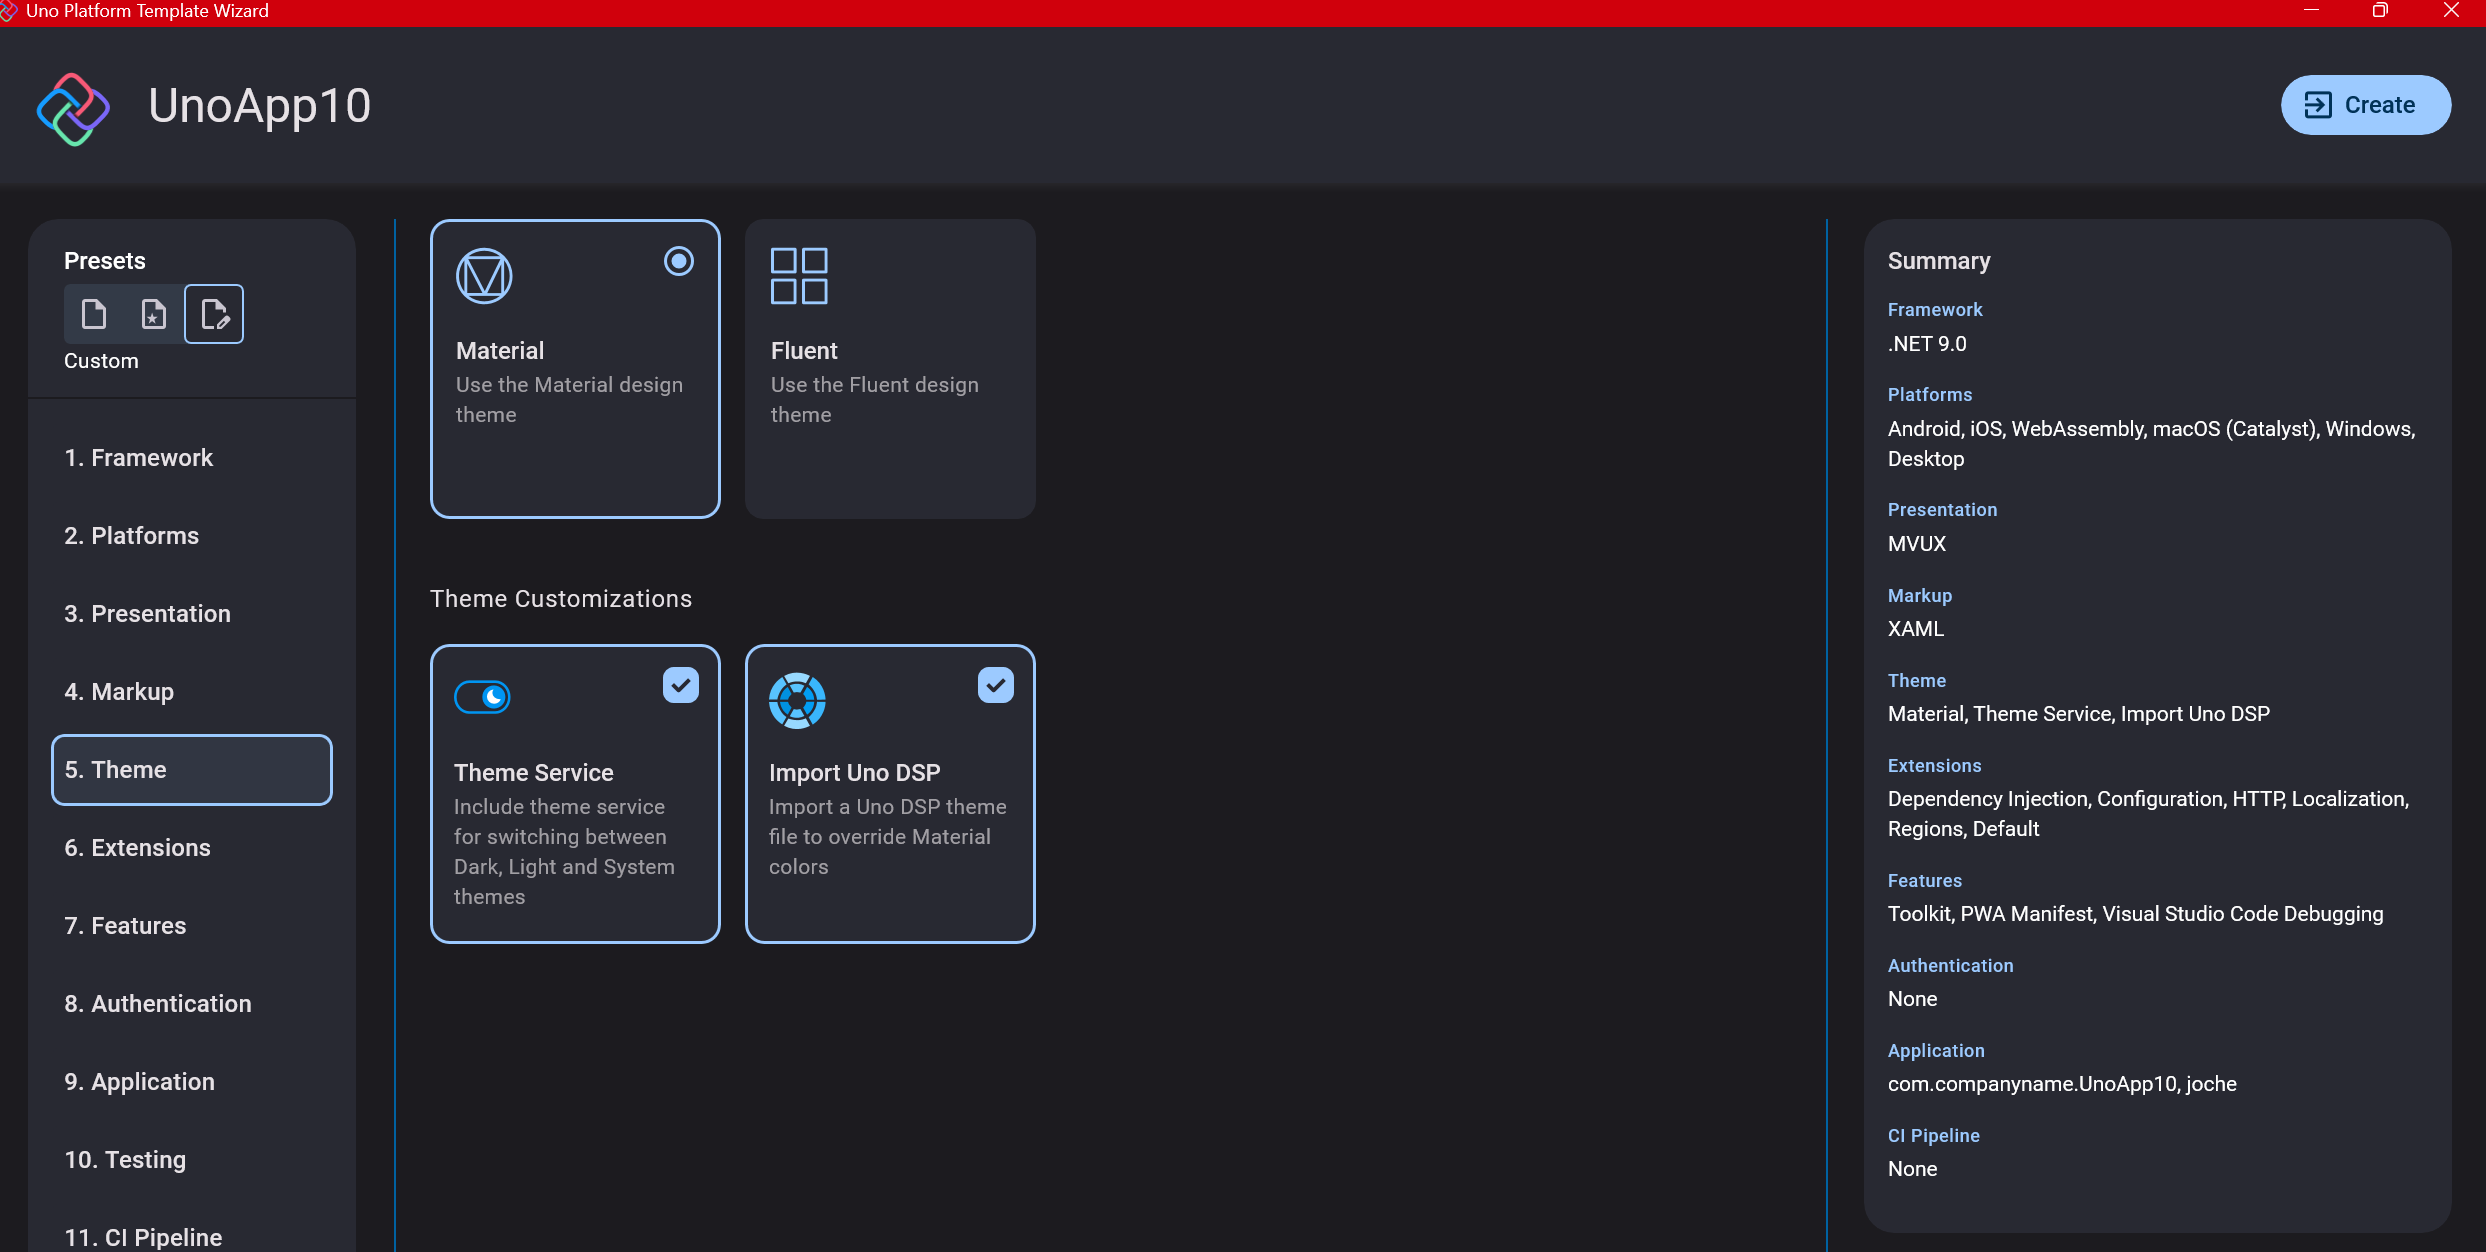
Step 7: Theming
For theming, you’ll need to select a UI theme. I don’t have a strong preference here and typically stick with the defaults: using Material Design, the theme service, and importing Uno DSP.
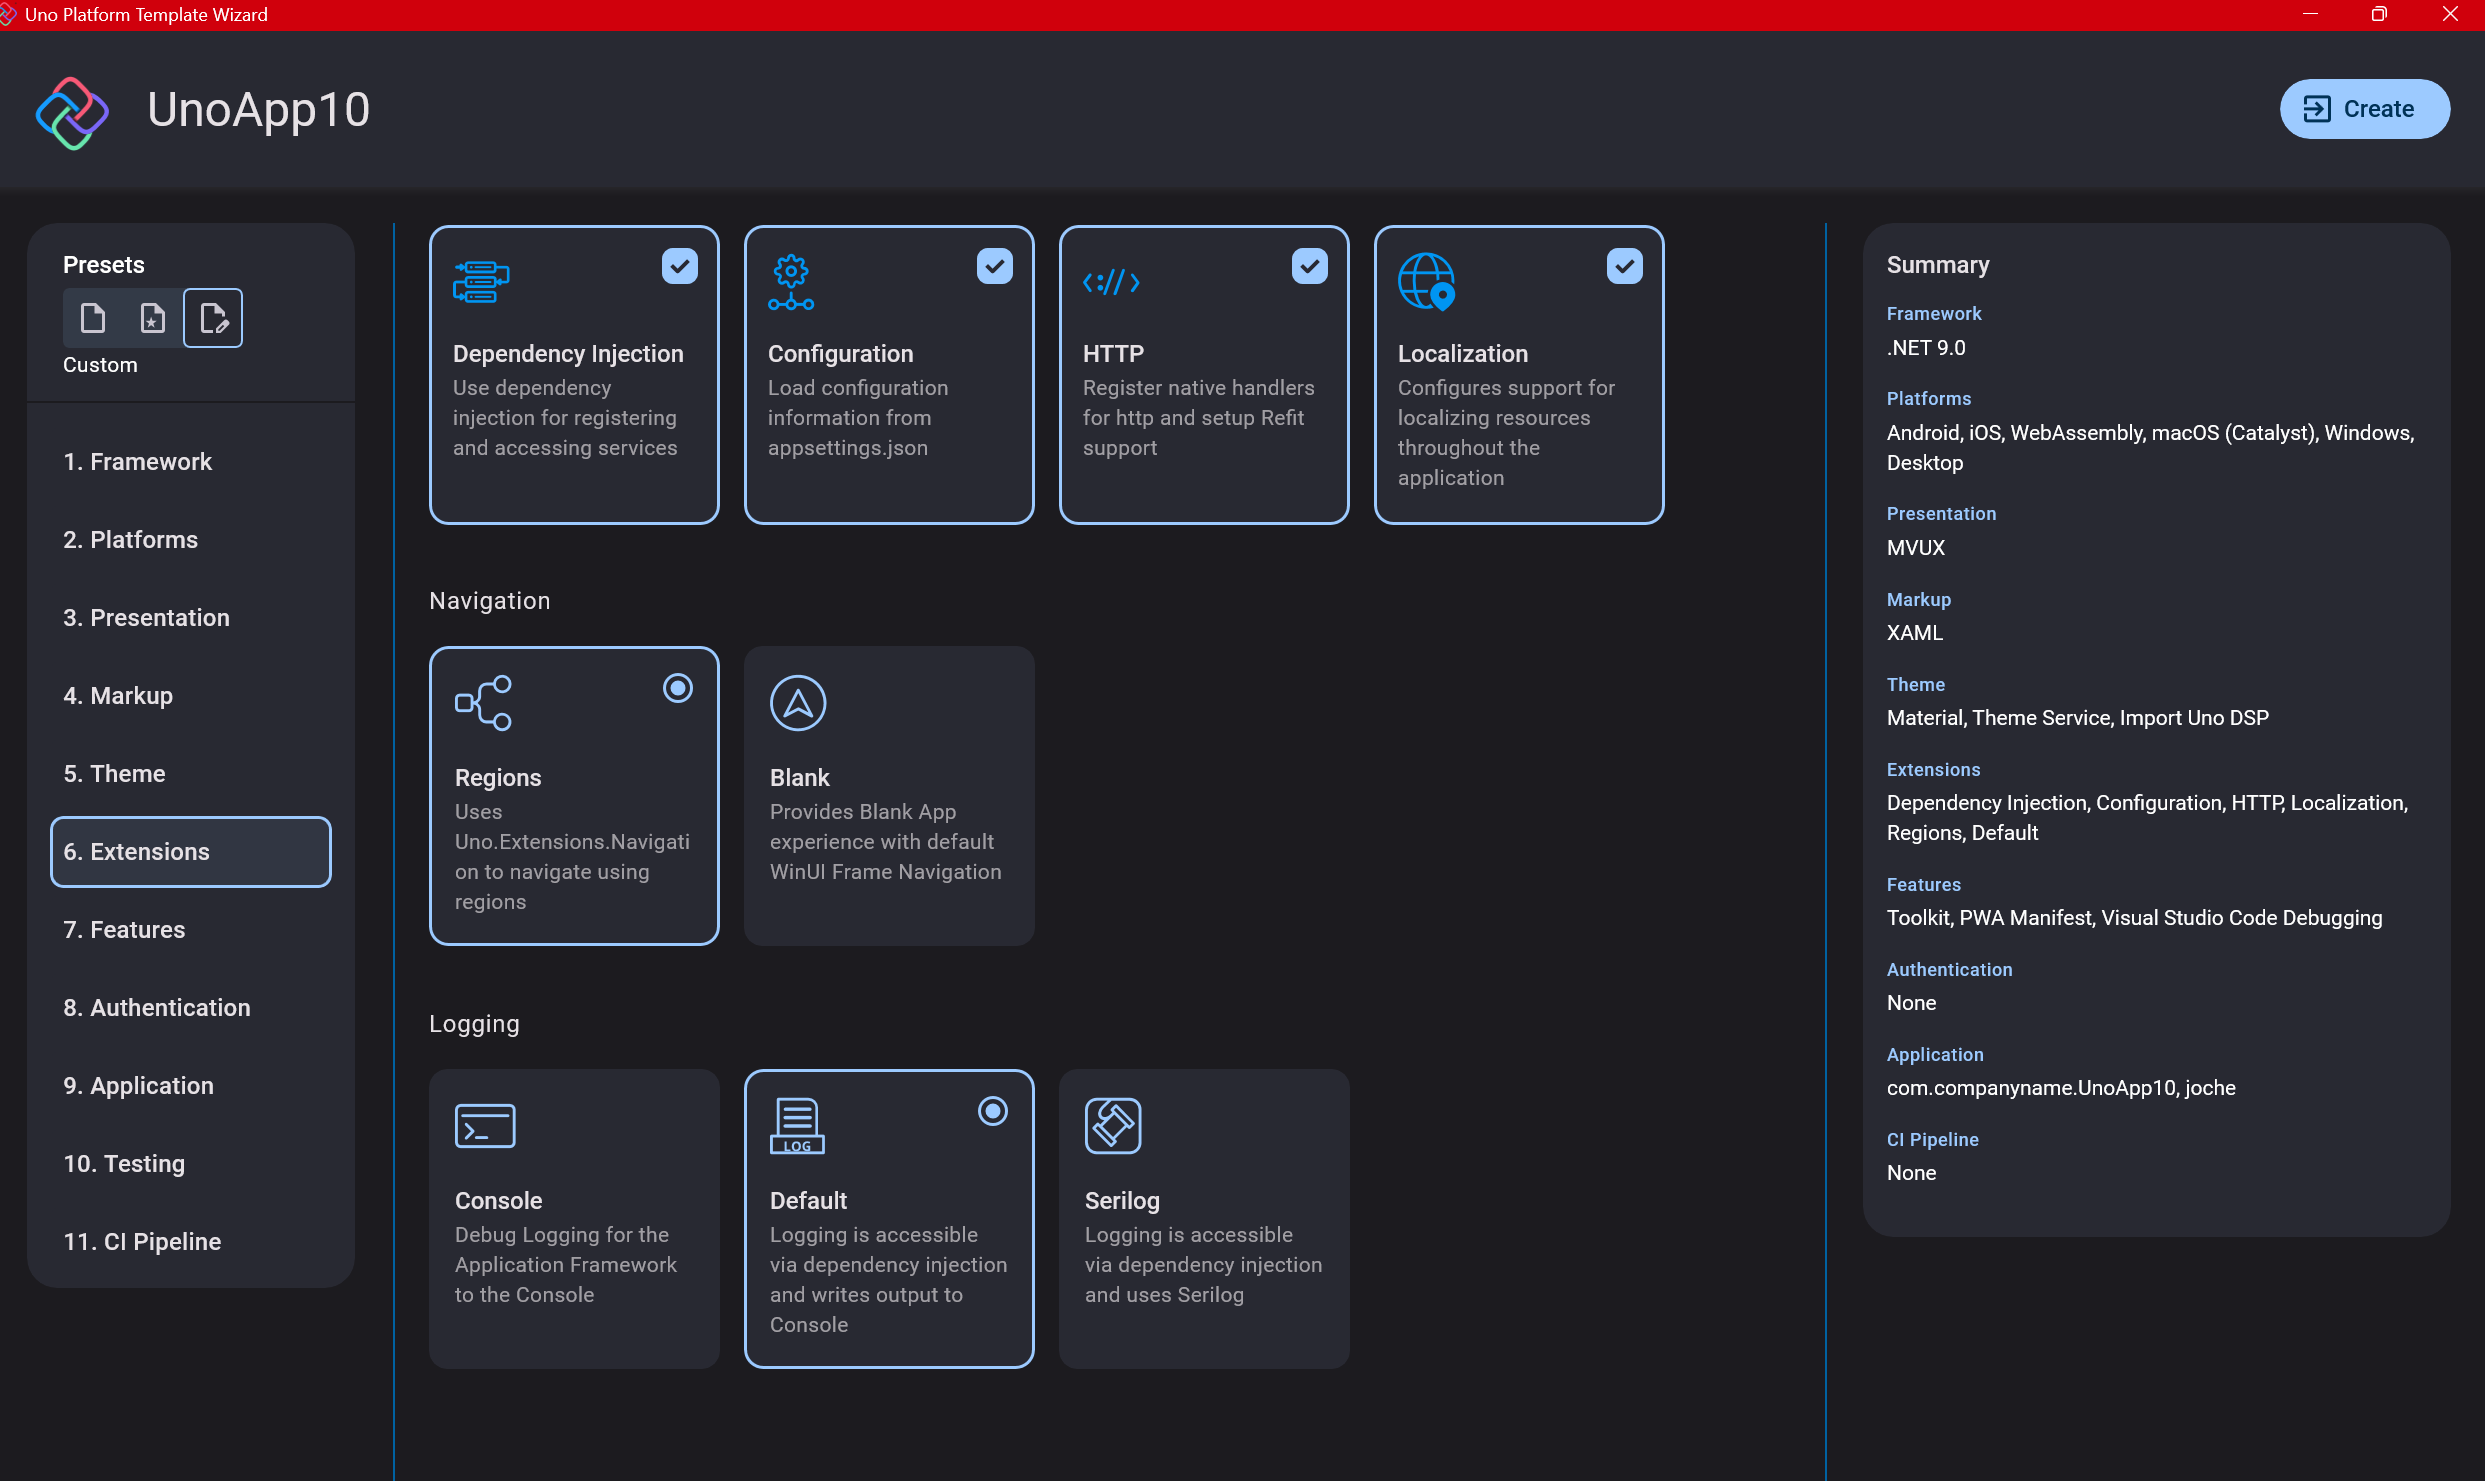
Step 8: Extensions
When selecting extensions to include, I recommend choosing almost all of them as they’re useful for modern application development. The only thing you might want to customize is the logging type (Console, Debug, or Serilog), depending on your previous experience. Generally, most applications will benefit from all the extensions offered.
Step 9: Features
Next, you’ll select which features to include in your application. For my tests, I include everything except the MAUI embedding and the media element. Most features can be useful, and I’ll show in a future post how to set them up when discussing the solution structure.

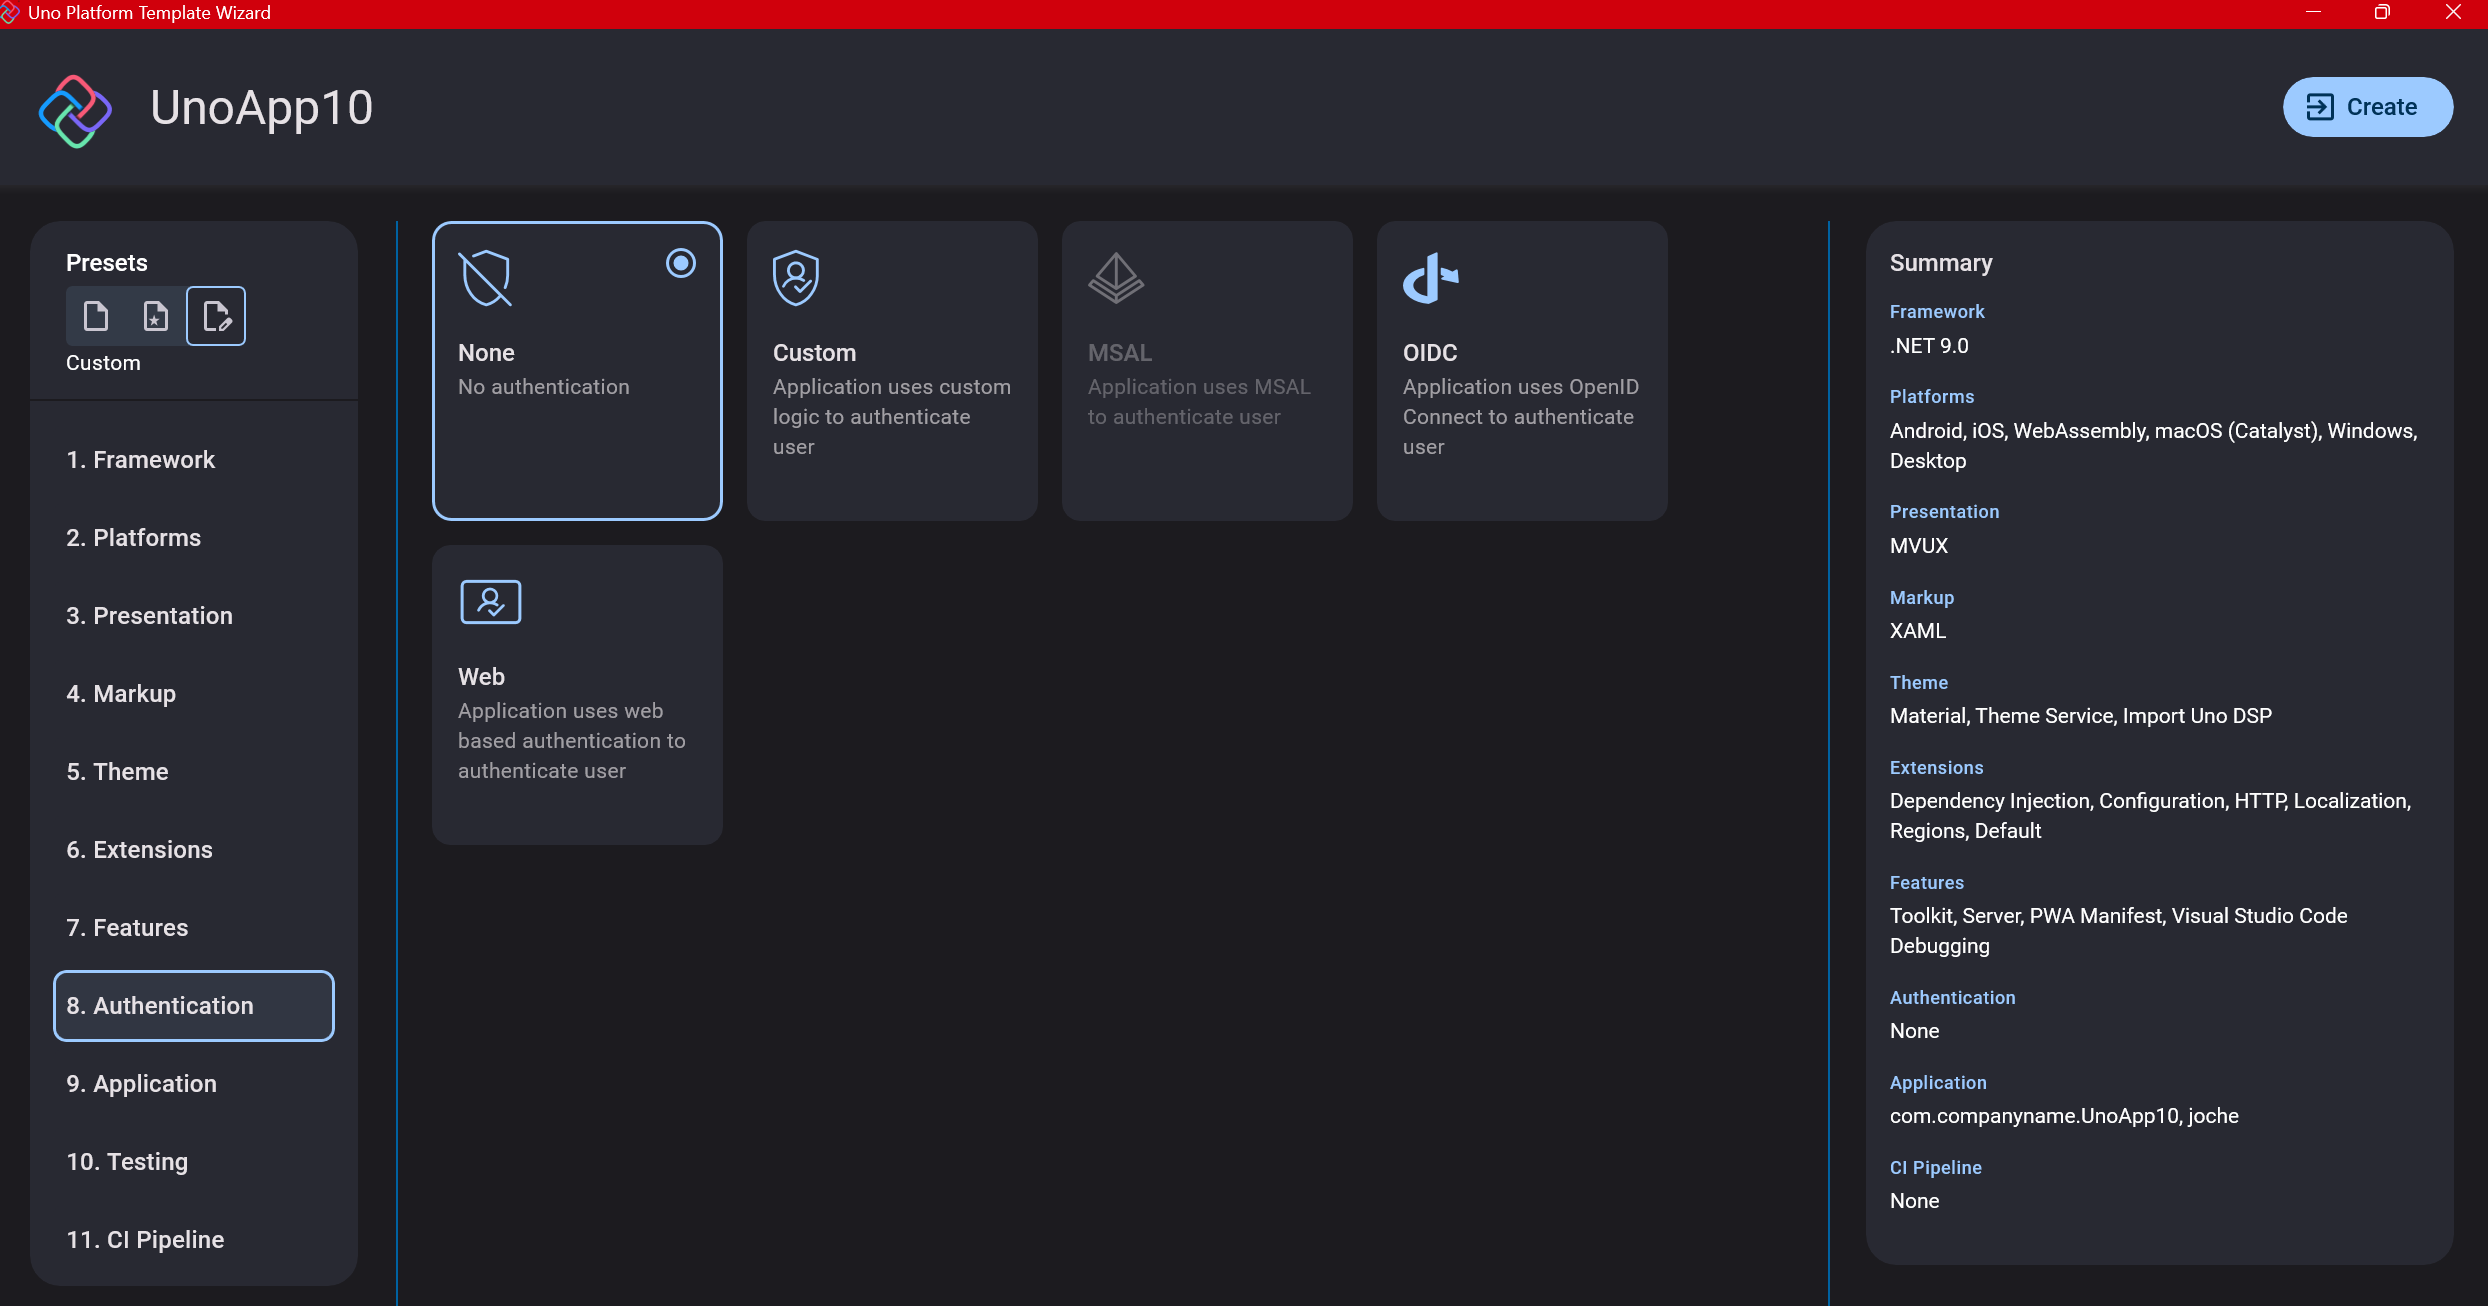
Step 10: Authentication
You can select “None” for authentication if you’re building test projects, but I chose “Custom” because I wanted to see how it works. In my case, I’m authenticating against DevExpress XAF REST API, but I’m also interested in connecting my test project to Azure B2C.
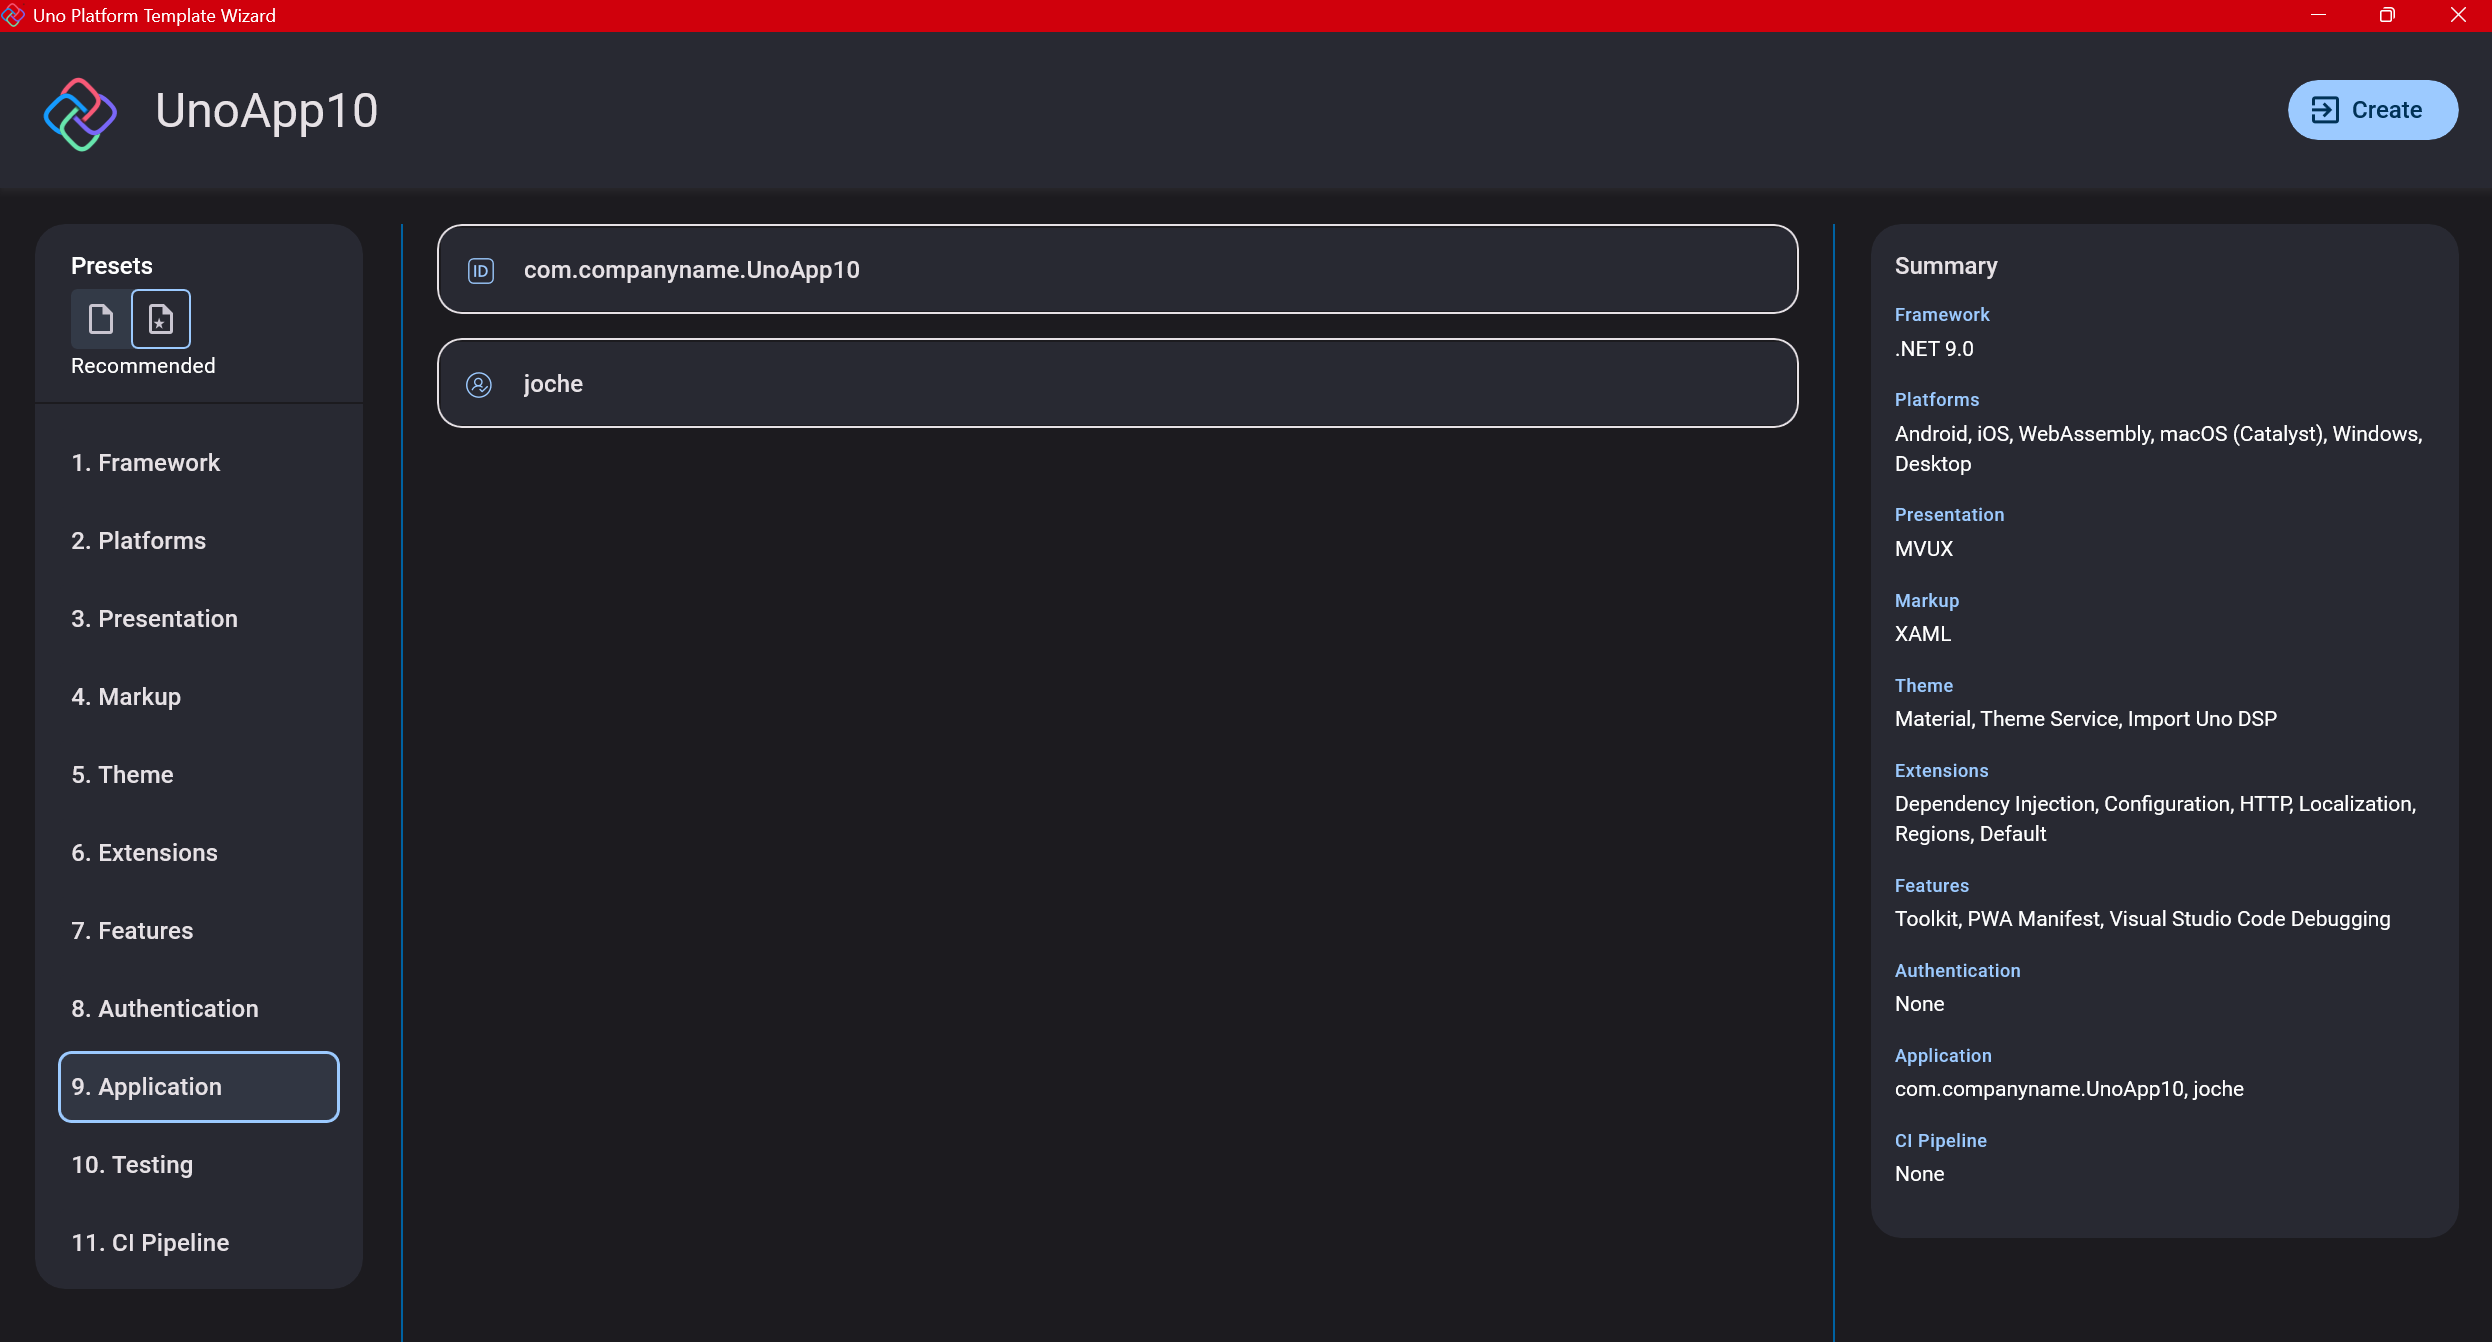
Step 11: Application ID
Next, you’ll need to provide an application ID. While I haven’t fully explored the purpose of this ID yet, I believe it’s needed when publishing applications to app stores like Google Play and the Apple App Store.
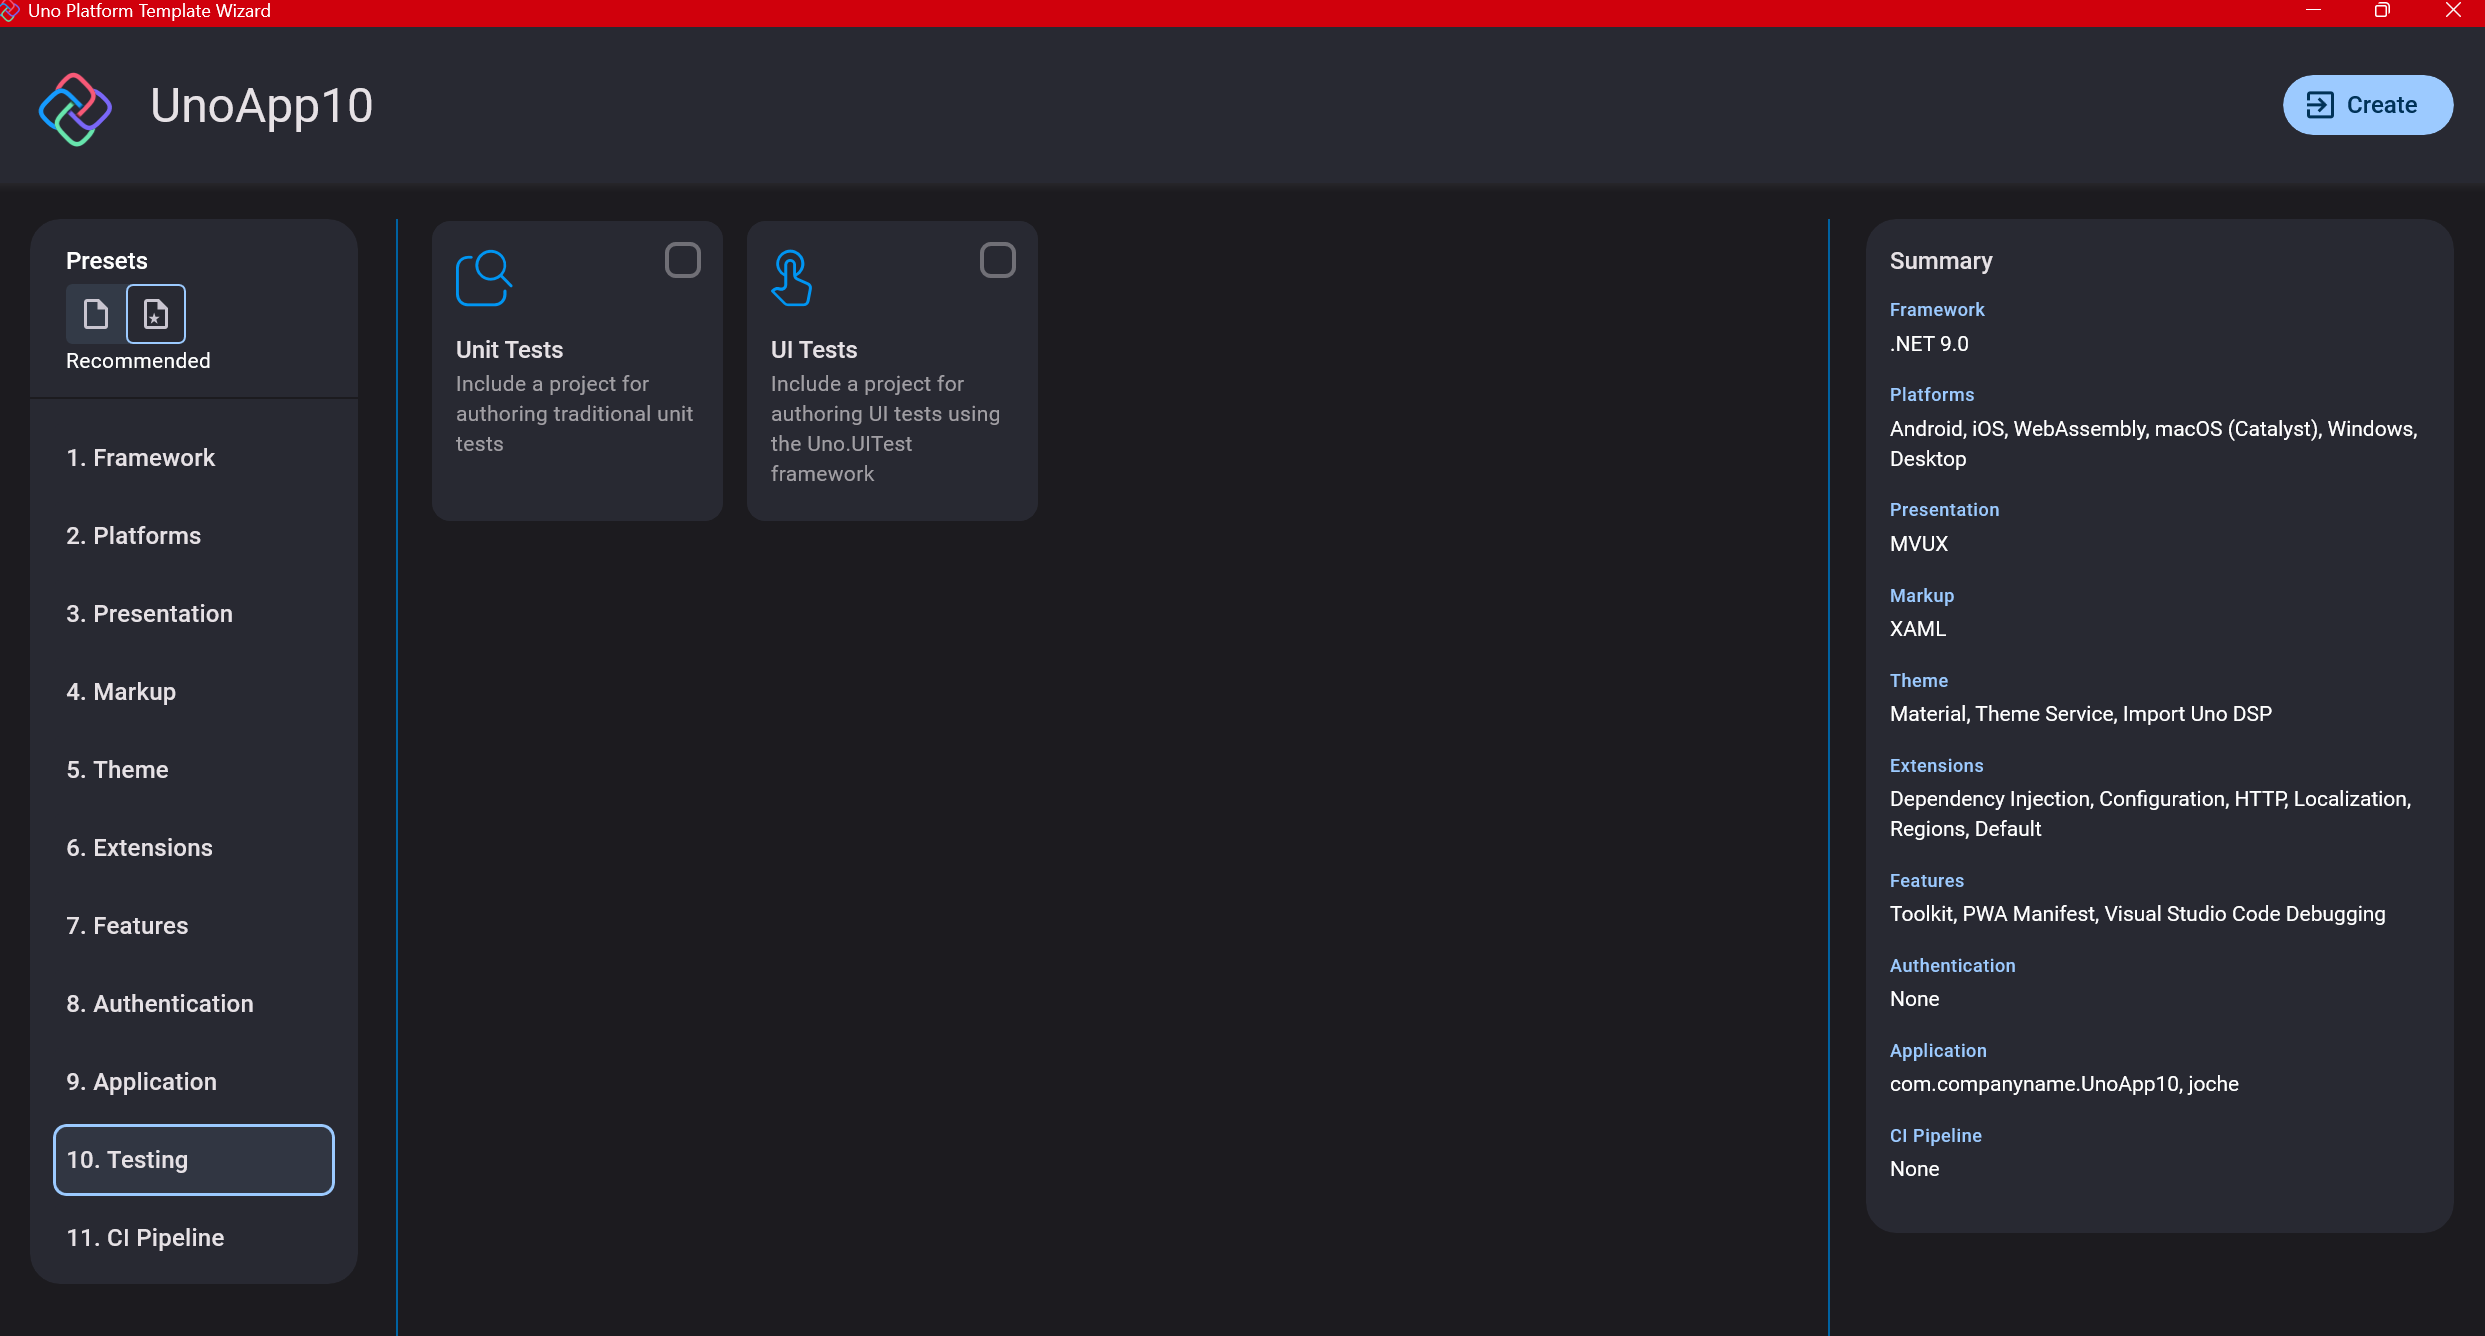
Step 12: Testing
I’m a big fan of testing, particularly integration tests. While unit tests are essential when developing components, for business applications, integration tests that verify the flow are often sufficient.
Uno also offers UI testing capabilities, which I haven’t tried yet but am looking forward to exploring. In platform UI development, there aren’t many choices for UI testing, so having something built-in is fantastic.
Testing might seem like a waste of time initially, but once you have tests in place, you’ll save time in the future. With each iteration or new release, you can run all your tests to ensure everything works correctly. The time invested in creating tests upfront pays off during maintenance and updates.
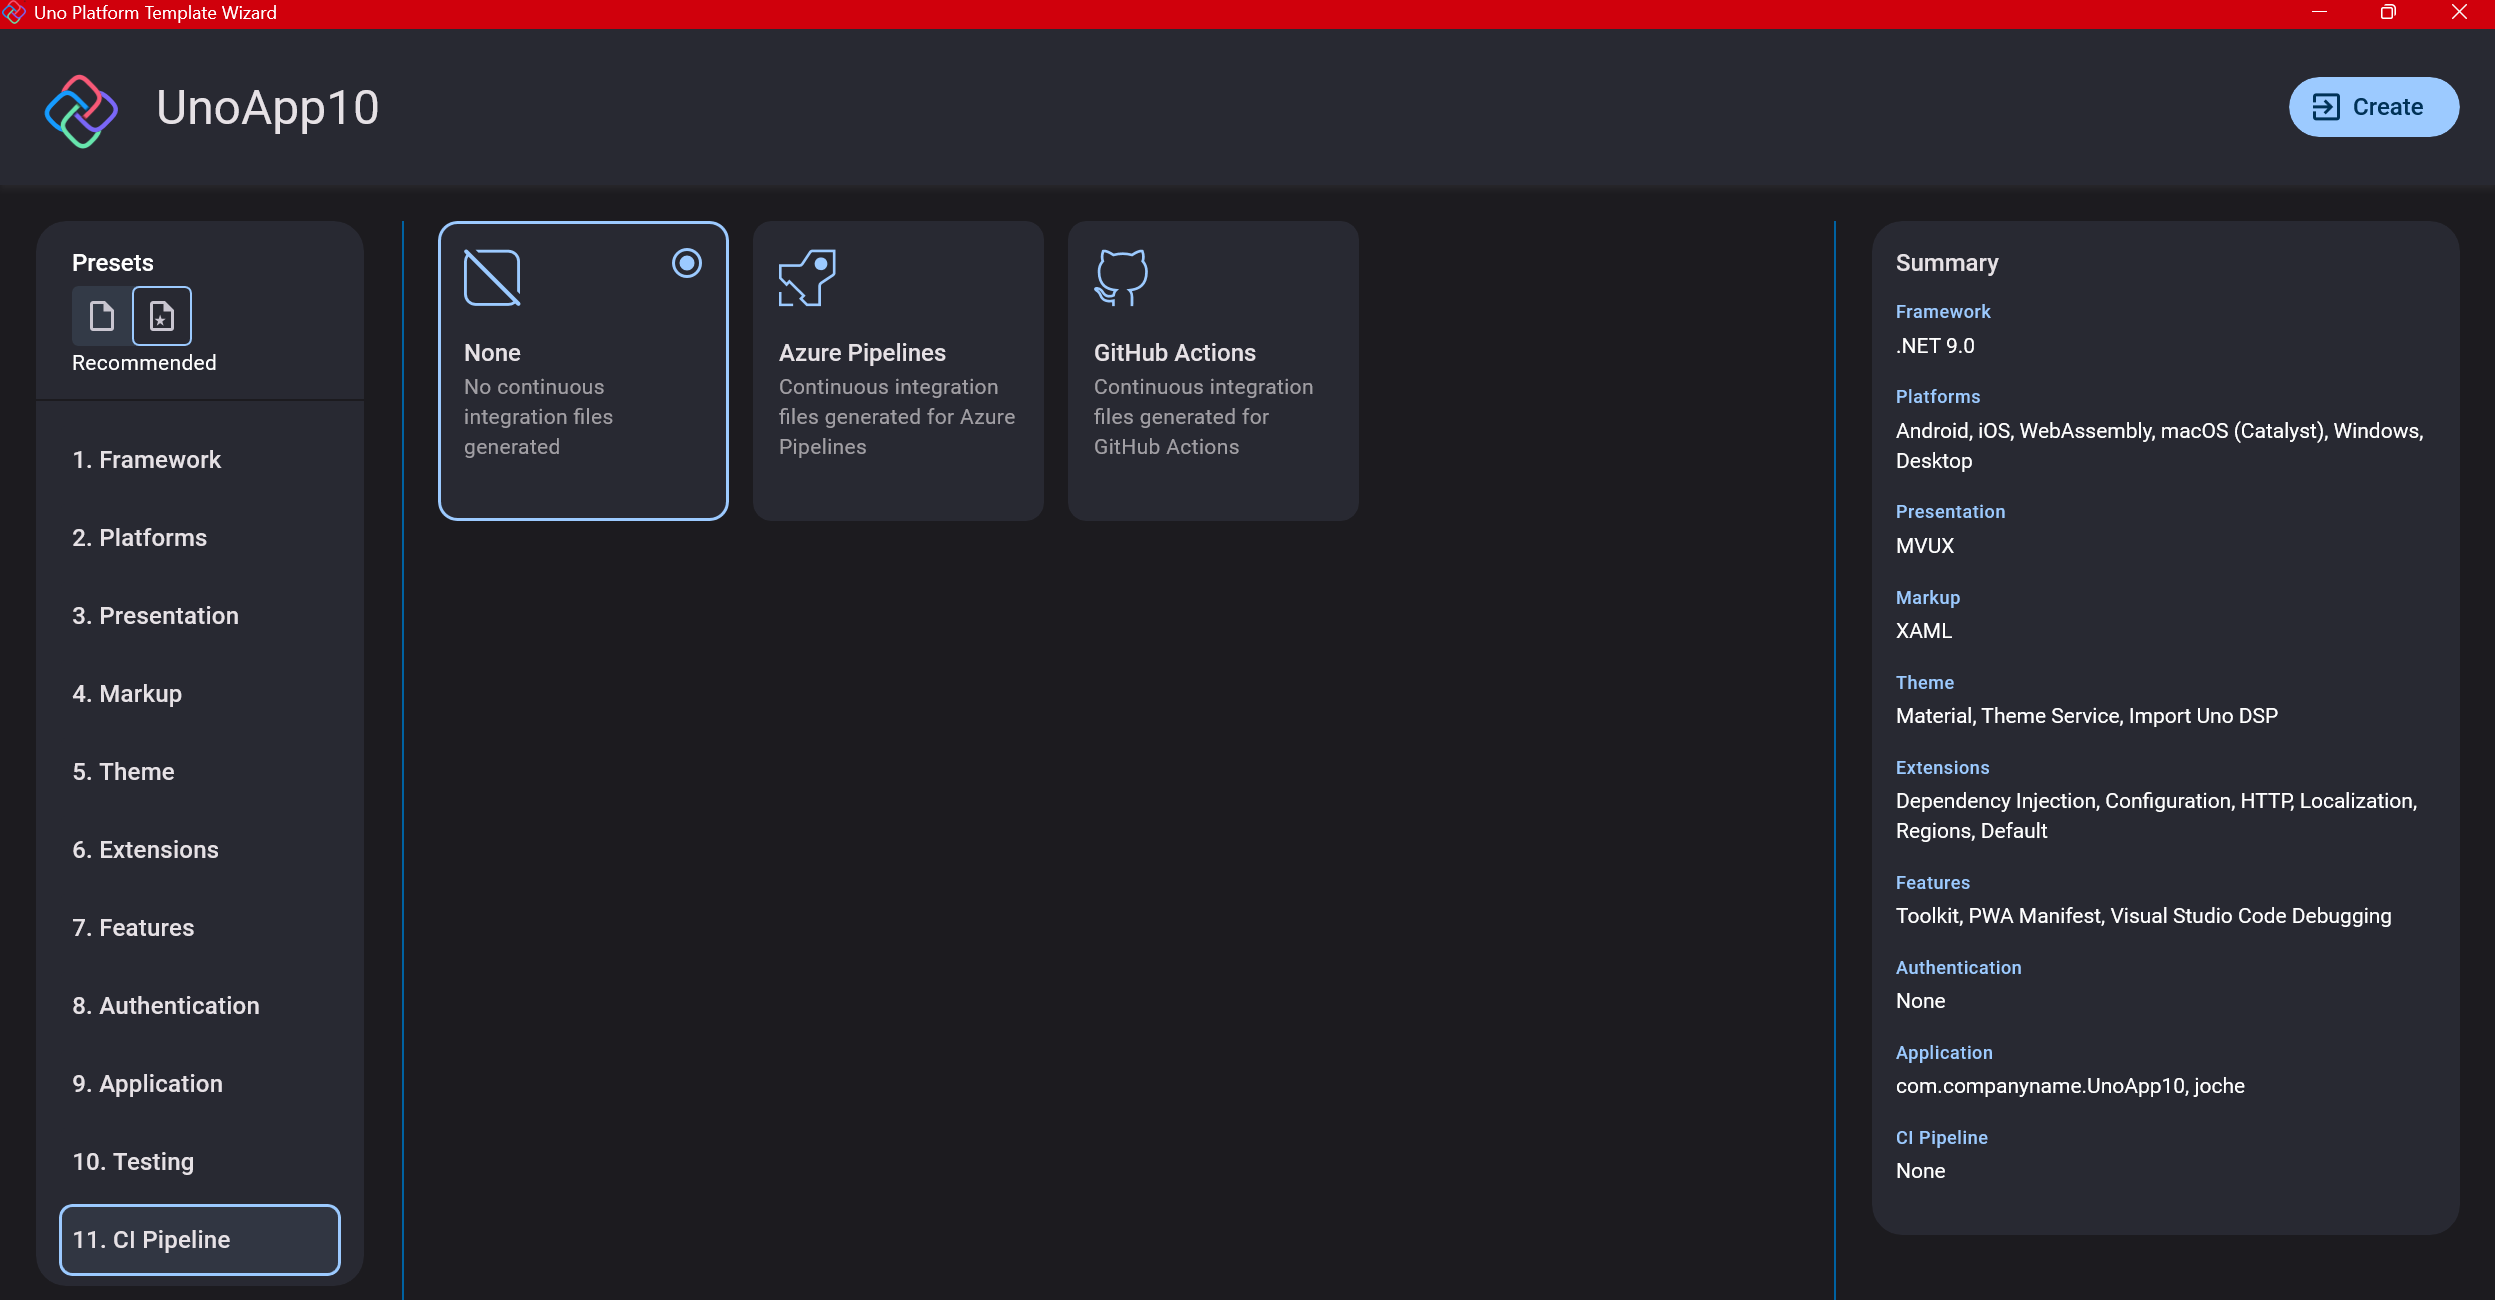
Step 13: CI Pipelines
The final step is about CI pipelines. If you’re building a test application, you don’t need to select anything. For production applications, you can choose Azure Pipelines or GitHub Actions based on your preferences. In my case, I’m not involved with CI pipeline configuration at my workplace, so I have limited experience in this area.
Conclusion
If you’ve made it this far, congratulations! You should now have a shiny new Uno Platform application in your IDE.
This post only covers the initial setup choices when creating a new Uno application. Your development path will differ based on the selections you’ve made, which can significantly impact how you write your code. Choose wisely and experiment with different combinations to see what works best for your needs.
During my learning journey with the Uno Platform, I’ve tried various settings—some worked well, others didn’t, but most will function if you understand what you’re doing. I’m still learning and taking a hands-on approach, relying on trial and error, occasional documentation checks, and GitHub Copilot assistance.
Thanks for reading and see you in the next post!
About Us
YouTube
https://www.youtube.com/c/JocheOjedaXAFXAMARINC
Our sites
Let’s discuss your XAF
https://www.udemy.com/course/microsoft-ai-extensions/
Our free A.I courses on Udemy

by Joche Ojeda | Mar 12, 2025 | dotnet, http, netcore, netframework, network, WebServers
Last week, I was diving into Uno Platform to understand its UI paradigms. What particularly caught my attention is Uno’s ability to render a webapp using WebAssembly (WASM). Having worked with WASM apps before, I’m all too familiar with the challenges of connecting to data sources and handling persistence within these applications.
My Previous WASM Struggles
About a year ago, I faced a significant challenge: connecting a desktop WebAssembly app to an old WCF webservice. Despite having the CORS settings correctly configured (or so I thought), I simply couldn’t establish a connection from the WASM app to the server. I spent days troubleshooting both the WCF service and another ASMX service, but both attempts failed. Eventually, I had to resort to webserver proxies to achieve my goal.
This experience left me somewhat traumatized by the mere mention of “connecting WASM with an API.” However, the time came to face this challenge again during my weekend experiments.
A Pleasant Surprise with Uno Platform
This weekend, I wanted to connect a XAF REST API to an Uno Platform client. To my surprise, it turned out to be incredibly straightforward. I successfully performed this procedure twice: once with a XAF REST API and once with the API included in the Uno app template. The ease of this integration was a refreshing change from my previous struggles.
Understanding CORS and Why It Matters for WASM Apps
To understand why my previous attempts failed and my recent ones succeeded, it’s important to grasp what CORS is and why it’s crucial for WebAssembly applications.
What is CORS?
CORS (Cross-Origin Resource Sharing) is a security feature implemented by web browsers that restricts web pages from making requests to a domain different from the one that served the original web page. It’s an HTTP-header based mechanism that allows a server to indicate which origins (domains, schemes, or ports) other than its own are permitted to load resources.
The Same-Origin Policy
Browsers enforce a security restriction called the “same-origin policy” which prevents a website from one origin from requesting resources from another origin. An origin consists of:
- Protocol (HTTP, HTTPS)
- Domain name
- Port number
For example, if your website is hosted at https://myapp.com, it cannot make AJAX requests to https://myapi.com without the server explicitly allowing it through CORS.
Why CORS is Required for Blazor WebAssembly
Blazor WebAssembly (which uses similar principles to Uno Platform’s WASM implementation) is fundamentally different from Blazor Server in how it operates:
- Separate Deployment: Blazor WebAssembly apps are fully downloaded to the client’s browser and run entirely in the browser using WebAssembly. They’re typically hosted on a different server or domain than your API.
- Client-Side Execution: Since all code runs in the browser, when your Blazor WebAssembly app makes HTTP requests to your API, they’re treated as cross-origin requests if the API is hosted on a different domain, port, or protocol.
- Browser Security: Modern browsers block these cross-origin requests by default unless the server (your API) explicitly permits them via CORS headers.
Implementing CORS in Startup.cs
The solution to these CORS issues lies in properly configuring your server. In your Startup.cs file, you can configure CORS as follows:
public void ConfigureServices(IServiceCollection services) {
    services.AddCors(options => {
        options.AddPolicy("AllowBlazorApp",
            builder => {
                builder.WithOrigins("https://localhost:5000") // Replace with your Blazor app's URL
                       .AllowAnyHeader()
                       .AllowAnyMethod();
            });
    });

    // Other service configurations...
}

public void Configure(IApplicationBuilder app, IWebHostEnvironment env) {
    // Other middleware configurations...

    app.UseCors("AllowBlazorApp");

    // Other middleware configurations...
}
Conclusion
My journey with connecting WebAssembly applications to APIs has had its ups and downs. What once seemed like an insurmountable challenge has now become much more manageable, especially with platforms like Uno that simplify the process. Understanding CORS and implementing it correctly is crucial for successful WASM-to-API communication.
If you’re working with WebAssembly applications and facing similar challenges, I hope my experience helps you avoid some of the pitfalls I encountered along the way.
About Us
YouTube
https://www.youtube.com/c/JocheOjedaXAFXAMARINC
Our sites
Let’s discuss your XAF
https://www.udemy.com/course/microsoft-ai-extensions/
Our free A.I courses on Udemy

by Joche Ojeda | Mar 7, 2024 | C#, dotnet, netcore, netframework
Understanding AppDomains in .NET Framework and .NET 5 to 8
AppDomains, or Application Domains, have been a fundamental part of isolation and security in the .NET Framework, allowing multiple applications to run under a single process without affecting each other. However, the introduction of .NET Core and its evolution through .NET 5 to 8 has brought significant changes to how isolation and application boundaries are handled. This article will explore the concept of AppDomains in the .NET Framework, their transition and replacement in .NET 5 to 8, and provide code examples to illustrate these differences.
AppDomains in .NET Framework
In the .NET Framework, AppDomains served as an isolation boundary for applications, providing a secure and stable environment for code execution. They enabled developers to load and unload assemblies without affecting the entire application, facilitating application updates, and minimizing downtime.
Creating an AppDomain
using System;

namespace NetFrameworkAppDomains
{
    class Program
    {
        static void Main(string[] args)
        {
            // Create a new application domain
            AppDomain newDomain = AppDomain.CreateDomain("NewAppDomain");

            // Load an assembly into the application domain
            newDomain.ExecuteAssembly("MyAssembly.exe");

            // Unload the application domain
            AppDomain.Unload(newDomain);
        }
    }
}
AppDomains in .NET 5 to 8
With the shift to .NET Core and its successors, the concept of AppDomains was deprecated, reflecting the platform’s move towards cross-platform compatibility and microservices architecture. Instead of AppDomains, .NET 5 to 8 emphasizes on assembly loading contexts for isolation and the use of containers (like Docker) for application separation.
AssemblyLoadContext in .NET 5 to 8
using System;
using System.Reflection;
using System.Runtime.Loader;

namespace NetCoreAssemblyLoading
{
    class Program
    {
        static void Main(string[] args)
        {
            // Create a new AssemblyLoadContext
            var loadContext = new AssemblyLoadContext("MyLoadContext", true);

            // Load an assembly into the context
            Assembly assembly = loadContext.LoadFromAssemblyPath("MyAssembly.dll");

            // Execute a method from the assembly (example method)
            MethodInfo methodInfo = assembly.GetType("MyNamespace.MyClass").GetMethod("MyMethod");
            methodInfo.Invoke(null, null);

            // Unload the AssemblyLoadContext
            loadContext.Unload();
        }
    }
}
Differences and Considerations
- Isolation Level: AppDomains provided process-level isolation without needing multiple processes. In contrast,
AssemblyLoadContext provides a lighter-weight mechanism for loading assemblies but doesn’t offer the same isolation level. For higher isolation, .NET 5 to 8 applications are encouraged to use containers or separate processes.
- Compatibility: AppDomains are specific to the .NET Framework and are not supported in .NET Core and its successors. Applications migrating to .NET 5 to 8 need to adapt their architecture to use
AssemblyLoadContext or explore alternative isolation mechanisms like containers.
- Performance: The move away from AppDomains to more granular assembly loading and containers reflects a shift towards microservices and cloud-native applications, where performance, scalability, and cross-platform compatibility are prioritized.
Conclusion
While the transition from AppDomains to AssemblyLoadContext and container-based isolation marks a significant shift in application architecture, it aligns with the modern development practices and requirements of .NET applications. Understanding these differences is crucial for developers migrating from the .NET Framework to .NET 5 to

by Joche Ojeda | Mar 29, 2023 | C#, Linux, netcore, Oqtane, Postgres, Ubuntu
A stack in software development refers to a collection of technologies, tools, and frameworks that are used together to build and run a complete application or solution. A typical stack consists of components that handle different aspects of the software development process, including frontend, backend, databases, and sometimes even the hosting environment.
A stack is often categorized into different layers based on the functionality they provide:
- Frontend: This layer is responsible for the user interface (UI) and user experience (UX) of an application. It consists of client-side technologies like HTML, CSS, and JavaScript, as well as libraries or frameworks such as React, Angular, or Vue.js.
- Backend: This layer handles the server-side logic, processing user requests, and managing interactions with databases and other services. Backend technologies can include programming languages like Python, Ruby, Java, or PHP, and frameworks like Django, Ruby on Rails, or Spring.
- Database: This layer is responsible for storing and managing the application’s data. Databases can be relational (e.g., MySQL, PostgreSQL, or Microsoft SQL Server) or NoSQL (e.g., MongoDB, Cassandra, or Redis), depending on the application’s data structure and requirements.
- Hosting Environment: This layer refers to the infrastructure where the application is deployed and run. It can include on-premises servers, cloud-based platforms like Amazon Web Services (AWS), Google Cloud Platform (GCP), or Microsoft Azure, or container orchestration platforms like Kubernetes or Docker Swarm.
Developers often refer to specific combinations of these technologies as named stacks. Some examples include:
- LAMP: Linux (operating system), Apache (web server), MySQL (database), and PHP (backend programming language).
- MEAN: MongoDB (database), Express.js (backend framework), Angular (frontend framework), and Node.js (runtime environment).
- MERN: MongoDB (database), Express.js (backend framework), React (frontend library), and Node.js (runtime environment).
Selecting a stack depends on factors such as project requirements, team expertise, performance, and scalability needs. By using a well-defined stack, developers can streamline the development process, improve collaboration, and ensure that all components work together efficiently.
The P.O.U.N.D. Stack is an innovative software development stack that combines Postgres, Oqtane, Ubuntu, and DotNet to create powerful, modern, and scalable applications. This stack is designed to leverage the strengths of each technology, providing developers with an integrated and efficient environment for building web applications.
- Postgres (P): As the database layer, Postgres offers robust performance, scalability, and support for advanced data types, such as GIS and JSON. Its open-source nature and active community make it a reliable choice for handling the storage and management of application data.
- Oqtane (O): Serving as the frontend framework, Oqtane is built on top of the Blazor technology in .NET, allowing for the creation of modern, responsive, and feature-rich user interfaces. With Oqtane, developers can create modular and extensible applications, while also benefiting from built-in features such as authentication, authorization, and multi-tenancy.
- Ubuntu (U): As the operating system and hosting environment, Ubuntu provides a stable, secure, and easy-to-use platform for deploying and running applications. It is widely supported and offers excellent compatibility with a variety of hardware and cloud platforms, making it an ideal choice for hosting P.O.U.N.D. Stack applications.
- DotNet (D): The backend layer is powered by the .NET framework, which offers a versatile and high-performance environment for server-side development. With support for multiple programming languages (such as C#, F#, and VB.NET), powerful libraries, and a large ecosystem, .NET allows developers to build scalable and efficient backend logic for their applications.
In summary, the P.O.U.N.D. Stack brings together the power of Postgres, Oqtane, Ubuntu, and DotNet to deliver a comprehensive and efficient development stack. By leveraging the unique capabilities of each technology, developers can build modern, scalable, and high-performance web applications that cater to diverse business needs.

by Joche Ojeda | Mar 24, 2023 | Linux, netcore, Oqtane, Ubuntu
In this post we will learn how to publish Oqtane as a Linux service, but before we continue let’s do a recap of what we have learned so far
- How to compile Oqtane for an O.S other than Windows: HTTPs://www.jocheojeda.com/2023/03/20/1-compiling-oqtane-3-4-to-target-ubuntu-linux/
- The process of publish Oqtane installation files :https://www.jocheojeda.com/2023/03/20/2-publishing-oqtane-3-4-to-target-ubuntu-linux/
- How to change the binding URLs for kestrel, so we can run multiple instances of Oqtane :https://www.jocheojeda.com/2023/03/21/3-running-multiple-instances-of-oqtane-for-virtual-hosting-environments-in-apache-webserver/
At this moment, you might be asking yourself why should we run oqtane as a service? well this can be really long to answer but I’ll try to make it as short as possible.
The first thing that we need to understand is the difference between IIS (Internet Information Services for windows) and Apache or NGINX
In an IIS web service, the activation process refers to the series of steps that occur when a client request is received by the web server, and the corresponding web service code is executed to process the request and generate a response. The activation process in IIS typically involves the following steps:
- Client request: A client, such as a web browser or another application, sends an HTTP request to the IIS web server, targeting a specific web service endpoint (e.g., a URL).
- Routing: The IIS server routes the request to the appropriate web service application based on the requested URL and other configuration settings.
- Application pool: The request is handled by an application pool, which is a group of worker processes (w3wp.exe) that manage the execution of one or more web applications. Application pools provide isolation and resource management for web applications, helping to improve the overall performance and stability of the IIS server.
- Worker process: A worker process within the application pool receives the request and begins processing it. If there is no available worker process, the application pool may create a new one, or queue the request until a worker process is available.
- HTTP pipeline: The worker process processes the request through the IIS HTTP pipeline, which is a series of events and modules that handle various aspects of the request, such as authentication, caching, and logging.
- Handler mapping: Based on the request’s file extension or URL pattern, IIS maps the request to a specific handler, which is a component responsible for processing the request and generating a response. In the case of a web service, this handler is typically an ASP.NET handler or another custom handler.
- Service activation: The handler activates the web service, instantiating the required objects and executing the service’s code to process the client request. This may involve parsing input data, performing calculations, accessing databases, or interacting with other services.
- Response generation: The web service generates an appropriate response, such as an XML or JSON document, and returns it to the handler.
- HTTP pipeline (response): The response travels back through the HTTP pipeline, where additional processing, such as caching or compression, may occur.
- Client response: The IIS server sends the generated response back to the client, completing the activation process.
The activation process in IIS is designed to provide a robust and efficient way to handle client requests, offering features like application isolation, resource management, and extensibility through custom handlers and modules.
+-------------+       +-------------+       +-----------------+       +-------------+       +------------------+
|             |       |             |       |                 |       |             |       |                  |
|  Client     +------->    IIS      +-------> Application Pool +-------> Worker     +------->  Web Service     |
|(Web browser,|       |  Web Server |       |                 |       |  Process    |       |                  |
|  app, etc.) |       |             |       | (w3wp.exe)      |       |             |       |                  |
+------+------+       +-------+------+       +--------+--------+       +------+------+       +------+-----------+
       ^                      |                       |                         |                       |
       |                      |                       |                         |                       |
       |                      v                       v                         v                       v
       |               +-------+------+       +--------+--------+       +------+------+       +------+-----------+
       |               |             |       |                 |       |             |       |                  |
       +---------------+   HTTP      |       |  Handler        |       |  HTTP       |       |  Response        |
                       |  Pipeline   |       |  Mapping        |       |  Pipeline   |       | (XML, JSON, etc.)|
                       | (Request)   |       |                 |       |  (Response) |       |                  |
                       |             |       |                 |       |             |       |                  |
                       +-------------+       +-----------------+       +-------------+       +------------------+
Now, let’s discuss the Apache web server. Unlike IIS, Apache does not have an activation process specifically designed for .NET applications. This implies that the server is unable to initiate a new process to handle incoming requests or restart the process in the event of a crash.
According to Microsoft documentation, hosting an ASP.NET Core application on servers other than IIS involves using a reverse proxy server. In this setup, the ASP.NET Core app runs on the built-in web server, Kestrel, which is only accessible via localhost. An external web server, such as Apache or NGINX, acts as a reverse proxy, forwarding requests between the client and the ASP.NET Core app seamlessly.
+-----------+     +-----------+     +-----------+     +---------------------+
|           |     |           |     |           |     |                     |
|  Client   +----->  Reverse  +----->  Kestrel  +----->  ASP.NET Core       |
| (Browser, |     |  Proxy    |     | (Built-in |     |  Application        |
|   App)    |     | (Apache,  |     |  Server)  |     |                     |
|           |     |  NGINX)   |     |           |     |                     |
+-----+-----+     +-----+-----+     +-----+-----+     +---------------------+
      ^                 ^                 ^                 ^
      |                 |                 |                 |
      +-----------------+-----------------+-----------------+
- The client (browser, app, etc.) sends a request to the reverse proxy server (Apache, NGINX, etc.).
- The reverse proxy server forwards the request to the Kestrel server, which is the built-in web server for the ASP.NET Core application.
- The Kestrel server processes the request and passes it to the ASP.NET Core application.
- The ASP.NET Core application processes the request and generates a response.
- The response is sent back to the Kestrel server.
- The Kestrel server forwards the response to the reverse proxy server.
- The reverse proxy server sends the response back to the client.
As demonstrated, handling requests and maintaining the application’s availability are two distinct processes in non-IIS servers, such as our scenario with an Ubuntu 22.04 server and Apache. Consequently, we must explore strategies for keeping our application process continuously running on an Ubuntu server.
On Microsoft official documentation on how to publish AspNetCore Apps in Linux, there is a section called “Monitoring the app” which describe how to create a Linux service that is able to restart automatically if the application crashes. Here is the link to the official documentation https://learn.microsoft.com/en-us/aspnet/core/host-and-deploy/linux-apache?view=aspnetcore-7.0#monitor-the-app
In Ubuntu Linux, services (also known as daemons) are background processes that run continuously and perform specific tasks, such as listening for incoming connections, managing system resources, or running scheduled tasks. They are designed to start automatically during system boot, run in the background, and stop during system shutdown.
Ubuntu uses the systemd system and service manager as its default init system, which is responsible for bootstrapping the user space and managing system services. Here’s how services work in Ubuntu Linux using systemd:
- Service unit files: Each service has a corresponding unit file with a
.service extension, typically located in /lib/systemd/system/ or /etc/systemd/system/. These files contain the configuration and instructions for starting, stopping, and managing the service.
- Service management: You can manage services using the
systemctl command. Some common tasks include starting, stopping, enabling, disabling, and checking the status of services. For example:
- Start a service:
sudo systemctl start service-name
- Stop a service:
sudo systemctl stop service-name
- Enable a service to start at boot:
sudo systemctl enable service-name
- Disable a service from starting at boot:
sudo systemctl disable service-name
- Check the status of a service:
systemctl status service-name
- Logging:
systemd services use the journalctl command for logging, which allows you to view and manage logs for services and the entire system. You can access logs for a specific service by running journalctl -u service-name.
- Custom services: You can create custom services by writing your own service unit files and placing them in the
/etc/systemd/system/ directory. This is useful when you want to run your own applications or scripts as services.
To maintain the availability of an application process on an Ubuntu server, you can create a custom service using systemd. This will enable the application to start automatically during system boot, restart if it crashes, and be managed using standard systemctl commands.
Most linux users will the create the unit (service file) using a command line text editor, this can be a bit challenging for a DotNet programmer since we are used to user interfaces. In our company (Xari) we often deploy AspNetCore applications to linux servers, we do it so often that I had to create a tool to generate the unit files, the tool is publicly available at https://linux4dotnet.jocheojeda.com/
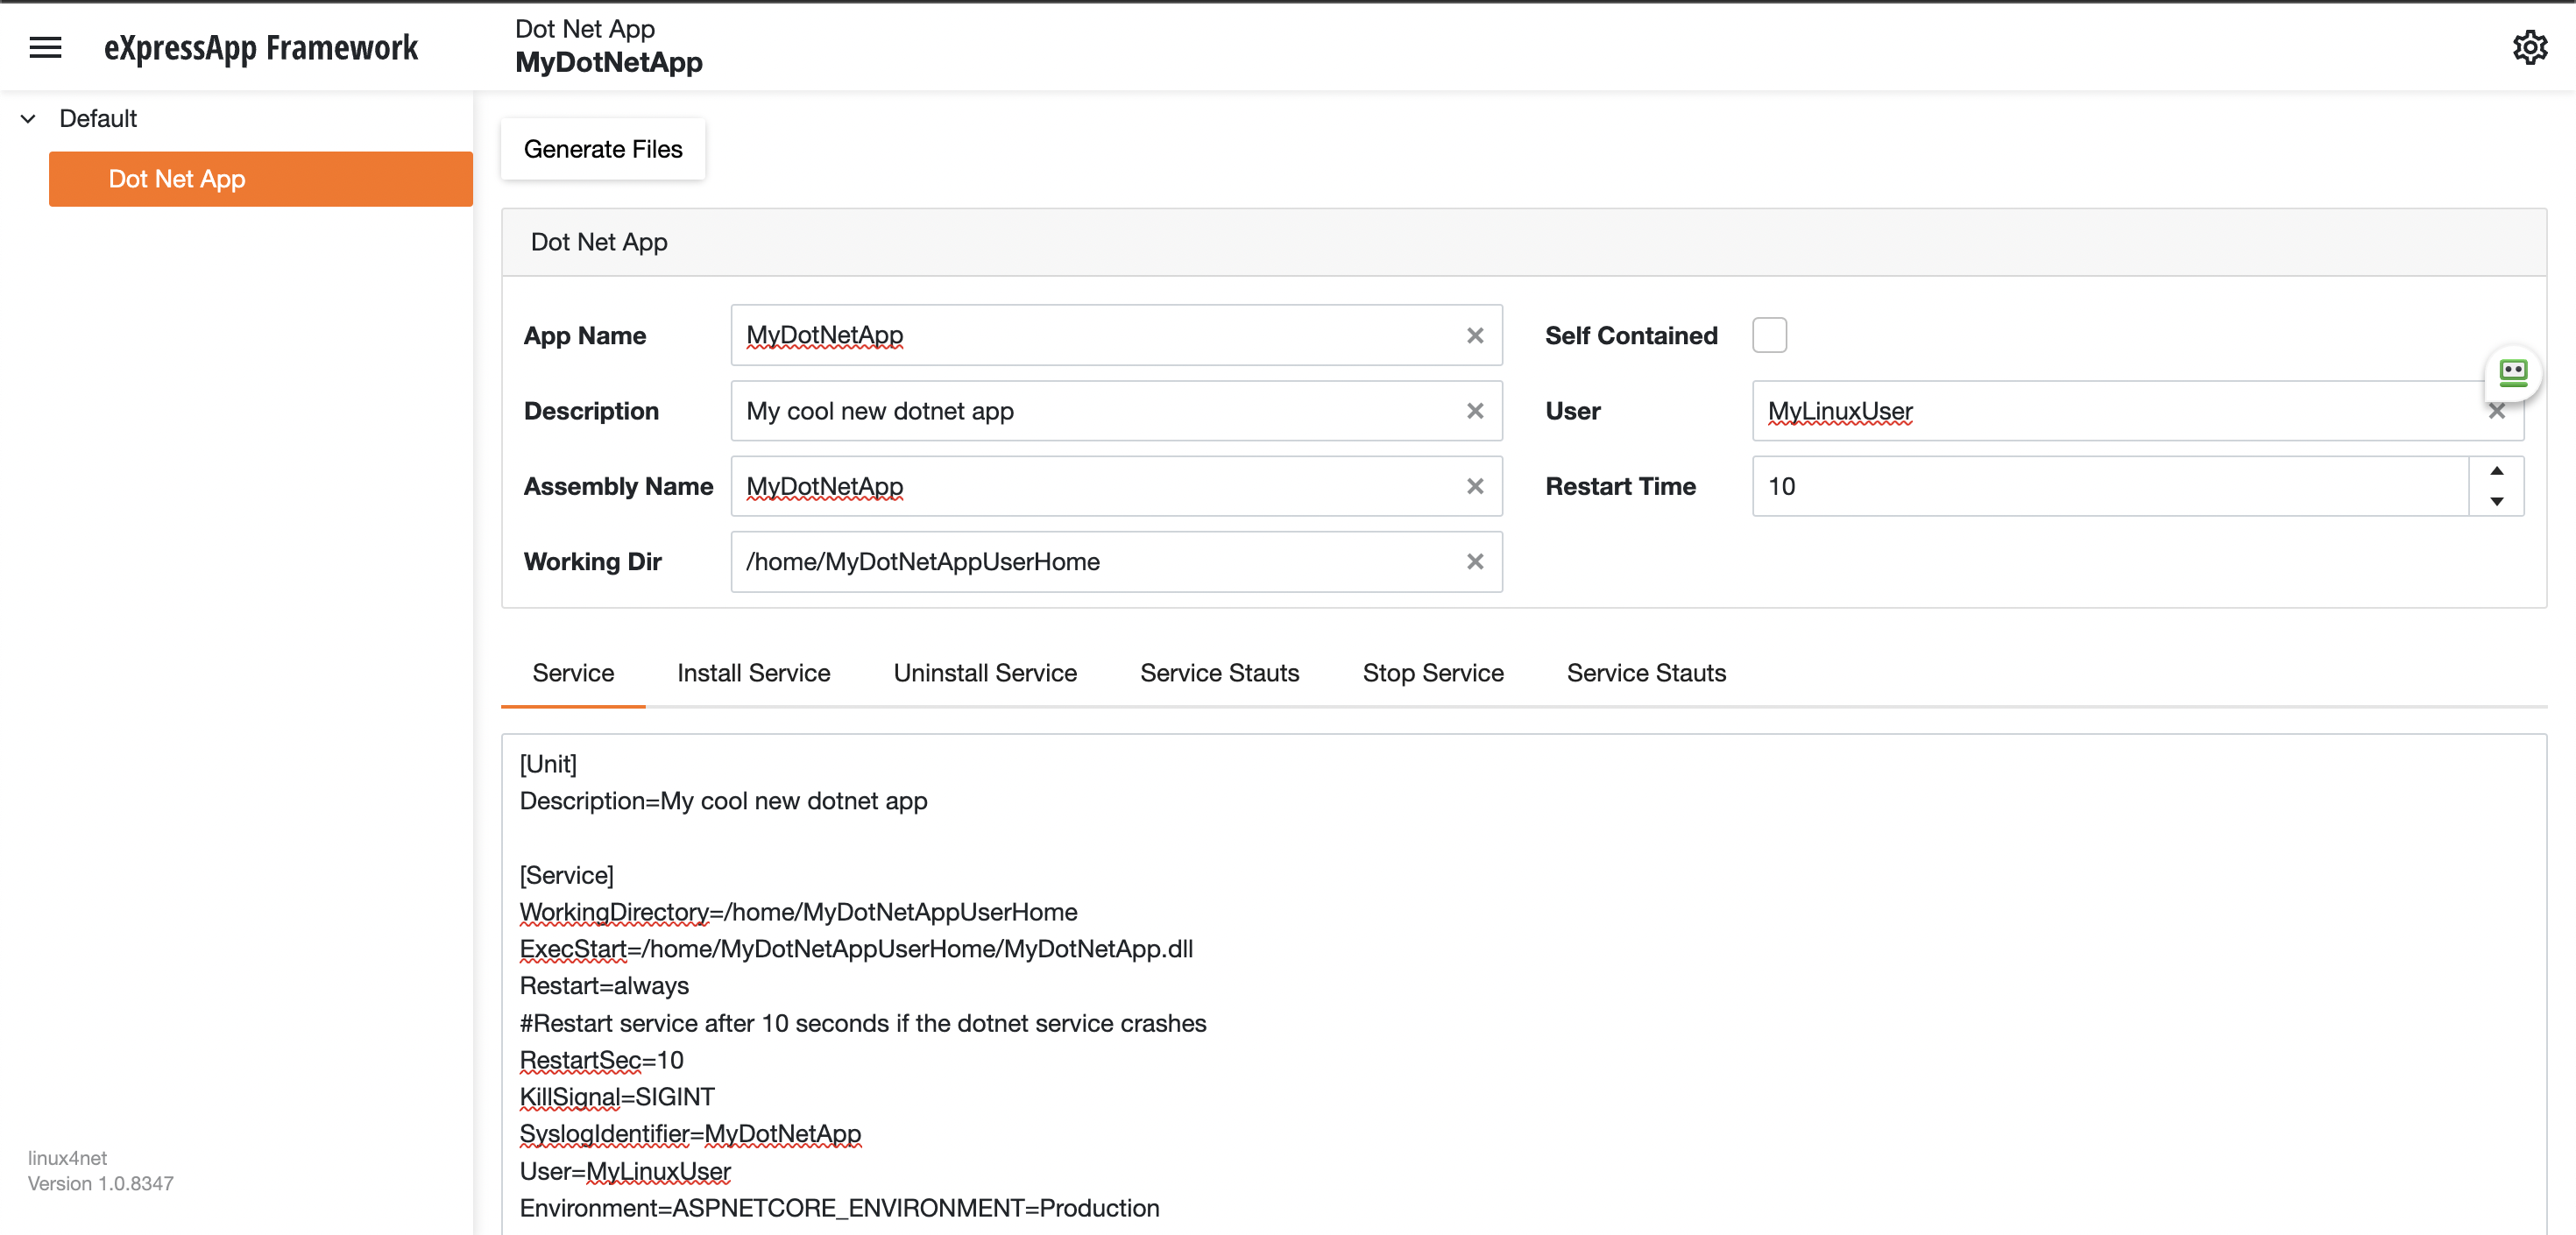
Using the tool you just need to fill the gaps and it will generate the text of each file that you need to use, so here are the files that I generated for my test of running oqtane in an ubuntu server
InstalService.sh
sudo apt-get update -y
sudo apt-get install -y libgdiplus
chmod +x /home/oqtane/Oqtane.Framework.3.4.0.Install/Oqtane.Server
chmod +x /home/oqtane/Oqtane.Framework.3.4.0.Install/UninstallService.sh
chmod +x /home/oqtane/Oqtane.Framework.3.4.0.Install/Start.sh
chmod +x /home/oqtane/Oqtane.Framework.3.4.0.Install/Stop.sh
chmod +x /home/oqtane/Oqtane.Framework.3.4.0.Install/Status.sh
sudo yes | cp /home/oqtane/Oqtane.Framework.3.4.0.Install/Oqtane.Server.service /etc/systemd/system/
sudo systemctl enable Oqtane.Server.service
sudo systemctl start Oqtane.Server.service
sudo systemctl status Oqtane.Server.service
Oqtane.Server.Service
[Unit]
Description=Oqtane.Server

[Service]
WorkingDirectory=/home/oqtane/Oqtane.Framework.3.4.0.Install
ExecStart=/home/oqtane/Oqtane.Framework.3.4.0.Install/Oqtane.Server
Restart=always
#Restart service after 10 seconds if the dotnet service crashes
RestartSec=10
KillSignal=SIGINT
SyslogIdentifier=Oqtane.Server
User=oqtane
Environment=ASPNETCORE_ENVIRONMENT=Production

[Install]
WantedBy=user. Target
Start.sh
sudo systemctl start Oqtane.Server.service
Stop.sh
sudo systemctl stop Oqtane.Server.service
Status.sh
sudo systemctl status OqtaneServer.service
Uninstall.sh
sudo systemctl stop Oqtane.Server.service
sudo systemctl disable Oqtane.Server.service
sudo rm /etc/systemd/system/Oqtane.Server.service
ps -ef | grep Oqtane.Server | grep -v grep | awk '{print }' | xargs kill
And last but not least the install instructions ))
These are the commands you need to run to install the app as a linux service
1) Go to the app directory
cd /home/oqtane/Oqtane.Framework.3.4.0.Install
2) First change the permissions of the InstallService.sh
chmod +x InstallService.sh
3) Run the installation file
./InstallService.sh


If you are using virtualmin(appache) and you want to for https redirection, here are the instructions
Virtualmin --> Services --> Configure Website(the one on port 80) --> Edit Directives
Under 'RewriteEngine On' add the next line
RewriteRule ^/(.*) https://%{HTTP_HOST}/$1 [R]
Restart Apache
Now we only need to copy the generated files to the Oqtane folder and run “InstallService.sh” and “voila” your oqtane app is a linux service now, you can check the results here https://oqtane.jocheojeda.com/
by Joche Ojeda | Mar 21, 2023 | Linux, netcore, Oqtane, Ubuntu, Uncategorized
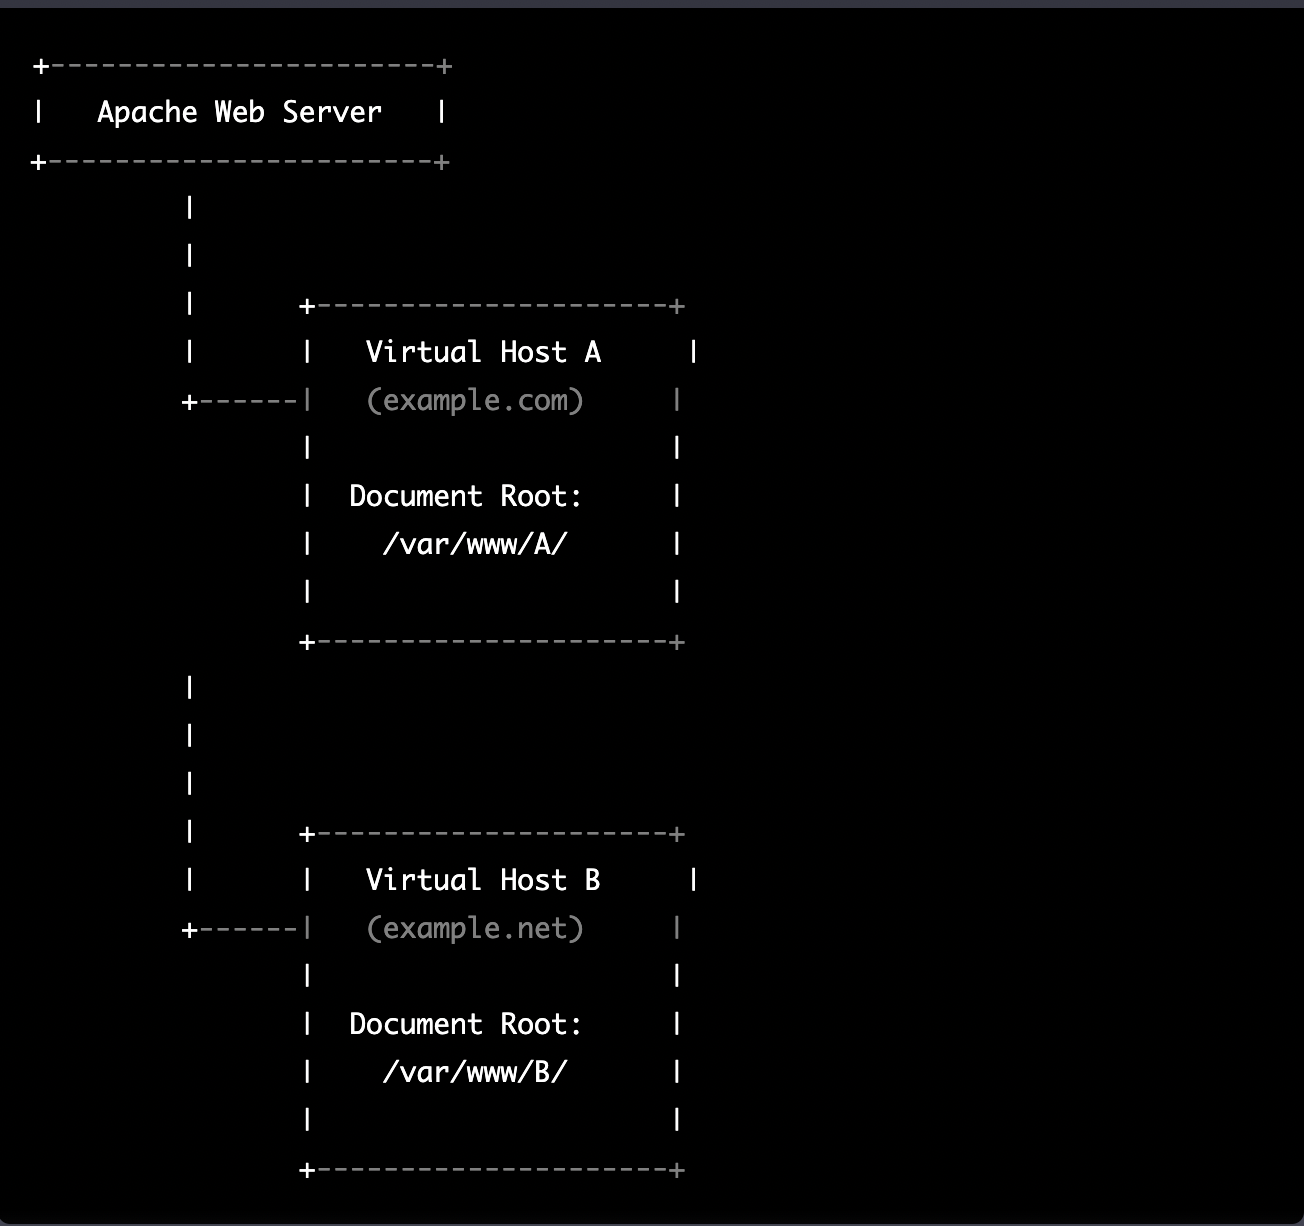
Virtual hosting is a technique used by Apache (and other web servers) to host multiple websites on a single server. With virtual hosting, a single physical server can host multiple virtual servers, each with its own domain name, IP address, and content.
Virtual hosting can be implemented in two ways:
- Name-based virtual hosting: In this approach, the server uses the domain name provided in the HTTP request to determine which virtual host should serve the request. For example, if a user requests a page from “example.com”, the server will use the virtual host configured for that domain and serve the appropriate content.
- IP-based virtual hosting: In this approach, each virtual host is assigned a separate IP address, and the server uses the IP address in the HTTP request to determine which virtual host should serve the request. For example, if a user requests a page from the IP address assigned to “example.com”, the server will use the virtual host configured for that IP address and serve the appropriate content.
Virtual hosting allows a server to serve multiple websites, each with its own domain name and content, using a single physical server. This makes hosting more efficient and cost-effective, especially for smaller websites that don’t require dedicated servers.
The following diagram represents the most common virtual hosting setup
+-----------------------+
|   Apache Web Server   |
+-----------------------+
         |
         |
         |      +---------------------+
         |      |   Virtual Host A     |
         +------|   (example.com)     |
                |                     |
                |  Document Root:     |
                |    /var/www/A/      |
                |                     |
                +---------------------+
         |
         |
         |
         |      +---------------------+
         |      |   Virtual Host B     |
         +------|   (example.net)     |
                |                     |
                |  Document Root:     |
                |    /var/www/B/      |
                |                     |
                +---------------------+
ASP.NET Core and Blazor applications have the capability to run their own in-process web server, Kestrel. Kestrel can be bound to a specific IP address or port number, enabling the applications to be hosted in virtual environments. To accomplish this, each application can be bound to a unique port number.
+-----------------------+
|   Apache Web Server   |
+-----------------------+
         |
         |
         |      +---------------------+
         |      |   Virtual Host A    |
         +------|   (example.com)     |
                |                     |
                |  Proxy to:          |
                |http://localhost:8016|
                |                     |
                +---------------------+
         |
         |
         |      +---------------------+
         |      |   Virtual Host B    |
         +------|   (example.net)     |
                |                     |
                |  Proxy to:          |
                |http://localhost:8017|
                |                     |
                +---------------------+
As shown in the diagram, physical folders for the document root are no longer utilized. Rather, a proxy is created to the Kestrel web server, which runs our ASP.NET Core applications
To bind our ASP.NET Core applications to a specific IP address or port number, there are multiple methods available. Detailed documentation on this subject can be found at the following link: https://learn.microsoft.com/en-us/aspnet/core/fundamentals/servers/kestrel/endpoints?view=aspnetcore-7.0#configureiconfiguration
There are various approaches that can be used based on the specific use case. For the sake of simplicity in this example, we will be utilizing the configuration method. This involves appending the configuration JSON for the Kestrel web server, as shown in the following example.
{
  "Kestrel": {
    "Endpoints": {
      "Http": {
        "Url": "http://localhost:8016"
      }
    }
  }
}
So here is how our configuration files should look like
Example.com (Host A)
{
  "Runtime": "Server",
  "RenderMode": "ServerPrerendered",
  "Database": {
    "DefaultDBType": "Oqtane.Database.PostgreSQL.PostgreSQLDatabase, Oqtane.Database.PostgreSQL"
  },
  "ConnectionStrings": {
    "DefaultConnection": "Server=127.0.0.1;Port=5432;Database=example.com;User ID=example.com;Password=1234567890;"
  },
  "Kestrel": {
  "Endpoints": {
    "Http": {
      "Url": "http://localhost:8016"
    }
   }
  },
  "Installation": {
    "DefaultAlias": "",
    "HostPassword": "",
    "HostEmail": "",
    "SiteTemplate": "",
    "DefaultTheme": "",
    "DefaultContainer": ""
  },
  "Localization": {
    "DefaultCulture": "en"
  },
  "AvailableDatabases": [
    {
      "Name": "LocalDB",
      "ControlType": "Oqtane.Installer.Controls.LocalDBConfig, Oqtane.Client",
      "DBType": "Oqtane.Database.SqlServer.SqlServerDatabase, Oqtane.Database.SqlServer"
    },
    {
      "Name": "SQL Server",
      "ControlType": "Oqtane.Installer.Controls.SqlServerConfig, Oqtane.Client",
      "DBType": "Oqtane.Database.SqlServer.SqlServerDatabase, Oqtane.Database.SqlServer"
    },
    {
      "Name": "SQLite",
      "ControlType": "Oqtane.Installer.Controls.SqliteConfig, Oqtane.Client",
      "DBType": "Oqtane.Database.Sqlite.SqliteDatabase, Oqtane.Database.Sqlite"
    },
    {
      "Name": "MySQL",
      "ControlType": "Oqtane.Installer.Controls.MySQLConfig, Oqtane.Client",
      "DBType": "Oqtane.Database.MySQL.MySQLDatabase, Oqtane.Database.MySQL"
    },
    {
      "Name": "PostgreSQL",
      "ControlType": "Oqtane.Installer.Controls.PostgreSQLConfig, Oqtane.Client",
      "DBType": "Oqtane.Database.PostgreSQL.PostgreSQLDatabase, Oqtane.Database.PostgreSQL"
    }
  ],
  "Logging": {
    "FileLogger": {
      "LogLevel": {
        "Default": "Error"
      }
    },
    "LogLevel": {
      "Default": "Information"
    }
  },
  "InstallationId": "f5789fa4-895c-45d7-bc26-03eb166e008a"
}
Example.net (Host B)
{
  "Runtime": "Server",
  "RenderMode": "ServerPrerendered",
  "Database": {
    "DefaultDBType": "Oqtane.Database.PostgreSQL.PostgreSQLDatabase, Oqtane.Database.PostgreSQL"
  },
  "ConnectionStrings": {
    "DefaultConnection": "Server=127.0.0.1;Port=5432;Database=example.net;User ID=example.net;Password=1234567890;"
  },
  {
    "Kestrel": {
    "Endpoints": {
      "Http": {
        "Url": "http://localhost:8017"
      }
     }
    }
  },
  "Installation": {
    "DefaultAlias": "",
    "HostPassword": "",
    "HostEmail": "",
    "SiteTemplate": "",
    "DefaultTheme": "",
    "DefaultContainer": ""
  },
  "Localization": {
    "DefaultCulture": "en"
  },
  "AvailableDatabases": [
    {
      "Name": "LocalDB",
      "ControlType": "Oqtane.Installer.Controls.LocalDBConfig, Oqtane.Client",
      "DBType": "Oqtane.Database.SqlServer.SqlServerDatabase, Oqtane.Database.SqlServer"
    },
    {
      "Name": "SQL Server",
      "ControlType": "Oqtane.Installer.Controls.SqlServerConfig, Oqtane.Client",
      "DBType": "Oqtane.Database.SqlServer.SqlServerDatabase, Oqtane.Database.SqlServer"
    },
    {
      "Name": "SQLite",
      "ControlType": "Oqtane.Installer.Controls.SqliteConfig, Oqtane.Client",
      "DBType": "Oqtane.Database.Sqlite.SqliteDatabase, Oqtane.Database.Sqlite"
    },
    {
      "Name": "MySQL",
      "ControlType": "Oqtane.Installer.Controls.MySQLConfig, Oqtane.Client",
      "DBType": "Oqtane.Database.MySQL.MySQLDatabase, Oqtane.Database.MySQL"
    },
    {
      "Name": "PostgreSQL",
      "ControlType": "Oqtane.Installer.Controls.PostgreSQLConfig, Oqtane.Client",
      "DBType": "Oqtane.Database.PostgreSQL.PostgreSQLDatabase, Oqtane.Database.PostgreSQL"
    }
  ],
  "Logging": {
    "FileLogger": {
      "LogLevel": {
        "Default": "Error"
      }
    },
    "LogLevel": {
      "Default": "Information"
    }
  },
  "InstallationId": "f5789fa4-895c-45d7-bc26-03eb166e008a"
}
As demonstrated, utilizing Oqtane in virtual hosting environments is a straightforward process. There is no need to recompile the source code, as configuring the application for virtual hosting can be easily accomplished through a single configuration section in the appsettings.json file.