
by Joche Ojeda | Jan 15, 2024 | ADO.NET, C#, Database, Sqlite
SQLite, known for its simplicity and lightweight architecture, offers unique opportunities for developers to integrate custom functions directly into their applications. Unlike most databases that require learning an SQL dialect for procedural programming, SQLite operates in-process with your application. This design choice allows developers to define functions using their application’s programming language, enhancing the database’s flexibility and functionality.
Scalar Functions
Scalar functions in SQLite are designed to return a single value for each row in a query. Developers can define new scalar functions or override built-in ones using the CreateFunction method. This method supports various data types for parameters and return types, ensuring versatility in function creation. Developers can specify the state argument to pass a consistent value across all function invocations, avoiding the need for closures. Additionally, marking a function as isDeterministic optimizes query compilation by SQLite if the function’s output is predictable based on its input.
Example: Adding a Scalar Function
connection.CreateFunction(
    "volume",
    (double radius, double height) => Math.PI * Math.Pow(radius, 2) * height);

var command = connection.CreateCommand();
command.CommandText = @"
    SELECT name,
           volume(radius, height) AS volume
    FROM cylinder
    ORDER BY volume DESC
";
Operators
SQLite implements several operators as scalar functions. Defining these functions in your application overrides the default behavior of these operators. For example, functions like glob, like, and regexp can be custom-defined to change the behavior of their corresponding operators in SQL queries.
Example: Defining the regexp Function
connection.CreateFunction(
    "regexp",
    (string pattern, string input) => Regex.IsMatch(input, pattern));

var command = connection.CreateCommand();
command.CommandText = @"
    SELECT count()
    FROM user
    WHERE bio REGEXP '\w\. {2,}\w'
";
var count = command.ExecuteScalar();
Aggregate Functions
Aggregate functions return a consolidated value from multiple rows. Using CreateAggregate, developers can define and override these functions. The seed argument sets the initial context state, and the func argument is executed for each row. The resultSelector parameter, if specified, calculates the final result from the context after processing all rows.
Example: Creating an Aggregate Function for Standard Deviation
connection.CreateAggregate(
    "stdev",
    (Count: 0, Sum: 0.0, SumOfSquares: 0.0),
    ((int Count, double Sum, double SumOfSquares) context, double value) => {
        context.Count++;
        context.Sum += value;
        context.SumOfSquares += value * value;
        return context;
    },
    context => {
        var variance = context.SumOfSquares - context.Sum * context.Sum / context.Count;
        return Math.Sqrt(variance / context.Count);
    });

var command = connection.CreateCommand
();
command.CommandText = @"
SELECT stdev(gpa)
FROM student
";
var stdDev = command.ExecuteScalar();
Errors
When a user-defined function throws an exception in SQLite, the message is returned to the database engine, which then raises an error. Developers can customize the SQLite error code by throwing a SqliteException with a specific SqliteErrorCode.
Debugging
SQLite directly invokes the implementation of user-defined functions, allowing developers to insert breakpoints and leverage the full .NET debugging experience. This integration facilitates debugging and enhances the development of robust, error-free custom functions.
This article illustrates the power and flexibility of SQLite’s approach to user-defined functions, demonstrating how developers can extend the functionality of SQL with the programming language of their application, thereby streamlining the development process and enhancing database interaction.
Github Repo

by Joche Ojeda | Jul 26, 2023 | Blazor, C#, Sqlite, WebAssembly
In the evolving panorama of contemporary web application development, a technology that has particularly caught attention is Microsoft’s Blazor WebAssembly. This powerful tool allows for a transformative approach to managing and interacting with client-side data, offering innovative capabilities that are shaping the future of web applications.
Understanding Blazor WebAssembly
Blazor WebAssembly is a client-side web framework from Microsoft. It allows developers to build interactive web applications using C# instead of JavaScript. As the name suggests, it uses WebAssembly, a binary instruction format for a stack-based virtual machine, providing developers with the ability to run client-side web applications directly in the browser using .NET.
The Power of SQLite
SQLite, on the other hand, is a software library that provides a relational database management system (RDBMS). It operates directly on disk files without the need for a separate server process, making it ideal for applications that need local storage. It’s compact, requires zero-configuration, and supports most of the SQL standard, making it an excellent choice for client-side data storage and manipulation.
Combining Blazor WebAssembly with SQLite
By combining these two technologies, you can unlock the full potential of client-side data handling. Here’s how:
Self-Contained and Cross-Platform Development
Both Blazor WebAssembly and SQLite are self-contained systems, requiring no external dependencies. They also both provide excellent cross-platform support. This makes your applications highly portable and reduces the complexity of the development environment.
Offline Availability
SQLite enables the storage of data directly in the client’s browser, allowing your Blazor applications to work offline. Changes made offline can be synced with the server database once the application goes back online, providing a seamless user experience.
Superior Performance
Blazor WebAssembly runs directly in the browser, offering near-native performance. SQLite, being a lightweight yet powerful database, reads and writes directly to ordinary disk files, providing high-speed data access. This combination ensures your application runs quickly and smoothly.
Full .NET Support and Shared Codebase
With Blazor, you can use .NET for both client and server-side code, enabling code sharing and eliminating the need to switch between languages. Coupled with SQLite, developers can use Entity Framework Core to interact with the database, maintaining a consistent, .NET-centric development experience.
Where does the magic happens?
The functionality of SQLite with WebAssembly may vary based on your target framework. If you’re utilizing .NET 6 and Microsoft.Data.SQLite 6, your code will reference SQLitePCLRaw.bundle_e_sqlite3 version 2.0.6. This bundle doesn’t include the native SQLite reference, as demonstrated in the following image
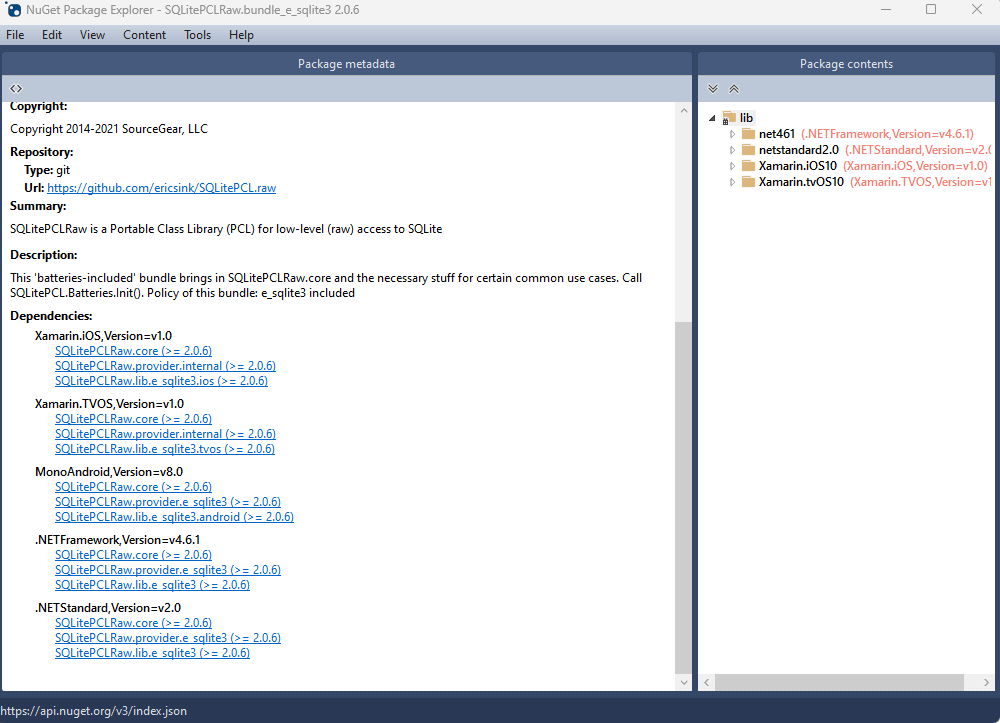
This implies that you’ll need to rely on .NET 6’s native dependencies to include your custom version of lib.e_sqlite3, compiled specifically for WebAssembly. For more detailed information about native dependencies, please refer to the provided links.
https://github.com/egarim/XpoNet6WasmSqlite
https://learn.microsoft.com/en-us/aspnet/core/blazor/webassembly-native-dependencies?view=aspnetcore-6.0
If you’re using .NET 7 or later, your reference from Microsoft.Data.SQLite will depend on SQLitePCLRaw.bundle_e_sqlite3 version 2.1.5. This bundle provides several targets for the native SQLite library (e_sqlite3), as can see in the accompanying image.

This indicates that we can utilize SQLite on any platform supported by .NET, provided that we supply the native reference for SQLite.
Conclusion
Blazor WebAssembly and SQLite together offer a compelling option for developers looking to leverage the power of client-side data. Their combination enables the development of web applications with high performance, offline availability, and a unified language platform.
This potent mix empowers developers to rethink what’s possible with web application development, pushing the boundaries of what we can achieve with client-side data storage and manipulation. In a world where user experience is paramount, the coupling of these technologies truly helps in unleashing the full potential of client-side data.
by Joche Ojeda | Jul 17, 2023 | Blazor, C#, Data Synchronization, EfCore, WebAssembly
Last week, I decided to create a playground for the SyncFramework to demonstrate how synchronization works. The sync framework itself is not designed in a client-server architecture, but as a set of APIs that you can use to synchronize data.
Synchronization scenarios usually involve a client-server architecture, but when I created the SyncFramework, I decided that network communication was something outside the scope and not directly related to data synchronization. So, instead of embedding the client-server concept in the SyncFramework, I decided to create a set of extensions to handle these scenarios. If you want to take a look at the network extensions, you can see them here.
Now, let’s return to the playground. The main requirement for me, besides showing how the synchronization process works, was not having to maintain an infrastructure for it. You know, a Sync Server and a few databases that I would have to constantly delete. So, I decided to use Blazor WebAssembly and SQLite databases running in the browser. If you want to know more about how SQLite databases can run in the browser, take a look at this article.
Now, there’s still a problem. How do I run a server on the browser? I know it’s somehow possible, but I did not have the time to do the research. So, I decided to create my own HttpClientHandler.
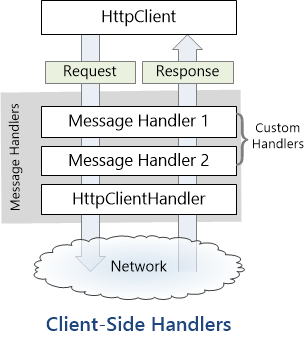
How the HttpClientHandler works
HttpClientHandler offers a number of attributes and methods for controlling HTTP requests and responses. It serves as the fundamental mechanism for HttpClient’s ability to send and receive HTTP requests and responses.
The HttpClientHandler manages aspects like the maximum number of redirects, redirection policies, handling cookies, and automated decompression of HTTP traffic. It can be set up and supplied to HttpClient to regulate the HTTP requests made by HttpClient.
HttpClientHandler might be helpful in testing situations when it’s necessary to imitate or mock HTTP requests and responses. The SendAsync method of HttpMessageHandler, from which HttpClientHandler also descended, can be overridden in a new class to deliver any response you require for your test.
here is a basic example
public class TestHandler : HttpMessageHandler
{
    protected override async Task<HttpResponseMessage> SendAsync(HttpRequestMessage request, CancellationToken cancellationToken)
    {
        // You can check the request details and return different responses based on that.
        // For simplicity, we're always returning the same response here.
        var responseMessage = new HttpResponseMessage(HttpStatusCode.OK)
        {
            Content = new StringContent("Test response.")
        };
        return await Task.FromResult(responseMessage);
    }
}
And here’s how you’d use this handler in a test:
[Test]
public async Task TestHttpClient()
{
    var handler = new TestHandler();
    var client = new HttpClient(handler);

    var response = await client.GetAsync("http://example.com");
    var responseContent = await response.Content.ReadAsStringAsync();

    Assert.AreEqual("Test response.", responseContent);
}
The TestHandler in this illustration consistently sends back an HTTP 200 response with the body “Test response.” In a real test, you might use SendAsync with more sophisticated logic to return several responses depending on the specifics of the request. By doing so, you may properly test your code’s handling of different answers without actually sending HTTP queries.
Going back to our main story
Now that we know we can catch the HTTP request and handle it locally, we can write an HttpClientHandler that takes the request from the client nodes and processes them locally. Now, we have all the pieces to make the playground work without a real server. You can take a look at the implementation of the custom handler for the playground here
Until next time, happy coding )))))

by Joche Ojeda | May 17, 2023 | AlchemyDotNet, C#
Alright, it’s time to start writing some code, but first, let’s decide how this project will be organized.
So far, the repository structure that I’ve found most appealing is the one I used for the SyncFramework (https://github.com/egarim/SyncFramework). Here is a representation with bullet points:
- Repo Folder: This is the parent folder that will contain all the code from our project. o Git Files: These are Ignore and attributes files.
- Clean.bat: This is a batch file that deletes all child BIN and OBJ folders to ensure our repository does not contain binary files (sometimes the ‘clean’ command from Visual Studio does not clear the outputs completely).
- CHANGES.MD: This is a Github markdown file that contains the history of changes in the code.
- README.MD: This is the landing page of the current repository where we can write some basic instructions and other important information about the project.
- src (folder): This is where the actual code resides.
Before I conclude this post, I want to discuss versioning. The main idea here is this: the project AlchemyDotNet.Core will start at version 1.0.0, and the version will change when there is a fix or an update to the core specification. We will only move to a new version like 2.0.0 when the specification introduces breaking changes. This means that we will be on version 1 for a very long time.
Link to the repo
https://github.com/egarim/Alchemy.Net
Previous posts
Alchemy Framework: 1 – Creating a framework for import data

by Joche Ojeda | Mar 29, 2023 | C#, Linux, netcore, Oqtane, Postgres, Ubuntu
A stack in software development refers to a collection of technologies, tools, and frameworks that are used together to build and run a complete application or solution. A typical stack consists of components that handle different aspects of the software development process, including frontend, backend, databases, and sometimes even the hosting environment.
A stack is often categorized into different layers based on the functionality they provide:
- Frontend: This layer is responsible for the user interface (UI) and user experience (UX) of an application. It consists of client-side technologies like HTML, CSS, and JavaScript, as well as libraries or frameworks such as React, Angular, or Vue.js.
- Backend: This layer handles the server-side logic, processing user requests, and managing interactions with databases and other services. Backend technologies can include programming languages like Python, Ruby, Java, or PHP, and frameworks like Django, Ruby on Rails, or Spring.
- Database: This layer is responsible for storing and managing the application’s data. Databases can be relational (e.g., MySQL, PostgreSQL, or Microsoft SQL Server) or NoSQL (e.g., MongoDB, Cassandra, or Redis), depending on the application’s data structure and requirements.
- Hosting Environment: This layer refers to the infrastructure where the application is deployed and run. It can include on-premises servers, cloud-based platforms like Amazon Web Services (AWS), Google Cloud Platform (GCP), or Microsoft Azure, or container orchestration platforms like Kubernetes or Docker Swarm.
Developers often refer to specific combinations of these technologies as named stacks. Some examples include:
- LAMP: Linux (operating system), Apache (web server), MySQL (database), and PHP (backend programming language).
- MEAN: MongoDB (database), Express.js (backend framework), Angular (frontend framework), and Node.js (runtime environment).
- MERN: MongoDB (database), Express.js (backend framework), React (frontend library), and Node.js (runtime environment).
Selecting a stack depends on factors such as project requirements, team expertise, performance, and scalability needs. By using a well-defined stack, developers can streamline the development process, improve collaboration, and ensure that all components work together efficiently.
The P.O.U.N.D. Stack is an innovative software development stack that combines Postgres, Oqtane, Ubuntu, and DotNet to create powerful, modern, and scalable applications. This stack is designed to leverage the strengths of each technology, providing developers with an integrated and efficient environment for building web applications.
- Postgres (P): As the database layer, Postgres offers robust performance, scalability, and support for advanced data types, such as GIS and JSON. Its open-source nature and active community make it a reliable choice for handling the storage and management of application data.
- Oqtane (O): Serving as the frontend framework, Oqtane is built on top of the Blazor technology in .NET, allowing for the creation of modern, responsive, and feature-rich user interfaces. With Oqtane, developers can create modular and extensible applications, while also benefiting from built-in features such as authentication, authorization, and multi-tenancy.
- Ubuntu (U): As the operating system and hosting environment, Ubuntu provides a stable, secure, and easy-to-use platform for deploying and running applications. It is widely supported and offers excellent compatibility with a variety of hardware and cloud platforms, making it an ideal choice for hosting P.O.U.N.D. Stack applications.
- DotNet (D): The backend layer is powered by the .NET framework, which offers a versatile and high-performance environment for server-side development. With support for multiple programming languages (such as C#, F#, and VB.NET), powerful libraries, and a large ecosystem, .NET allows developers to build scalable and efficient backend logic for their applications.
In summary, the P.O.U.N.D. Stack brings together the power of Postgres, Oqtane, Ubuntu, and DotNet to deliver a comprehensive and efficient development stack. By leveraging the unique capabilities of each technology, developers can build modern, scalable, and high-performance web applications that cater to diverse business needs.

by Joche Ojeda | Jan 2, 2023 | C#
Integration tests are a crucial part of any software development process, as they help ensure that different parts of a system are working together correctly. When writing integration tests, it is important to follow best practices in order to ensure that your tests are effective and maintainable. Here are a few good practices for integration testing using NUnit:
- Use test fixtures: NUnit provides a concept called “test fixtures,” which allow you to set up and tear down common resources that are needed by multiple test cases. This can help reduce duplication and make your tests more maintainable.
[TestFixture]
public class DatabaseTests
{
    private Database _database;

    [SetUp]
    public void SetUp()
    {
        _database = new Database();
    }

    [TearDown]
    public void TearDown()
    {
        _database.Dispose();
    }

    [Test]
    public void Test1()
    {
        // test code goes here
    }

    [Test]
    public void Test2()
    {
        // test code goes here
    }
}
- Use setup and teardown methods: In addition to test fixtures, NUnit also provides setup and teardown methods that can be used to perform common tasks before and after each test case. This can be helpful for setting up test data or cleaning up after a test.
[TestFixture]
public class DatabaseTests
{
    private Database _database;

    [SetUp]
    public void SetUp()
    {
        _database = new Database();
    }

    [TearDown]
    public void TearDown()
    {
        _database.Dispose();
    }

    [SetUp]
    public void TestSetup()
    {
        // setup code goes here
    }

    [TearDown]
    public void TestTeardown()
    {
        // teardown code goes here
    }

    [Test]
    public void Test1()
    {
        // test code goes here
    }

    [Test]
    public void Test2()
    {
        // test code goes here
    }
}
- Use test cases: NUnit allows you to specify multiple test cases for a single test method using the
TestCase attribute. This can help reduce duplication and make it easier to test different scenarios.
[TestFixture]
public class CalculatorTests
{
    [TestCase(1, 2, 3)]
    [TestCase(10, 20, 30)]
    [TestCase(-1, -2, -3)]
    public void TestAdd(int x, int y, int expected)
    {
        Calculator calculator = new Calculator();
        int result = calculator.Add(x, y);
        Assert.AreEqual(expected, result);
    }
}
- Use the
Assert class: NUnit provides a variety of assertions that can be used to verify the behavior of your code. It is important to use these assertions rather than manually checking for expected results, as they provide better error messages and make it easier to debug test failures.
[TestFixture]
public class CalculatorTests
{
    [Test]
    public void TestAdd()
    {
        Calculator calculator = new Calculator();
        int result = calculator.Add(1, 2);
        Assert.AreEqual(3, result);
    }

    [Test]
    public void TestSubtract()
    {
        Calculator calculator = new Calculator();
        int result = calculator.Subtract(10, 5);
        Assert.AreEqual(5, result);
    }
}
- Use test categories: NUnit allows you to categorize your tests using the
Category attribute. This can be helpful for organizing your tests and selectively running only certain categories of tests.
[TestFixture]
public class DatabaseTests
{
    [Test]
    [Category("Database")]
    public void Test1()
    {
        // test code goes here
    }

    [Test]
    [Category("Database")]
    public void Test2()
    {
        // test code goes here
    }

    [Test]
    [Category("API")]
    public void Test3()
    {
        // test code goes here
    }
}
By following these best practices, you can write integration tests that are effective, maintainable, and easy to understand. This will help you ensure that your code is working correctly and reduce the risk of regressions as you continue to develop and evolve your system.